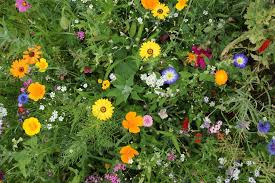
Embrace the Unexpected: The Joy of Chaos Gardening

Have you heard of chaos gardening? Or maybe wildflower gardening? Or freestyle gardening? No matter what you call it, this carefree gardening trend is all about letting nature take the lead—and it might be just the breath of fresh air your yard needs.

What Is Chaos Gardening?

Chaos gardening is the act of scattering seeds without a strict plan or layout. Think of it as gardening with a sense of adventure. Instead of planting in tidy rows or perfectly coordinated colors, you toss a variety of seeds into the soil and let nature do its thing.

You might be surprised by what grows—and that’s part of the fun.

Why Try Chaos Gardening?

  1. Low stress, high reward – No pressure to plan the perfect layout or stress over spacing.
  2. Pollinator-friendly – A mix of flowers and herbs can attract bees, butterflies, and other beneficial insects.
  3. Budget-friendly – Use leftover seed packets, saved seeds, or inexpensive seed mixes.
  4. Fun for all ages – A perfect way to involve kids or spark your own childlike wonder.
  5. A beautiful surprise – Each season becomes a mini mystery, with something new popping up.

A Few Tips for Successful Chaos

  • Loosen the soil before scattering your seeds for better germination.
  • Water regularly, especially at first, until your seedlings are established.
  • Use a mix of annuals and perennials for continuous color year after year.
  • Be patient—chaos gardening takes time, but the results are worth it.

Let Nature Be Your Artist

Not every plant will thrive. Not every bloom will be perfectly placed. But that’s okay. Chaos gardening teaches us to let go, experiment, and celebrate the wild beauty of imperfection.

https://www.realsimple.com/chaos-gardening-method-11710310

Eat more from Earth

In a world full of processed foods and artificial ingredients, returning to the basics—eating more from the earth—can be one of the best decisions for your health and the planet. Whether you’re growing your own food, shopping at a local farmers’ market, or simply making mindful choices at the grocery store, embracing whole, earth-grown foods can transform the way you nourish your body and live your life.

Why Eat More from the Earth?

The benefits of eating more plant-based, whole foods are endless. Here are just a few reasons to make the shift:

  • Better Health: Fruits, vegetables, nuts, seeds, and whole grains provide essential vitamins, minerals, and antioxidants. These foods support your immune system, reduce inflammation, and help prevent chronic diseases.
  • Sustainability: Eating locally and seasonally reduces the environmental impact of food transportation and supports sustainable farming practices.
  • Connection to Nature: When you eat fresh, whole foods, you develop a deeper appreciation for the earth and where your food comes from.

Simple Ways to Eat More from the Earth

1. Choose Whole Foods Over Processed

When possible, opt for foods that are as close to their natural state as possible. Think fresh vegetables, fruits, legumes, whole grains, and nuts rather than packaged, refined, and artificially flavored products.

💡 Tip: If a food comes in a box with a long list of ingredients you can’t pronounce, it’s probably not from the earth.

2. Grow Your Own Food

Even if you don’t have a large garden, growing herbs, tomatoes, or leafy greens in pots or a small backyard space can be a great way to connect with your food and ensure freshness.

💡 Tip: Start with easy-to-grow plants like basil, lettuce, or peppers—they thrive in small spaces!

3. Shop at Farmers’ Markets

Supporting local farmers means fresher produce, fewer pesticides, and a stronger local food system. Plus, seasonal foods are often more flavorful and nutritious.

💡 Tip: Bring reusable bags and ask farmers about their growing practices to make the best choices.

Eating more from the earth isn’t about following strict rules—it’s about making mindful choices that prioritize health, sustainability, and a deeper connection to nature. Whether you grow your own food, shop locally, or simply add more whole foods to your plate, every small step brings big benefits.

What’s one way you can eat more from the earth today? 🌍🍎🥦

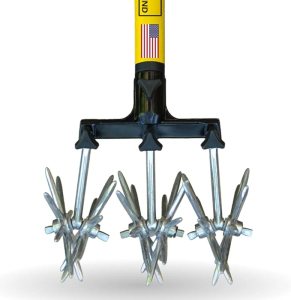
When Should You Use Cultivating in Your Yard?

Cultivating is an essential gardening practice that helps improve soil structure, manage weeds, and prepare your garden for planting. But when should you cultivate your yard for the best results? Here are key times to use this technique effectively.

1. Before Planting

Cultivating before planting helps loosen compacted soil, making it easier for roots to grow. It also improves drainage and aeration, ensuring that your plants get the nutrients and oxygen they need. If you’re adding compost or fertilizer, cultivating helps mix these amendments evenly into the soil.

2. After Heavy Rainfall

Rain can sometimes cause soil compaction, making it harder for water and nutrients to reach plant roots. Light cultivation after the soil has dried a bit can break up the hardened surface and restore proper aeration.

3. To Control Weeds

Weeds compete with your plants for nutrients, water, and sunlight. Shallow cultivation disrupts young weed growth before they have a chance to take over your garden. Be careful not to cultivate too deeply, as this can bring dormant weed seeds to the surface and encourage more growth.

4. At the End of the Growing Season

After harvesting, cultivating your soil can help break down old plant material, mix in organic matter, and prepare your garden beds for the next planting season. This is a great time to add compost or mulch for winter protection.

When to Avoid Cultivating

  • When Soil is Too Wet: Cultivating wet soil can lead to compaction and clumping, making it harder for plants to grow.
  • During Dry, Windy Conditions: Dry cultivation can lead to soil erosion and loss of valuable topsoil.
  • Around Established Plants: Deep cultivation near mature plants can disturb their root systems and cause stress.

By timing your cultivating efforts correctly, you can create a healthier, more productive yard while minimizing potential damage to your plants and soil. Happy gardening!

https://amzn.to/441lZ12

Finding Balance: Lessons from the Garden

In the garden, plants thrive when they receive the right balance of water, sunlight, and nutrients. Too much of one, and they may wilt; too little, and they won’t grow. It’s a delicate dance, a harmonious relationship between nature’s elements. In many ways, our lives mirror this cycle. Just as plants require balance to flourish, we need balance in our own lives for growth and well-being. Work, rest, and relationships must be nurtured in the right proportions for us to thrive.

The Importance of Balance in Life

Life is often a juggling act—work demands our attention, relationships pull us in different directions, and our own need for rest is sometimes overlooked. Much like a garden that requires a thoughtful combination of water, sunlight, and soil, we need to pay attention to different areas of our lives to maintain our overall health and happiness.

  1. Work: The Sunlight of Productivity

    In the garden, sunlight is crucial for growth. Without it, plants cannot thrive. Similarly, work and productivity are essential for our own growth—whether it’s personal development, career success, or pursuing our passions. However, just as too much sunlight can scorch a plant, overworking ourselves can lead to burnout. We need enough light to help us grow but also shade to prevent damage.

    Striking a balance between productivity and rest allows us to give our best at work without compromising our health or personal life. Set boundaries, prioritize tasks, and make space for rest.

  2. Rest: The Water for Recovery

    Plants rely on water to stay hydrated and healthy. Without it, they can’t absorb the nutrients they need, and they begin to wither. Likewise, rest is the water we need to recharge and stay balanced. When we don’t prioritize rest, we can’t function at our highest level, and our overall well-being suffers.

    Rest doesn’t just mean sleep—it’s about taking time to unplug, disconnect, and recharge. Whether it’s enjoying a hobby, meditating, or simply doing nothing, taking time to relax helps restore our mental, emotional, and physical health.

  3. Relationships: The Soil That Nurtures Us

    Just as soil provides a foundation for a plant’s roots, relationships ground and nourish us. We need a solid support system—family, friends, colleagues, or community—who help us weather life’s challenges and celebrate our successes. Without healthy, meaningful relationships, we can feel disconnected, like a plant deprived of nutrients.

    Cultivating strong relationships requires time, effort, and understanding. Just as plants need regular care, so do our connections with others. By giving and receiving love, support, and encouragement, we ensure that our personal garden of relationships flourishes.

How to Find Balance in Your Life

Just as in the garden, achieving balance in life is an ongoing process. Here are a few tips to help you find your equilibrium:

  • Prioritize Your Health: Just like plants need water and sunlight to grow, your body needs rest, nutrition, and exercise. Take care of yourself so you can take care of everything else.
  • Set Boundaries: Learn to say no when you need to. Just as too much sunlight can be harmful to plants, overcommitting yourself can lead to stress and burnout.
  • Focus on What Matters: In the garden, we must tend to the most important plants. Similarly, focus on the relationships and tasks that matter most to your happiness and fulfillment.
  • Be Flexible: Sometimes the weather changes unexpectedly, and we must adjust. Life doesn’t always go as planned, so being adaptable is key to finding balance.
  • Make Time for Yourself: Ensure that you have regular breaks and time away from work or social obligations to rest and recharge.

In the same way that a garden thrives when it receives the right amount of water, sunlight, and care, our lives require balance to grow and flourish. By tending to the different areas of our lives—work, rest, and relationships—we can nurture ourselves, avoid burnout, and achieve a sense of well-being. Just as every plant needs a unique balance of elements, each of us must discover our own ideal mix to thrive. Remember, life isn’t about perfection, it’s about finding harmony in the rhythms of your own journey.

What are some ways you maintain balance in your life?


Stop Buying Blueberries – Grow Your Own for a Never-Ending Supply

Blueberries are more than just a delicious snack. These little berries are packed with antioxidants, vitamins, and fiber that support heart health, brain function, and immune health. However, with the rising costs of fresh produce, buying blueberries frequently can quickly become expensive. Why not skip the store-bought ones and grow your own supply? Not only will you save money, but you’ll also enjoy fresh, chemical-free berries right from your garden.

Why Grow Your Own Blueberries?

Before diving into the specifics of how to grow blueberries, it’s important to know why it’s such a smart move.

  1. Cost Savings: Fresh blueberries can be pricey, especially when buying them regularly. Growing your own blueberries means you can enjoy a constant supply without breaking the bank.
  2. Health Benefits: Homegrown blueberries are free from pesticides and chemicals, giving you a healthier option compared to store-bought varieties.
  3. Beauty in the Garden: Blueberries aren’t just functional—they also enhance the beauty of your garden. In the spring, their white blossoms create a lovely display, while in the fall, their vibrant red foliage adds rich color.

Step 1: Choosing the Right Blueberry Variety

One of the keys to having a continuous supply of blueberries is choosing the right varieties that ripen at different times. By planting a mix of early, mid, and late-season varieties, you can enjoy fresh berries from early summer to late fall.

Early-Season Varieties:

  • Duke: Known for its high yield and firm, flavorful berries.
  • Patriot: Hardy and produces large berries early in the season.

Mid-Season Varieties:

  • Bluecrop: One of the most popular varieties, known for its large, juicy berries.
  • Legacy: Produces sweet berries with a long shelf life, extending the harvest into the late season.

Late-Season Varieties:

  • Elliott: A high-yielding variety that produces berries late into the season.
  • Aurora: Extends the season even further with tart, firm berries that ripen last.

By planting a combination of these varieties, you’ll be able to enjoy blueberries from early summer until fall.

Step 2: Creating the Ideal Growing Conditions

Blueberries are fairly easy to grow, but they do require specific conditions to thrive. Follow these steps to create an environment that promotes healthy growth and a bountiful harvest:

Soil Preparation:

Blueberries require acidic soil with a pH between 4.5 to 5.5. Test your soil with a pH test kit or send it to a local extension service. If necessary, lower the pH by mixing in peat moss, pine needles, or sulfur to increase soil acidity.

Sunlight:

Blueberries need at least 6-8 hours of direct sunlight each day. More sunlight means sweeter, juicier berries, so make sure to plant them in a sunny spot.

Watering:

Blueberries like consistently moist soil. Water deeply once or twice a week, making sure the soil stays evenly moist but not waterlogged. Mulch around the base with pine bark or wood chips to help retain moisture.

Spacing:

Blueberry bushes should be planted 3-4 feet apart to allow for proper growth and air circulation, which helps prevent disease.

Step 3: Propagating Blueberries for a Never-Ending Supply

Once you’ve got your blueberry plants growing, you can propagate new ones to expand your supply. Blueberries can be propagated through cuttings, which is a great way to keep adding plants each year.

How to Propagate Blueberries:

  1. Take Cuttings: In early spring, cut 6-8 inch sections from a healthy blueberry plant. Make sure each cutting has at least 3-4 leaf nodes.
  2. Prepare Cuttings for Rooting: Remove the leaves from the bottom half of each cutting. Optionally, dip the cut end in rooting hormone to promote faster root growth.
  3. Plant the Cuttings: Insert each cutting into a pot with a mix of equal parts peat moss and perlite for good drainage. Water and place the pot in indirect sunlight, keeping the soil moist.
  4. Transplant to Your Garden: After 8-12 weeks, once roots have developed, transplant your new blueberry plants into your garden or containers.

Step 4: Pruning for Continuous Yield

Proper pruning is essential for a healthy blueberry bush and an abundant harvest. Regular pruning encourages new growth and maximizes berry production.

When to Prune:

Prune your blueberry plants in late winter or early spring before new growth begins.

How to Prune:

  • Remove any dead, damaged, or diseased branches.
  • Trim older branches that have stopped producing fruit to encourage new growth.
  • Cut back small, weak branches to improve air circulation and allow more light to reach the plant.

Pruning not only keeps the bushes healthy but also helps ensure a high yield of berries.

Step 5: Protecting Your Blueberries from Birds

Birds love blueberries as much as you do, so you’ll need to protect your crop from these feathered thieves. Here are a few ways to keep them at bay:

  1. Netting: Use bird netting over your bushes during the ripening period to prevent birds from getting to your berries.
  2. Scare Tactics: Hang shiny objects like aluminum foil strips or place wind chimes nearby. The reflections and noise can help scare the birds off.
  3. Bird Feeders: Set up bird feeders away from your blueberries to give birds an alternative food source.

Step 6: Growing Blueberries in Containers for Limited Space

Even if you don’t have a large garden, you can still grow blueberries in containers. They’re perfect for patios, balconies, or smaller spaces.

How to Grow Blueberries in Containers:

  • Choose the Right Pot: Use a pot that’s at least 18-24 inches wide and deep, with good drainage.
  • Soil Mix: Use a mix designed for acid-loving plants, or create your own by combining peat moss, pine bark, and perlite.
  • Water and Fertilize Regularly: Container-grown blueberries require more frequent watering and regular feeding. Use a balanced, slow-release fertilizer made for acid-loving plants in early spring.

Containers also make it easier to move the plants indoors or to a sheltered location during harsh winter months.

Harvesting and Enjoying Your Blueberries

Blueberries are ready for harvest when they are fully blue, plump, and easily pull away from the stem. To ensure the best taste, wait for them to reach peak ripeness. The longer they stay on the bush after turning blue, the sweeter they become.

Store fresh blueberries in the fridge for up to two weeks, or freeze them for long-term storage. Enjoy them fresh, in smoothies, on cereal, or baked into delicious treats.

Growing your own blueberries is a rewarding, cost-effective way to enjoy these nutritious berries year-round. By choosing the right varieties, creating optimal growing conditions, and properly maintaining your plants, you’ll have a steady supply of fresh blueberries to enjoy throughout the season. Plus, with propagation and proper care, you can ensure your blueberry harvest continues to thrive year after year. Say goodbye to expensive store-bought berries and start growing your own today!

Stop Buying Blueberries- Use This Clever Method To Get A Never Ending Supply

What Farmers Can Do About the Current Egg Shortage: Strategies for Resilience

In recent months, grocery store shelves across the U.S. have been left with empty or nearly empty egg sections. From pasture-raised to organic, consumers are struggling to find their preferred eggs, and the problem isn’t showing signs of disappearing anytime soon. While many factors contribute to the shortage—including supply chain issues, avian flu, and rising feed costs—farmers can take proactive steps to weather the storm and keep their businesses running smoothly.

If you’re a farmer in the egg industry, here are a few strategies to consider in response to the current crisis:

1. Diversify Your Egg Production

One of the first things farmers can do is diversify the types of eggs they produce to appeal to a wider market.

  • Offer a variety of egg types: If you’re focusing on one specific type of egg, like organic or pasture-raised, now may be the time to explore other options like free-range or omega-3 enriched eggs.
  • Consider niche markets: Think about special offerings like brown eggs, colored eggs, or eggs from heritage breeds. These unique products can help differentiate your farm and attract customers.

2. Build Strong Direct-to-Consumer Sales Channels

While supermarket shelves may be empty, there’s a growing opportunity for farmers to directly connect with consumers.

  • Farmers’ markets: If you aren’t already, consider setting up a booth at local farmers’ markets where consumers can buy directly from you.
  • Subscription services: Offer egg delivery subscriptions to your local community. People love the convenience, and it ensures that they always have fresh eggs while you build a loyal customer base.
  • Online presence: Create or enhance your online presence through social media and e-commerce platforms where people can place orders directly from your farm.

3. Focus on Animal Health and Sustainability

The egg shortage has brought attention to the importance of raising healthy, well-cared-for chickens. Sustainable and humane farming practices are in high demand.

  • Pasture management: Invest in sustainable and regenerative farming practices to maintain the health of your hens and their environment. Healthy hens will produce higher-quality eggs, which will make your product stand out.
  • Feed and nutrition: Proper nutrition is essential for high egg production. Evaluate your feed and consider sourcing local grains to mitigate rising feed costs. Consider growing your own feed or forming co-ops with other local farmers to reduce costs.
  • Health protocols: Ensure biosecurity measures are in place to prevent diseases like avian flu from impacting your flock. A healthy flock means less disruption to egg production.

4. Collaborate with Other Farmers and Industry Leaders

Farmers don’t have to face the challenges of the egg shortage alone. By working together, we can build stronger, more resilient communities.

  • Join co-ops: Pooling resources with other local farmers can help with purchasing feed, equipment, and even marketing efforts to reach more customers.
  • Advocate for the industry: Work with industry leaders to advocate for policies that support egg farmers, such as subsidies or grants that help alleviate financial burdens caused by rising costs.
  • Collaborate on research: Partner with agricultural organizations to stay on top of the latest research and best practices for egg production during challenging times.

5. Improve Marketing and Transparency

In times of shortage, consumers are more likely to support local farmers they trust. To gain consumer confidence, be transparent about your practices and share your story.

  • Transparency: Be open about how your eggs are produced, your farming practices, and what makes your eggs different. This will build trust with consumers.
  • Storytelling: People want to know where their food comes from. Share your journey and the care you take in raising your hens. Show the behind-the-scenes of your farm through social media or farm tours.
  • Packaging and labeling: Make sure your eggs are clearly labeled with important information such as “pasture-raised,” “organic,” or “local.” This will help consumers make informed decisions.

6. Educate Consumers About the Value of Local Eggs

The egg shortage can be a great opportunity to educate your community on the value of local, sustainably raised eggs.

  • Promote the benefits: Highlight the nutritional advantages of locally produced eggs, like higher omega-3 content and better flavor.
  • Offer farm tours: Provide educational tours where consumers can see your farm in action, learn about how your eggs are produced, and understand the care you take with your hens.
  • Work with schools and local businesses: Partner with local schools or restaurants to introduce your eggs to a larger audience.

While the egg shortage has certainly created challenges, it also presents opportunities for farmers to become more resilient, creative, and connected with their local communities. By diversifying egg production, building strong relationships with consumers, and embracing sustainable farming practices, farmers can thrive in these challenging times.

The egg shortage may not be over soon, but your ability to adapt and innovate can help your farm stand strong. Farmers are essential to the food supply chain, and with determination and resilience, we can continue to meet the needs of consumers while building a more sustainable future for egg production.

How to Make Perfect Brownies Using Muffin Tins: Crispy Edges, Chewy Centers

If you love brownies (who doesn’t?), but you’re tired of waiting for that large baking pan to cool before slicing, here’s a fun and easy solution: muffin tins! Yes, you can make individual brownie portions in muffin tins, and the results? Well, they’re nothing short of perfect.

Why Muffin Tins?

Muffin tins give you individual brownies that are perfectly portioned, and they bake faster than a full pan. But the best part is the texture. The batter’s exposure to the muffin tin’s edges creates that sought-after contrast between crispy, crunchy edges and a chewy, fudgy center. It’s a win-win!

What You’ll Need:

– Your favorite brownie recipe (or a box mix if you’re in a hurry)
– Muffin tin (standard size)
– Non-stick spray or cupcake liners
– An oven preheated to 350°F

The Magic Numbers: 350°F for 20 Minutes

Here’s where the magic happens. Preheat your oven to 350°F, then scoop your brownie batter into the muffin tins, filling each cup about 2/3 full. The key to getting that perfect crispy edge with a chewy center is baking for about **20 minutes**. This will give you the right balance of texture. You’ll know they’re done when a toothpick inserted into the center comes out with just a few moist crumbs.

The Best of Both Worlds: Crispy Edges, Chewy Centers

One of the main reasons muffin tin brownies are so popular is because they offer two types of brownie textures in every bite. The edges crisp up thanks to their exposure to the hot muffin tin, while the centers stay perfectly soft and chewy. It’s like getting the best of both worlds—what could be better?

Tips for Extra Fudgy Brownies:

1. Use a high-quality cocoa powder or melt some chocolate into your batter for a richer flavor.
2. Don’t overmix the batter, as that can make your brownies cakier.
3. Let them cool in the tin for a few minutes before transferring them to a cooling rack—this helps them hold their shape.

The beauty of this method is that you don’t need to be a professional baker to get a perfect batch of brownies. Whether you’re craving a quick treat for yourself or impressing guests with a fun, individual serving, muffin tins make brownie baking a breeze. Crispy edges, chewy centers, and all the chocolatey goodness in between. What’s not to love?

Happy baking!

https://amzn.to/3CixlSK

https://amzn.to/3YWNkif

Fall Flavors: Cooking with Pumpkin—Muffins, Cookies, Lattes & More!

It’s that time of year again—leaves are changing, there’s a crisp chill in the air, and pumpkins are *everywhere*. Whether you’re a full-on pumpkin fanatic or just dabbling in the orange-hued world of fall flavors, there’s something cozy and comforting about cooking with pumpkin. So let’s talk pumpkin treats, shall we?

Pumpkin Muffins with Chocolate Chips: The MVP of Fall 🍫
Ah, pumpkin muffins. Soft, warm, and the perfect snack for a chilly day. I’m personally a big fan of adding chocolate chips to the mix. There’s just something magical about the slightly bitter chocolate cutting through the sweet, spiced pumpkin. It’s the best of both worlds! Imagine a chilly Saturday morning with a hot coffee and a fresh pumpkin muffin—it’s practically fall in a bite.

And if you’re in the mood for something richer, top those muffins with a dollop of cream cheese frosting. It’s like a tiny pumpkin cheesecake in every bite. Just a heads-up: these don’t last long on the counter. One muffin quickly turns into two, and before you know it, you’re contemplating baking another batch.

Pumpkin Cookies: Soft, Chewy & Just Sweet Enough 🍪
For those who want pumpkin spice without the heaviness of a pie, pumpkin cookies are the answer. I like to add a hint of cinnamon and nutmeg, which pairs perfectly with a cup of tea or coffee. These cookies are soft, almost cake-like, with a little chew that makes them irresistible. If you’re feeling adventurous, toss in some chopped nuts or a sprinkle of sea salt for a little twist. These are perfect for sharing at fall gatherings—or, you know, hoarding all to yourself on the couch. No judgment!

Pumpkin Pie: The Classic Everyone Loves 🥧
Of course, we can’t forget the OG—pumpkin pie. This classic is a must at any Thanksgiving table and arguably the dessert of the season. Some swear by extra cinnamon; others add a pinch of cloves or ginger to spice things up. Whatever your style, pumpkin pie brings everyone together, whether you’re a whipped cream purist or go for that sprinkle of powdered sugar.

Pumpkin Spice Latte: The Controversial Hero ☕️
Now, here’s where it gets a little controversial: the pumpkin spice latte. Some folks wait all year for it; others can’t stand the thought. But whether you love it or hate it, the pumpkin spice latte is a fall icon. Personally, I enjoy one every now and then—it’s sweet, spicy, and tastes like autumn itself in a cup. And if PSLs aren’t your thing, pumpkin spice tea is a lighter option that still brings those fall vibes.

Or…Maybe You’re Just Not That Into Pumpkin? 😳
Not everyone is a fan of pumpkin, and that’s totally okay! Maybe apple cinnamon or caramel-flavored treats are more your jam. The beauty of fall is that it brings all kinds of cozy flavors to the table. And if pumpkin’s not for you, there are plenty of other ways to get into the seasonal spirit!

So, What’s Your Pumpkin Go-To?
Are you a pumpkin muffin lover, pie purist, or cookie fanatic? Or maybe you’re ready to try something new this fall? Whatever your preference, fall is the time to dive in and enjoy the flavors of the season.

So grab that can of pumpkin, preheat your oven, and let’s get baking! 🍂🎃

Holiday Cooking: How a Digital Spatula Thermometer Can Save Your Sweet Treats and Holiday Feasts

As the holidays roll around and the kitchen starts heating up, we all know what’s coming—endless rounds of cookies, candy-making marathons, and big family dinners. It’s the time of year when the oven is always on, and you suddenly become a mix of Julia Child and a mad scientist. There’s nothing quite like the chaos of the holiday kitchen, but having the right tools on hand makes it a little more fun—and a lot less stressful.

Enter: the Digital LCD Candy Spatula Thermometer. Sounds fancy, right? Well, it kind of is. If you’ve ever tried to make candy or check the temperature of a roast without a trusty thermometer, you know that the margin for error is about as thin as a filo dough sheet. This little gadget is not just any thermometer, though—it’s an instant-read meat and candy thermometer, stirrer, and spatula all in one. BPA-free and made of food-grade silicone, it’s basically the Swiss Army knife of kitchen tools.

The Struggle is Real

I’ll admit it—candy-making used to intimidate me. The first time I tried making homemade caramel, I ended up with a pot full of what I can only describe as caramel-flavored concrete. That’s when I realized, maybe I need some help in the precision department. You can’t just wing it when it comes to candy temperatures, and the “soft ball stage” doesn’t mean it’ll feel like a soft ball; it’s about chemistry, folks!

That’s where the Digital Candy Thermometer has saved my holiday sanity. You can stir while checking the temperature, which means no more burnt hands from trying to multitask with a spoon and an old-school mercury thermometer. Plus, there’s something satisfying about watching those digital numbers climb as you get closer to the perfect temperature for fudge, caramel, or divinity (anyone else’s grandma still make divinity?).

The Roast Beast Test

But wait, it’s not just for sweets! This spatula thermometer also works for meats, which is a game-changer for holiday roasts. Forget cutting into the turkey to “see if it’s done” and watching all the juices run out. Just poke this thermometer in and get an instant read on the temperature without missing a beat.

The holidays are stressful enough without worrying about undercooked (or overcooked) main dishes. And let’s be real—there’s no faster way to derail a holiday feast than to serve a dry turkey. Trust me, nobody will remember the perfect mashed potatoes if the bird’s a bust.

Why You’ll Love It

If you’re like me and like to keep things simple yet effective in the kitchen, this gadget will fit right in with your holiday routine. It’s one of those small investments that make a big difference. You’ll save time, stress, and a whole lot of guessing games when it comes to getting your recipes just right.

I like to think of it as my little sous chef—quiet, dependable, and always ready to lend a (silicone) hand. And the best part? No more failed fudge or overdone turkey. It’s foolproof, which is exactly what I need when I’m juggling cookie trays and holiday guests who show up early.

The Holidays are Coming—Be Ready!

Because who has time for kitchen disasters when there are gifts to wrap and holiday movies to binge? Happy cooking—and may your thermometer always read “just right!”

https://amzn.to/3YnX2tE

Thumbprint Cookies Delight

There’s something magical about Thumbprint Cookies – their buttery texture, delicate crumb, and, of course, the tempting center filled with your favorite jams or chocolate ganache.

The Butteriness of Thumbprint Cookies:
The foundation of a perfect Thumbprint Cookie lies in its buttery goodness. The dough, with its melt-in-your-mouth texture, serves as the ideal vessel for the flavorful surprises that await in the center. Simple yet elegant, these cookies set the stage for a delightful taste experience.

Crafting the Thumbprint:
Creating the perfect well for your chosen filling is an art in itself. Use your thumb, the back of a spoon, or any small object to gently press into the center of each cookie, forming a well that will cradle the sweet, fruity, or chocolatey goodness that follows.

The Customization Element:
What sets Thumbprint Cookies apart is the ability to customize each one to suit your taste buds. Whether you prefer classic strawberry jam, tangy raspberry preserves, or rich chocolate ganache, the possibilities are endless. Experiment with different fillings to create a variety that caters to everyone’s preferences.

Sharing the Joy:
Thumbprint Cookies aren’t just a treat; they’re a gesture of love and sharing. Consider baking a batch for friends, family, or holiday gatherings. Their customizable nature makes them suitable for any occasion, and the joy they bring is as heartwarming as their flavor.

Thumbprint Cookies stand out as a canvas for culinary creativity. With their buttery base, customizable fillings, and visually appealing presentation, they’re a delightful treat that satisfies both the palate and the eyes! 🍪✨ #ThumbprintCookies #BakingMagic

Thumbprint Cookies