Spritz Cookies: A Timeless Holiday Tradition

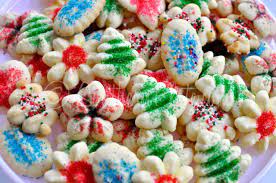
The holiday season is a time of joy, laughter, and of course, delicious treats. Among the myriad of festive confections, one particular delight stands out – the spritz cookie. With its delicate buttery flavor and distinctive shapes, spritz cookies have been gracing holiday tables for generations.

The History of Spritz Cookies:
The origins of spritz cookies can be traced back to Germany, where they are known as “Spritzgebäck.” The word “spritz” comes from the German verb “spritzen,” which means “to squirt” or “to spray.” The name aptly describes the technique of using a cookie press to create intricate shapes by extruding the dough onto the baking sheet. This German culinary gem gradually made its way into Scandinavian and American kitchens, becoming a cherished part of holiday celebrations.

Ingredients and Preparation:
The magic of spritz cookies lies in their simple yet high-quality ingredients. Flour, sugar, butter, and vanilla extract form the base of the dough, creating a rich and buttery flavor that melts in your mouth. Almond extract is often added to enhance the taste, providing a subtle nuttiness that elevates the cookie’s profile.

The dough is mixed to a smooth consistency, and the key to achieving the perfect spritz cookie lies in its texture. It should be pliable enough to pass through the cookie press easily, yet firm enough to hold its intricate shape during baking.

The Cookie Press: A Spritz Cookie Essential:
No discussion about spritz cookies is complete without mentioning the indispensable tool – the cookie press. This handheld device allows bakers to create an array of shapes, from classic swirls to festive holiday symbols. The press enables precise control over the dough, ensuring that each cookie is a work of art.

Baking and Decorating:
Once the dough is prepared and loaded into the cookie press, the fun part begins – shaping the cookies. The pressed dough is carefully arranged on a baking sheet, and after a short time in the oven, the kitchen is filled with the irresistible aroma of butter and vanilla. After baking, the cookies can be left as is or adorned with a sprinkle of colored sugar, chopped nuts, or a drizzle of chocolate.

Sharing the Tradition:
Spritz cookies are not just a delightful treat; they are also a symbol of togetherness and tradition. Baking and decorating spritz cookies with family and friends create lasting memories that are as sweet as the cookies themselves. Whether passed down through generations or started as a new family tradition, the act of making spritz cookies is a joyful celebration of the holiday spirit.

As the holiday season approaches, consider adding the time-honored tradition of baking spritz cookies to your festivities. With their rich history, delightful flavors, and endless possibilities for creativity, spritz cookies are sure to bring warmth and cheer to your home. Embrace the joy of baking and sharing these classic treats, and create your own delicious memories to cherish for years to come.

https://preppykitchen.com/spritz-cookies/

https://amzn.to/4ae3vO8


How to Make Perfect Brownies Using Muffin Tins: Crispy Edges, Chewy Centers

If you love brownies (who doesn’t?), but you’re tired of waiting for that large baking pan to cool before slicing, here’s a fun and easy solution: muffin tins! Yes, you can make individual brownie portions in muffin tins, and the results? Well, they’re nothing short of perfect.

Why Muffin Tins?

Muffin tins give you individual brownies that are perfectly portioned, and they bake faster than a full pan. But the best part is the texture. The batter’s exposure to the muffin tin’s edges creates that sought-after contrast between crispy, crunchy edges and a chewy, fudgy center. It’s a win-win!

What You’ll Need:

– Your favorite brownie recipe (or a box mix if you’re in a hurry)
– Muffin tin (standard size)
– Non-stick spray or cupcake liners
– An oven preheated to 350°F

The Magic Numbers: 350°F for 20 Minutes

Here’s where the magic happens. Preheat your oven to 350°F, then scoop your brownie batter into the muffin tins, filling each cup about 2/3 full. The key to getting that perfect crispy edge with a chewy center is baking for about **20 minutes**. This will give you the right balance of texture. You’ll know they’re done when a toothpick inserted into the center comes out with just a few moist crumbs.

The Best of Both Worlds: Crispy Edges, Chewy Centers

One of the main reasons muffin tin brownies are so popular is because they offer two types of brownie textures in every bite. The edges crisp up thanks to their exposure to the hot muffin tin, while the centers stay perfectly soft and chewy. It’s like getting the best of both worlds—what could be better?

Tips for Extra Fudgy Brownies:

1. Use a high-quality cocoa powder or melt some chocolate into your batter for a richer flavor.
2. Don’t overmix the batter, as that can make your brownies cakier.
3. Let them cool in the tin for a few minutes before transferring them to a cooling rack—this helps them hold their shape.

The beauty of this method is that you don’t need to be a professional baker to get a perfect batch of brownies. Whether you’re craving a quick treat for yourself or impressing guests with a fun, individual serving, muffin tins make brownie baking a breeze. Crispy edges, chewy centers, and all the chocolatey goodness in between. What’s not to love?

Happy baking!

https://amzn.to/3LGnkmT

https://amzn.to/3WV2zX2

Making Sourdough Bread

I made the best sourdough bread yesterday and thought you might like more information on baking bread. Maybe you can learn to bake a loaf too and share it with a neighbor, family, or friends- it also makes the best toast for breakfast…yum!

I have been using, Artisan Sourdough Made Simple: A Beginner’s Guide to Delicious Handcrafted Bread with Minimal Kneading by Emilie Raffa to help in my bread-making journey. I have a Le Creuset Dutch Oven to cook the bread.

Le Creuset Enameled Cast Iron Signature Round Dutch Oven

https://amzn.to/46n3YeC


Artisan Sourdough Made Simple A Beginner’s Guide to Delicious Handcrafted Bread with Minimal Kneading

https://amzn.to/4gOTkRy

Capture Nature in Clay: The Art of Botanical Bas-Relief

There’s something magical about freezing a moment in nature—capturing the delicate curve of a petal, the intricate veins of a leaf, or the subtle texture of a stem. Casting Flowers offers a creative way to do just that, introducing botanical bas-relief as a rewarding art form for beginners and seasoned artists alike.

What is Botanical Bas-Relief?

Botanical bas-relief is a technique where artists create low-relief impressions of flowers and plants in clay and plaster. Unlike flat drawings or pressed flowers, this method preserves the texture, pattern, and delicate details of each plant, turning them into lasting, three-dimensional works of art.

Simple Materials, Stunning Results

All you need is a few basic materials: clay, flowers or plants, and plaster. Even a single stem can be transformed into a beautiful piece, or you can create elaborate compositions reminiscent of a wildflower meadow. The process is forgiving enough for beginners, yet versatile enough to challenge more experienced creators.

Bring Your Pieces to Life

Once your plaster cast is dry, you can leave it bare for an elegant, minimalist look—or add color with paints to breathe life back into the flowers. Each piece becomes a unique celebration of nature, a personal snapshot of its beauty preserved in time.

Why Try It?

  • Creative satisfaction: Even beginners can achieve professional-looking results.

  • Mindful practice: The process encourages observation, patience, and appreciation for natural details.

  • Decorative art: Finished pieces make beautiful, personalized home décor or gifts.

Botanical bas-relief lets you hold a piece of nature in your hands, capturing the essence of flowers and plants in a tangible, artistic way. Whether you leave your casts natural or painted, each creation tells a story of beauty, texture, and delicate artistry.

https://amzn.to/41HbEph

Planting Spring Bulbs: A September Guide for Gardeners in USDA Zones 1–7

As summer winds down and the first hints of fall appear, it’s the perfect time to start thinking about your spring garden. For home gardeners in USDA Zones 1 through 7, September is the ideal month to plant spring bulbs like daffodils, tulips, and crocuses. With the right timing, your garden will burst into color when the weather warms again.

1. Check the Weather First

Before you dig, check your extended weather forecast. Spring bulbs need several weeks to develop roots before the ground freezes. Planting too late risks poor root development and weak blooms.

2. Avoid Too-Warm Soil

If your region is unusually warm in September, be cautious. Planting bulbs in overly warm soil can cause them to sprout early, making them vulnerable to frost and reducing their bloom potential.

3. Prepare Your Soil

Choose well-draining soil and a sunny or partially sunny spot. Loosen the ground and enrich it with compost or bulb fertilizer to give your bulbs the best start.

4. Plant at the Right Depth

As a general rule, plant bulbs about two to three times as deep as the bulb’s height. Tulips, daffodils, and hyacinths each have slightly different depth requirements, so follow the instructions for the specific variety you’re planting.

5. Water and Mulch

After planting, water bulbs thoroughly and add a layer of mulch to protect them from fluctuating fall temperatures. Mulch also helps retain moisture and discourages weeds.

Planting your spring bulbs in September gives them the time they need to root and thrive. By checking the forecast, avoiding overly warm soil, and planting properly, you’ll ensure a vibrant and colorful garden when spring arrives.

https://amzn.to/3I0ryV0

https://amzn.to/3UX27Xu

How My Garden Gives Me Something to Relate to With Others

One of the unexpected joys of having a garden is how it connects me to other people. Whether it’s talking about what I’m planting, sharing the excitement of the first tomato ripening, or swapping tips on how to keep pests away, the garden gives me common ground to relate to others.

It’s funny how quickly conversations start when gardening comes up. Everyone has a story—maybe it’s about their grandmother’s garden, the basil plant they tried to grow on their windowsill, or their neighbor’s zucchini that seemed to multiply overnight. Even people who don’t garden themselves often light up at the thought of fresh herbs or vegetables.

For me, the garden becomes more than just soil, seeds, and sunshine—it’s a bridge. It allows me to connect, listen, and share experiences with people from all walks of life. And it reminds me that even in a fast-paced, digital world, something as simple as growing a cucumber or tending to flowers can spark real conversation and genuine connection.

Sometimes the best relationships grow just like gardens—slowly, naturally, and with a little bit of care.

https://amzn.to/4oZLecu

The Simple Citrus Hack That’ll Squeeze Out More Juice

You know the saying, “When life gives you lemons…”—but what if you’ve been squeezing them the wrong way this whole time?

If you’re using a handheld citrus juicer, here’s a little kitchen hack that might surprise you: turn your lemon the opposite direction. Instead of placing it cut-side down, try placing it cut-side up, curved-side down—and watch the juice flow.

Why It Works

Most of us instinctively place lemons cut-side down into citrus presses. But by flipping the lemon so the cut side faces up, the press’s dome pushes into the rounded exterior of the lemon. This squeezes the fruit from the outside in, maximizing pressure and surface contact inside the lemon.

Result? You get a lot more juice—especially from firmer lemons or limes.

How to Do It:

  1. Cut your lemon in half as usual.
  2. Place one half in your citrus press cut-side up (so the curved rind faces down into the bowl of the juicer).
  3. Squeeze like normal.
  4. Be amazed at how much more juice comes out—with less strain on your hands!

Roll Before You Slice

Want to make it even easier? Roll the lemon on your counter with firm pressure before slicing. This breaks down some of the internal membranes, making juicing even more effective.

Sometimes, the best kitchen tips are the simplest. So next time you’re making salad dressing, cocktails, or fresh lemonade—flip that lemon. Your juicer (and your recipes) will thank you.

https://amzn.to/4kM46bA

To Plant a Garden Is to Believe in Tomorrow” — Why This Quote Still Matters

Audrey Hepburn once said, “To plant a garden is to believe in tomorrow.”
And isn’t that exactly what gardening is—a quiet, hopeful act of faith?

When you press a seed into the soil, you can’t see the roots it will grow or the fruit it may bear. You simply trust. You trust the sun will rise, the rain will fall, and time will do its work. You believe that what you sow today will one day bloom, nourish, or delight.

Planting a garden invites us to slow down. It reminds us that good things take time—that growth doesn’t happen overnight. Whether it’s a tomato plant, a sunflower, or a small herb on a windowsill, each planting is a promise to the future. It’s a statement: I still believe in beauty, in growth, and in the seasons to come.

Gardening as a Metaphor for Life

This quote doesn’t just apply to soil and seeds. It’s a way of living. Every kind word, every act of generosity, every time we choose hope over fear—we’re planting something for tomorrow. We may not see the results right away, but the impact is real.

And just like a garden, life requires patience, care, and resilience. There will be weeds. There will be dry spells. But there will also be blooms. Surprises. Fresh starts. And joy.

A Garden is a Form of Optimism

Whether you’re a seasoned gardener or just starting out, every seed you plant is a small act of optimism. So dig your hands into the earth. Dream about the harvest. Believe in tomorrow.

https://amzn.to/4jRXsAE

Sometimes Growth Requires New Locations, People, and Perspective

There’s a reason repotting a plant can make all the difference—it’s not that the plant was broken, it just outgrew the container it was in.

The same thing can happen in our lives.

Sometimes growth requires new soil. A new environment. A new circle. A fresh perspective.

It’s not always easy to recognize when we’ve outgrown a season, a space, or even some relationships. But the discomfort you feel? The sense that something just isn’t right anymore? That might be your sign that it’s time to stretch. Time to expand.

Growth doesn’t always happen in familiar places. Sometimes, you need to step into something unknown to see what you’re really capable of.

That might mean changing your scenery—physically or mentally. It might mean seeking out people who push you to be better, who believe in you, who think big. It might mean looking at the same life through a new lens.

And while change can be unsettling, it also holds incredible power. You’re not abandoning where you’ve been—you’re honoring it by using it as the foundation for what’s next.

Let it. 🌱

Eat more from Earth

In a world full of processed foods and artificial ingredients, returning to the basics—eating more from the earth—can be one of the best decisions for your health and the planet. Whether you’re growing your own food, shopping at a local farmers’ market, or simply making mindful choices at the grocery store, embracing whole, earth-grown foods can transform the way you nourish your body and live your life.

Why Eat More from the Earth?

The benefits of eating more plant-based, whole foods are endless. Here are just a few reasons to make the shift:

  • Better Health: Fruits, vegetables, nuts, seeds, and whole grains provide essential vitamins, minerals, and antioxidants. These foods support your immune system, reduce inflammation, and help prevent chronic diseases.
  • Sustainability: Eating locally and seasonally reduces the environmental impact of food transportation and supports sustainable farming practices.
  • Connection to Nature: When you eat fresh, whole foods, you develop a deeper appreciation for the earth and where your food comes from.

Simple Ways to Eat More from the Earth

1. Choose Whole Foods Over Processed

When possible, opt for foods that are as close to their natural state as possible. Think fresh vegetables, fruits, legumes, whole grains, and nuts rather than packaged, refined, and artificially flavored products.

💡 Tip: If a food comes in a box with a long list of ingredients you can’t pronounce, it’s probably not from the earth.

2. Grow Your Own Food

Even if you don’t have a large garden, growing herbs, tomatoes, or leafy greens in pots or a small backyard space can be a great way to connect with your food and ensure freshness.

💡 Tip: Start with easy-to-grow plants like basil, lettuce, or peppers—they thrive in small spaces!

3. Shop at Farmers’ Markets

Supporting local farmers means fresher produce, fewer pesticides, and a stronger local food system. Plus, seasonal foods are often more flavorful and nutritious.

💡 Tip: Bring reusable bags and ask farmers about their growing practices to make the best choices.

Eating more from the earth isn’t about following strict rules—it’s about making mindful choices that prioritize health, sustainability, and a deeper connection to nature. Whether you grow your own food, shop locally, or simply add more whole foods to your plate, every small step brings big benefits.

What’s one way you can eat more from the earth today? 🌍🍎🥦