Keeping Hanging Baskets Happy in Hot Weather: Twice-a-Day Watering Tips

When summer turns up the heat, your hanging baskets can go from lush and perky to droopy and sad faster than you can say, “Where did all the water go?” Unlike plants in the ground, hanging baskets have less soil to hold moisture. Combine that with blazing sunshine and high temps, and you’ve got a recipe for rapid evaporation—and a stressed-out plant.

Why Hanging Baskets Need Extra Care in the Heat
During hot spells, it’s not unusual for hanging plants to need water twice a day. In the morning, before the day’s heat sets in, you’re giving them a head start. In the evening, you’re replenishing what they lost during the day. This routine keeps soil consistently moist, which is key to avoiding wilt, leaf drop, or worse—permanent damage.

Watering Smart: The Dos and Don’ts

  • Morning & Evening Routine: Water early and late to reduce evaporation.
  • Check Before You Pour: Stick your finger into the soil up to your second knuckle—if it feels dry, it’s time to water.
  • Go Deep: Water until you see it draining from the bottom of the basket so the entire root ball gets a drink.
  • Skip Peak Heat Watering: Midday watering often evaporates before it does any good.
  • Drainage Matters: Make sure your baskets have proper drainage holes to prevent root rot.

If your plants still seem thirsty no matter how often you water, try bottom watering. Place the basket in a shallow tub or saucer of water for about 30 minutes—this allows the roots to soak up what they need without splashing water everywhere.

With a little extra attention during heat waves, your hanging baskets can stay vibrant and healthy all season long. And trust me, it’s a lot more rewarding to see them thriving than to watch them droop in defeat.

Get Trimming: Why Low-Hanging Branches Need to Go

If your lawn feels like an obstacle course—complete with ducking, weaving, and the occasional accidental hair-snatch from a rogue branch—it might be time to grab those pruning shears. Low-hanging branches from trees and shrubs might seem harmless, even charming, but they can make mowing your lawn a real headache.

When branches creep across your lawn space, you end up doing a weird dance every time you mow—leaning, twisting, or stopping completely to avoid getting whacked in the face. And let’s be honest, mowing is already a chore. Why make it harder?

By trimming those branches back, you’ll do two things:

  1. Make mowing easier – Ideally, your mower should be able to reach right up to the trunk of each tree or shrub without you needing to double back with clippers.

  2. Give your garden a cleaner look – Trimmed branches open up the space, making everything look neater and more intentional.

Here’s a quick tip: Trim branches when the weather is dry to avoid spreading disease, and make clean cuts so the tree or shrub heals well.

So, next time you’re out in the yard, take a look around. If you see branches hanging low enough to high-five you on your mowing route, it’s time to show them the door… or, well, the compost pile.

The Power of Three: A Simple Trick to Transform Your Garden Design

Ever notice how a trio of flowers just feels better than a pair? Or how three decorative pots by the front door look more inviting than just one? You’re not imagining things. There’s a little design magic at work here—and it’s called the Rule of Three.

This design principle shows up everywhere from photography and graphic design to architecture and yes, even gardening. And once you start to see it, you’ll understand why it works—and how to use it to create a more beautiful, balanced, and memorable outdoor space.

Why Three?

The human brain loves patterns, but too much symmetry can feel stiff or boring. Odd numbers, especially threes, naturally guide the eye. They feel dynamic, organic, and intentional. Threes create visual movement, which is especially helpful in a garden, where you want the eye to flow and the space to feel alive.

How to Use the Rule of Three in Your Garden

Plant Groupings

Instead of planting two shrubs or four flowers in a row, go with three. Try placing them at slightly different heights or spacing them in a triangle to create depth and visual interest.

Tip: Try planting three different plants that thrive in the same conditions—like lavender, coneflowers, and salvia for a pollinator-friendly purple theme.

Hardscape Features

Whether you’re arranging patio furniture, boulders in a rock garden, or even stepping stones, threes just work better. They create rhythm and feel intentional rather than random.

Example: A small path of three staggered pavers looks more inviting and less stiff than two side-by-side or four in a straight line.

Focal Points

Have one striking garden statue? Consider flanking it with two smaller planters or lanterns. That creates a balanced trio that makes the focal point stand out without feeling lonely or overpowering.

Threes Don’t Have to Match

The beauty of the Rule of Three is in its flexibility. The elements don’t all have to be the same. Three different but complementary items—like a tall grass, a mid-height flowering plant, and a low groundcover—can look even more stunning than three identical ones.

The next time you’re out in the garden rearranging pots or planning a new bed, think in threes. It’s a small shift, but it makes a big difference. Just like storytelling and comedy, great gardens often come in threes.

End-of-Season Surprise: The Joy of a Mystery Bloom

Sometimes the best things in life come from a little mystery—and maybe a clearance table at your local nursery.

It was the end of the season, the nursery was clearing out the last of their plants, and I spotted a little green pot with no tag, sitting half off to the side like it had already accepted its fate. It didn’t have a name, no picture, not even a price sticker that made sense. But for a couple bucks, I thought, “Why not?”

I planted it not really knowing what to expect. Would it even survive? Would it bloom?

Weeks went by. It grew taller. Still no sign of color, still no clue what it was.

And then—it bloomed.

Bright, bold, sunshine yellow. Not soft or pale, not subtle, but the kind of yellow that makes you smile the second you see it.

It was a simple moment, but it reminded me of what gardening is really about: the wonder, the waiting, the little surprises that pop up when you least expect them. Not everything needs to be perfectly planned. Sometimes it’s the “what is this thing?” that ends up stealing the show.

So, here’s a fun idea if you’re closing out your gardening season: head to your local nursery’s clearance section. Pick out a mystery plant or two. Something unlabeled, forgotten, or a little scruffy. Give it a spot in your garden and see what happens.

Worst case? You got your hands dirty and added some green. Best case? You’ll be grinning like I was

A Timeless Garden Hack: Keep Your Tools Sharp, Clean & Rust-Free

Every gardener knows that having the right tools makes a world of difference—but keeping those tools in top shape? That’s a game-changer. There’s an old-school garden trick that’s simple, affordable, and incredibly effective for maintaining your hand tools: the sand-and-oil bucket method.

Here’s how it works and why you’ll want to add it to your gardening routine.

What You’ll Need:

  • A 5-gallon bucket
  • About 5 gallons of coarse sand
  • ¾ quart of motor oil (used or new works)

How to Use the Sand and Oil Bucket:

  1. Fill the Bucket: Pour the sand into the bucket, then drizzle the motor oil over the top.
  2. Mix It Up: Use a trowel or small hand tool to mix the sand and oil until it’s evenly distributed.
  3. Clean Your Tools: Plunge your dirty tools into the sand several times. The gritty texture scrapes off dirt and debris.
  4. Tap and Wipe: Tap the tool against the edge of the bucket and wipe with a cloth to remove leftover sand.

Why It Works:

  • Cleans Dirt: The abrasive sand naturally scrapes away stuck-on soil without damaging your tools.
  • Sharpens Edges: The friction created as you dip the tool in and out of the sand helps sharpen blades and edges.
  • Prevents Rust: The oil coats the metal, creating a barrier that protects against moisture and rust.

It’s Reusable

This isn’t a one-and-done solution. Your sand-and-oil bucket will last all season (and longer), ready to clean and protect your tools after every use. Just keep it in your shed or garage, and dip your tools in regularly for quick maintenance.

Sometimes, the best solutions are the simplest. This old garden trick proves you don’t need fancy gadgets to care for your tools—just a little sand, oil, and a few minutes of upkeep. Your tools will thank you with years of dependable use in return.


The Simple Citrus Hack That’ll Squeeze Out More Juice

You know the saying, “When life gives you lemons…”—but what if you’ve been squeezing them the wrong way this whole time?

If you’re using a handheld citrus juicer, here’s a little kitchen hack that might surprise you: turn your lemon the opposite direction. Instead of placing it cut-side down, try placing it cut-side up, curved-side down—and watch the juice flow.

Why It Works

Most of us instinctively place lemons cut-side down into citrus presses. But by flipping the lemon so the cut side faces up, the press’s dome pushes into the rounded exterior of the lemon. This squeezes the fruit from the outside in, maximizing pressure and surface contact inside the lemon.

Result? You get a lot more juice—especially from firmer lemons or limes.

How to Do It:

  1. Cut your lemon in half as usual.
  2. Place one half in your citrus press cut-side up (so the curved rind faces down into the bowl of the juicer).
  3. Squeeze like normal.
  4. Be amazed at how much more juice comes out—with less strain on your hands!

Roll Before You Slice

Want to make it even easier? Roll the lemon on your counter with firm pressure before slicing. This breaks down some of the internal membranes, making juicing even more effective.

Sometimes, the best kitchen tips are the simplest. So next time you’re making salad dressing, cocktails, or fresh lemonade—flip that lemon. Your juicer (and your recipes) will thank you.

https://amzn.to/4kM46bA

Why a Flexible Garden Hose Might Be Your New Favorite Tool

When it comes to garden tools, sometimes it’s the small upgrades that make the biggest difference. One of those game-changers? A flexible garden hose.

Whether you’re a seasoned gardener or just getting started, dealing with a stiff, kinked hose can turn watering your plants into an annoying chore. But with a flexible hose, the experience becomes smoother, easier, and—dare we say—more enjoyable.

What is a Flexible Hose?

A flexible hose, often made from durable materials like latex or expandable polymers, is designed to be lightweight, easy to store, and kink-free. Many models expand when the water is on and shrink back down when the water is off, making them simple to coil and tuck away.

3 Reasons to Love a Flexible Garden Hose

1. No More Kinks or Tangles

Traditional hoses can twist and kink at the worst times—usually when you’re in the middle of watering delicate seedlings or cleaning garden tools. Flexible hoses move with you, saving time and frustration.

2. Lightweight and Easy to Maneuver

Forget dragging a heavy, bulky hose across the yard. A flexible hose is light enough for anyone to handle, making it especially helpful for older gardeners or those with limited strength.

3. Compact and Space-Saving

These hoses shrink down significantly when not in use, taking up far less space in your shed, garage, or on a hose reel. They’re perfect for small spaces or urban gardens.

Things to Consider

While flexible hoses are super convenient, they’re not indestructible. Look for one with solid brass fittings and durable inner layers to get the most life out of your hose. Store it out of direct sun and drain it after each use to prevent damage.

A flexible hose might not seem like a big deal, but once you try one, you may wonder how you ever gardened without it. It’s one of those upgrades that makes your gardening life a little easier—and who doesn’t want that?

https://amzn.to/4f8iPfP

  • EXTREMELY FLEXIBLE – All weather flexibility
  • EXTREMELY DURABLE – Abrasion resistant outer cover and crush resistant anodized aircraft aluminum fittings
  • HYBRID POLYMER – Won’t kink under pressure, coils easily and lays flat with zero memory
  • LIGHTWEIGHT – Lighter than traditional garden hoses making Flexzilla easier to carry and maneuver around the yard
  • LEAK FREE CONNECTIONS AND DRINKING WATER SAFE – A durable O-ring provides long lasting leak free connections and feature an inner tube material that is drinking water safe

https://amzn.to/4f8iPfP

Mulch Magic: Retain Moisture and Protect Roots From Extreme Temperatures

If you’re looking for an easy way to give your garden a boost this summer, look no further than mulch. It’s one of the most effective—and often overlooked—tools for healthy plants. Whether you’re growing flowers, veggies, or shrubs, mulch helps your garden thrive in both scorching heat and dry spells.

Here’s why mulch matters and how to use it for maximum benefit.

1. Mulch Helps Retain Moisture

In the heat of summer, soil can dry out fast. Mulch acts like a protective blanket, slowing evaporation and helping the soil stay damp longer. That means your plants get more consistent hydration, and you won’t have to water as often.

Pro tip: Organic mulches like wood chips, bark, straw, or shredded leaves work best for water retention.

2. Mulch Regulates Soil Temperature

Just like insulation in your home, mulch helps regulate temperature in the soil. In the summer, it keeps roots cool during extreme heat. In cooler months, it helps protect them from freezing.

Why does this matter? Healthy roots mean stronger plants, better growth, and less stress during unpredictable weather.

3. Mulch Prevents Soil Erosion and Compaction

Heavy rain or even hand-watering can cause soil to compact or wash away. Mulch provides a cushion that protects the surface of your garden beds, allowing water to soak in slowly and preventing valuable topsoil from disappearing.

4. Mulch Suppresses Weeds

Bonus benefit—less weeding! A thick layer of mulch makes it harder for weeds to break through and steal water and nutrients from your plants. Less competition = more room for your garden to grow.

How to Mulch Effectively:

  • Apply 2–4 inches of mulch around your plants.
  • Keep mulch a few inches away from stems and trunks to prevent rot.
  • Replenish mulch as needed—especially after heavy rain or wind.

Mulch Is Simple, Affordable, and Powerful

If you want healthier soil, happier plants, and fewer garden chores, mulch is a must. It’s a simple step that makes a big difference—especially when battling summer heat and unpredictable weather.

https://amzn.to/4dh9eSF

Tips for Having and Maintaining a Fountain in Your Yard

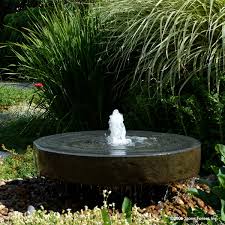
A fountain can transform your backyard into a tranquil oasis, offering soothing sounds and a beautiful focal point. However, like any feature in your garden, fountains require care and maintenance to keep them looking and functioning their best. Here are some essential tips to ensure your garden fountain stays in top shape throughout the year.

1. Choose the Right Fountain for Your Space

Before diving into maintenance, make sure you select a fountain that suits your yard’s size and style. Consider the scale of your space—large fountains work well in spacious gardens, while smaller, more compact models are better suited for cozy patios or smaller yards. Ensure the design complements the overall aesthetic of your outdoor space.

2. Keep the Water Clean

Water is the heart of a fountain, and keeping it clean is crucial to its function. Regularly check for debris like leaves, dirt, and insects that can clog the pump or reduce water flow. To keep the water sparkling, use a mild cleaning solution, such as vinegar or a specialized fountain cleaner, to clean the basin and fountain surfaces. Change the water frequently to prevent algae build-up and odors.

3. Protect the Pump

The pump is the key component that keeps the water circulating. To prevent it from clogging or becoming damaged, make sure it’s regularly cleaned. Remove any debris from the pump and check that the water level is adequate—if the water level is too low, the pump can burn out. It’s also a good idea to periodically inspect the pump to ensure it’s functioning properly.

4. Use a Water Conditioner

Water conditioners help keep your fountain water clear by preventing algae growth and mineral deposits. These products can be especially helpful if you live in an area with hard water. Be sure to follow the instructions on the product to avoid overuse, which could impact the ecosystem in your garden.

5. Winter Care

If you live in a climate where temperatures dip below freezing, you’ll need to protect your fountain during the colder months. Drain the water from the fountain and clean it thoroughly before storing it for the winter. For fountains that cannot be easily disassembled, ensure the pump is removed and stored in a warm place to prevent freezing. If the fountain is left outside, consider covering it with a weather-resistant tarp.

6. Prevent Algae and Mineral Deposits

Algae and mineral deposits can turn your crystal-clear fountain into a murky mess. To prevent this, avoid placing your fountain in direct sunlight, as sunlight accelerates algae growth. You can also add a small pump filter or use products designed to inhibit algae. Regular cleaning will help keep these deposits from building up over time.

7. Monitor Water Levels

The water level in your fountain can fluctuate due to evaporation and splashing. Be sure to check the water level regularly and refill it as needed. Low water levels can damage the pump or cause it to malfunction.

8. Check for Leaks

Periodically check your fountain for any signs of leakage. A leaking fountain can result in wasted water, and over time, it can damage your landscape. If you find a leak, it may require resealing or repair depending on the severity.

9. Landscaping Around Your Fountain

Landscaping can enhance the beauty of your fountain. Surround it with plants or flowers that complement its style. However, avoid planting trees or shrubs near the fountain, as their leaves and debris will require constant cleaning and can clog the fountain’s pump.

10. Consider the Noise Factor

The sound of running water can be very calming, but it’s important to consider how much noise your fountain will make. If you want a gentle, peaceful sound, choose a smaller, more tranquil fountain with a slow flow. For a more dramatic sound, select a fountain with a stronger flow.

A fountain can be an enchanting addition to your yard, offering both beauty and serenity. By choosing the right fountain for your space, maintaining the water quality, and keeping the pump in working order, you can ensure your fountain remains a peaceful centerpiece in your garden for years to come. Regular care and maintenance may require a little effort, but the rewards—of having a soothing, tranquil environment—are well worth it.

https://amzn.to/4iZcsvo

https://amzn.to/3H0iw9y

Find the Right Watering Wand for Your Garden’s Needs

When it comes to caring for your garden, one of the simplest yet most important tools you can have is a watering wand. Whether you’re tending to delicate flowers, sturdy vegetables, or a lush green lawn, the right watering wand can make all the difference in how well your plants thrive. But with so many options out there, how do you choose the best one for your garden?

Here are some key factors to consider when selecting the perfect watering wand for your needs.

1. Length

The length of your watering wand is one of the first factors to consider. A longer wand helps you reach plants that are further away or in hard-to-reach places, like hanging baskets or plants at the back of a bed. If you’re watering a large garden, a longer wand (30-36 inches) can save you time and effort. However, for smaller gardens or more compact spaces, a shorter wand might be easier to handle and store.

2. Adjustable Water Flow

Different plants require different amounts of water. An adjustable watering wand lets you control the flow of water, which is especially helpful when you have a mix of plants that need varying amounts of hydration. You can go from a gentle mist for delicate seedlings to a heavy stream for larger, more established plants. This flexibility can be crucial for giving your garden the care it deserves.

3. Spray Patterns

Look for a watering wand that offers multiple spray patterns, such as a fine mist, gentle shower, and strong stream. A gentle mist is great for watering seedlings or delicate flowers, while a strong stream can be used for heavy-duty watering, like on vegetable plants or established shrubs. Having several options ensures you’re prepared for any situation your garden throws at you.

4. Comfortable Grip

Gardening is often a long, labor-intensive activity, so having a comfortable, ergonomic grip on your watering wand is important. Look for a wand with a soft, non-slip handle that will keep your hand from cramping up during extended watering sessions. Some wands also feature trigger grips or valve controls that reduce the amount of force you need to apply, making watering more comfortable.

5. Material Durability

Watering wands are typically made from plastic, metal, or a combination of both. Plastic wands are lightweight and affordable, but they may not be as durable as metal wands. If you’re looking for something more heavy-duty, metal wands are great because they can withstand wear and tear. Just be mindful of the weight, as they can be a bit heavier, especially when full of water.

6. Ease of Use

If you have a larger garden or need to do a lot of watering, it’s important to choose a wand that’s easy to maneuver. Look for a wand with a flexible hose attachment or a swivel feature that lets you easily adjust the angle. This can help you avoid having to move your entire body or hose to get the right angle for watering your plants.

7. Price vs. Quality

Lastly, think about your budget. While it’s tempting to buy the cheapest option available, investing in a quality watering wand can save you time and money in the long run. A higher-quality wand might come with a higher upfront cost, but it will likely last longer and provide a better watering experience.

Choosing the right watering wand can transform your gardening experience. By considering factors like length, adjustable flow, spray patterns, grip comfort, and material durability, you can find a tool that suits your needs and helps your garden thrive. Whether you’re a seasoned gardener or just getting started, having the right watering wand is a simple way to make your gardening routine more efficient and enjoyable.

https://amzn.to/4k7ruA2