Senior Alpaca Finds Friendship in a Cow

A senior alpaca had no friends until one day he met a cow. He is a 17-year-old alpaca, which is pretty old for an alpaca. Stevie had been living at a petting zoo and not getting along with the other animals so he was taken in by Happy Compromise Farm, a sanctuary for animals.
Sadly, “Grandpa Stevie” didn’t get along with the other alpacas because they had already bonded with each other and he was socially awkward, not having learned how to be an alpaca at the zoo. But his social life changed when he met a senior cow named Miriam. The two old-timers get along really well. It turns out that Stevie likes cows more than alpacas and happily hangs out with them, eating hay and enjoying their company!
We’re so glad Stevie found a friend and a herd to belong to.

https://www.reshareworthy.com/friendless-senior-alpaca-meets-cow-friend/

Making Sourdough Bread

I made the best sourdough bread yesterday and thought you might like more information on baking bread. Maybe you can learn to bake a loaf too and share it with a neighbor, family, or friends- it also makes the best toast for breakfast…yum!

I have been using, Artisan Sourdough Made Simple: A Beginner’s Guide to Delicious Handcrafted Bread with Minimal Kneading by Emilie Raffa to help in my bread-making journey. I have a Le Creuset Dutch Oven to cook the bread.

Le Creuset Enameled Cast Iron Signature Round Dutch Oven

https://amzn.to/46n3YeC


Artisan Sourdough Made Simple A Beginner’s Guide to Delicious Handcrafted Bread with Minimal Kneading

https://amzn.to/4gOTkRy

Garden Fresh Salsa: A Taste of Summer, Preserved

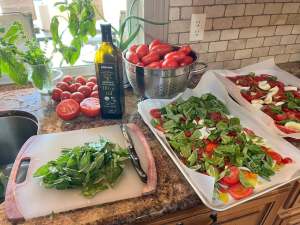
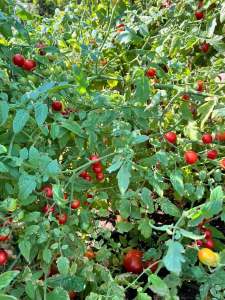
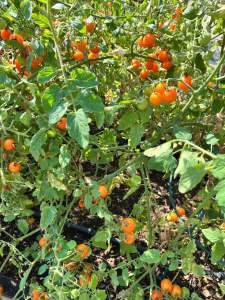
There’s something undeniably satisfying about growing your vegetables, plucking them straight from your garden, and turning them into a delicious salsa. But what happens when your garden’s bounty becomes too much to enjoy at once? Enter the world of homemade garden fresh salsa, a vibrant taste of summer, lovingly preserved to enjoy year-round.

The Garden’s Bounty:
When your garden is in full swing, it can feel like a race to savor each tomato, pepper, and onion at its peak. However, there comes a point when you have more than you can consume in one sitting. That’s where homemade salsa comes to the rescue.

The Raw, Fresh Advantage:
Unlike cooked salsa, which can alter the flavor and texture of your garden’s treasures, raw salsa retains the essence of each ingredient. The crispness of freshly harvested vegetables shines through, offering a burst of flavor in every bite.

The Preservation Process:
To ensure you can enjoy your garden’s salsa long after the harvest season has ended, consider vacuum-sealing it and storing it in the freezer. This method locks in the salsa’s freshness, preserving its vibrant colors and flavors.

Versatility at Its Best:
Homemade salsa is incredibly versatile. It’s not just a dip for tortilla chips; it can be a topping for grilled chicken, a filling for tacos, or a zesty addition to scrambled eggs. With your garden fresh salsa at the ready, your culinary options are endless.

A Taste of Summer Year-Round:
In the depths of winter, when your garden lies dormant under a blanket of snow, you can open your freezer and find a taste of summer waiting for you. Each spoonful of your homemade garden fresh salsa will transport you back to those sunny days in the garden, a reminder of the joy of growing and savoring your own produce.

So, the next time your garden overflows with ripe tomatoes, peppers, and onions, consider whipping up a batch of homemade garden fresh salsa. With a little effort in the preservation process, you can enjoy the flavors of your garden throughout the year, bringing a taste of summer to even the coldest of days.  #GardenFreshSalsa #PreservationJoy #TasteOfSummer

https://www.kimscravings.com/best-damn-salsa-ever/

https://amzn.to/46usjxG

https://amzn.to/46CWkM1

Copycat Recipes: Bringing Your Favorite Baked Goods Home

There’s something magical about walking into your favorite bakery—the smell of fresh bread, the sight of golden cookies, the taste of a perfectly flaky pastry. But what if you could bring that magic into your own kitchen? That’s where copycat recipes come in.

Copycat recipes are all about recreating the flavors you love from restaurants and bakeries right at home. Not only is it fun, but it can also save money, let you control the ingredients, and give you the satisfaction of baking something delicious from scratch.

Maybe it’s that famous chocolate chip cookie you can never resist, a cinnamon roll that’s perfectly gooey, or a loaf of bread that tastes like it came straight from a bakery case. With a little trial and error (and maybe a few taste tests along the way), you can get surprisingly close to the original.

Here are a few reasons to try copycat baking:

  • Creativity in the kitchen – Test your skills and experiment with flavors.

  • Healthier tweaks – Adjust sugar, flour, or fats to fit your lifestyle.

  • A fun family project – Bake together and see whose version tastes the best.

  • That “nailed it” moment – Nothing beats pulling out a tray and realizing you’ve recreated your favorite treat.

Next time a craving hits, don’t just drive to the bakery—challenge yourself to recreate it. Who knows? You might just discover your homemade version tastes even better.

Copycat Starbucks Pumpkin Cream Cheese Muffins

Ingredients:

  • 1 3/4 cups all-purpose flour

  • 1 cup sugar

  • 1/2 cup vegetable oil

  • 2 eggs

  • 1 cup canned pumpkin puree

  • 1 tsp baking soda

  • 1/2 tsp baking powder

  • 1/2 tsp salt

  • 1 tsp cinnamon

  • 1/2 tsp nutmeg

  • 1/4 tsp cloves

  • 1/4 tsp ginger

Cream Cheese Filling:

  • 4 oz cream cheese, softened

  • 1/4 cup sugar

  • 1/2 tsp vanilla extract

Topping:

  • Pumpkin seeds (pepitas)

Instructions:

  1. Preheat oven to 350°F (175°C). Line a muffin tin with paper liners.

  2. In a bowl, whisk together flour, baking soda, baking powder, salt, and spices.

  3. In another bowl, mix sugar, oil, eggs, and pumpkin puree until smooth. Combine wet and dry ingredients.

  4. Fill muffin cups about 3/4 full.

  5. Mix cream cheese, sugar, and vanilla until smooth. Drop a spoonful into the center of each muffin.

  6. Sprinkle with pumpkin seeds.

  7. Bake for 18–20 minutes, until a toothpick (avoiding the cream cheese center) comes out clean.

  8. Cool slightly and enjoy warm—or store in the fridge for a chilled trea

https://amzn.to/428r9H5

Capture Nature in Clay: The Art of Botanical Bas-Relief

There’s something magical about freezing a moment in nature—capturing the delicate curve of a petal, the intricate veins of a leaf, or the subtle texture of a stem. Casting Flowers offers a creative way to do just that, introducing botanical bas-relief as a rewarding art form for beginners and seasoned artists alike.

What is Botanical Bas-Relief?

Botanical bas-relief is a technique where artists create low-relief impressions of flowers and plants in clay and plaster. Unlike flat drawings or pressed flowers, this method preserves the texture, pattern, and delicate details of each plant, turning them into lasting, three-dimensional works of art.

Simple Materials, Stunning Results

All you need is a few basic materials: clay, flowers or plants, and plaster. Even a single stem can be transformed into a beautiful piece, or you can create elaborate compositions reminiscent of a wildflower meadow. The process is forgiving enough for beginners, yet versatile enough to challenge more experienced creators.

Bring Your Pieces to Life

Once your plaster cast is dry, you can leave it bare for an elegant, minimalist look—or add color with paints to breathe life back into the flowers. Each piece becomes a unique celebration of nature, a personal snapshot of its beauty preserved in time.

Why Try It?

  • Creative satisfaction: Even beginners can achieve professional-looking results.

  • Mindful practice: The process encourages observation, patience, and appreciation for natural details.

  • Decorative art: Finished pieces make beautiful, personalized home décor or gifts.

Botanical bas-relief lets you hold a piece of nature in your hands, capturing the essence of flowers and plants in a tangible, artistic way. Whether you leave your casts natural or painted, each creation tells a story of beauty, texture, and delicate artistry.

https://amzn.to/41HbEph

From Garden to Table: Making Yummy Pasta Sauce with Fresh Ingredients

There’s something special about sitting down to a plate of pasta covered in sauce made from ingredients you grew yourself. The taste is richer, the colors brighter, and the satisfaction unbeatable. Turning your garden harvest into a delicious pasta sauce isn’t just cooking—it’s celebrating your hard work.

Start with the Tomatoes

The base of any good pasta sauce is tomatoes. If your garden gave you a bumper crop, you’re in luck! Roma or plum tomatoes work best because they’re meaty and less watery. Simply roast or simmer them down until they release their natural sweetness.

Add Fresh Herbs

This is where your garden shines. Basil, oregano, thyme, and parsley bring depth and freshness you just can’t buy in a jar. Toss them in at different stages—oregano and thyme early for bold flavor, basil at the end for that bright, fragrant finish.

Don’t Forget the Extras

Onions, garlic, and peppers make great supporting players. If you grew them in your garden, even better! Sauté them until golden before adding tomatoes. Want some spice? Add a pinch of red pepper flakes.

Simmer for Flavor

The secret to pasta sauce is patience. Letting your sauce simmer for at least 30–45 minutes helps all the flavors blend together. If you have time, go even longer—you’ll be rewarded with a rich, velvety sauce.

Enjoy the Harvest

Once your sauce is ready, ladle it over your favorite pasta, sprinkle with fresh Parmesan, and enjoy. You can even jar or freeze extra sauce so you’ll have a taste of summer long after the garden has gone to rest.

There’s nothing like the joy of a homemade meal that started as a seed in your backyard. It’s fresh, delicious, and a reminder that the best flavors come from your own hands.

Planting Spring Bulbs: A September Guide for Gardeners in USDA Zones 1–7

As summer winds down and the first hints of fall appear, it’s the perfect time to start thinking about your spring garden. For home gardeners in USDA Zones 1 through 7, September is the ideal month to plant spring bulbs like daffodils, tulips, and crocuses. With the right timing, your garden will burst into color when the weather warms again.

1. Check the Weather First

Before you dig, check your extended weather forecast. Spring bulbs need several weeks to develop roots before the ground freezes. Planting too late risks poor root development and weak blooms.

2. Avoid Too-Warm Soil

If your region is unusually warm in September, be cautious. Planting bulbs in overly warm soil can cause them to sprout early, making them vulnerable to frost and reducing their bloom potential.

3. Prepare Your Soil

Choose well-draining soil and a sunny or partially sunny spot. Loosen the ground and enrich it with compost or bulb fertilizer to give your bulbs the best start.

4. Plant at the Right Depth

As a general rule, plant bulbs about two to three times as deep as the bulb’s height. Tulips, daffodils, and hyacinths each have slightly different depth requirements, so follow the instructions for the specific variety you’re planting.

5. Water and Mulch

After planting, water bulbs thoroughly and add a layer of mulch to protect them from fluctuating fall temperatures. Mulch also helps retain moisture and discourages weeds.

Planting your spring bulbs in September gives them the time they need to root and thrive. By checking the forecast, avoiding overly warm soil, and planting properly, you’ll ensure a vibrant and colorful garden when spring arrives.

https://amzn.to/3I0ryV0

https://amzn.to/3UX27Xu

Fall Garden Check-In: Evaluating Your Garden for Next Year

As the growing season winds down, fall is the perfect time to pause and take a good look at your garden. What thrived this year? What didn’t quite make the cut? Doing an honest evaluation now can save you headaches—and help you make better choices—when spring arrives.

1. Reflect on What Worked and What Didn’t

Take note of plants that flourished and those that struggled. Maybe certain flowers bloomed beautifully, while others never took off. Jotting this down now gives you a clear roadmap for next year’s shopping and planting decisions.

2. Plan for Better Placement

Fall is an ideal time to consider moving plants to more suitable spots. Some areas of your garden may receive more sun or shade than you realized, or certain plants might perform better elsewhere. Take notes for next year’s layout adjustments.

3. Enhance Privacy and Views

Are there spots in your garden where you’d like more privacy or screening from less-than-ideal views? Consider adding shrubs, hedges, or trellises to improve your garden’s comfort and aesthetics.

4. Think About Fall Interest

Fall isn’t just about clean-up—it’s also a chance to plan for beauty in the cooler months. Think about adding plants with striking fall colors or interesting textures to keep your garden lively and engaging even as temperatures drop.

5. Start a Master List

Create a running list of lessons learned, plant successes, and ideas for next year. This list will be invaluable when you start shopping in spring, helping you make smarter decisions and avoid repeating mistakes.

Evaluating your garden in the fall is more than a seasonal chore—it’s a strategic step toward a healthier, more beautiful, and well-planned garden next year. Take notes, reflect honestly, and use this time to set yourself up for success.

Give Your Plants a Drink: Repurposing Wine Bottles for Easy Watering

Did you know that those empty wine bottles in your kitchen can have a second life in your garden? Instead of tossing them or recycling, you can turn them into simple, effective watering tools for your plants. Not only is this eco-friendly, but it also saves time and helps your plants thrive.

Method 1: The Inverted Bottle Technique

One of the easiest ways to repurpose a wine bottle is by using it as a slow-release watering device. Simply fill the bottle with water, turn it upside down, and insert the neck into the soil near your plant. As the soil dries, it will gradually draw water from the bottle, keeping your plant hydrated without daily attention. This method is perfect for indoor plants, balcony gardens, or even your vegetable patch.

Method 2: Using a Special Adapter

For a more controlled water flow, consider using a wine bottle adapter. These adapters fit onto the bottle and allow you to connect it securely to the soil. They regulate the release of water, ensuring your plants get just the right amount, reducing overwatering and water waste.

Wine bottles are ideal for this purpose because of their shape and size. Their narrow necks allow water to drip slowly, giving plants a consistent supply without drowning the roots. Plus, it’s a clever way to reuse something that would otherwise end up in the trash.

For best results, make sure the bottle is clean before using it in the soil. You can also experiment with different bottle sizes depending on the water needs of your plants.

By repurposing wine bottles, you’re not only helping your plants stay healthy but also embracing a creative, sustainable gardening solution.

https://amzn.to/3VmDJOY

How My Garden Gives Me Something to Relate to With Others

One of the unexpected joys of having a garden is how it connects me to other people. Whether it’s talking about what I’m planting, sharing the excitement of the first tomato ripening, or swapping tips on how to keep pests away, the garden gives me common ground to relate to others.

It’s funny how quickly conversations start when gardening comes up. Everyone has a story—maybe it’s about their grandmother’s garden, the basil plant they tried to grow on their windowsill, or their neighbor’s zucchini that seemed to multiply overnight. Even people who don’t garden themselves often light up at the thought of fresh herbs or vegetables.

For me, the garden becomes more than just soil, seeds, and sunshine—it’s a bridge. It allows me to connect, listen, and share experiences with people from all walks of life. And it reminds me that even in a fast-paced, digital world, something as simple as growing a cucumber or tending to flowers can spark real conversation and genuine connection.

Sometimes the best relationships grow just like gardens—slowly, naturally, and with a little bit of care.

https://amzn.to/4oZLecu