A Simple Tool to Help You Water Your Plants the Right Way

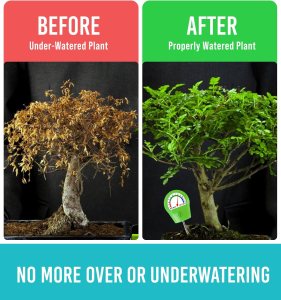
One of the most common challenges for gardeners and plant lovers is knowing when to water their plants. Too much water can damage roots, while too little can cause plants to dry out and struggle to grow. Finding the right balance can sometimes feel like guesswork.

That’s where a soil moisture meter can make a big difference.

A soil moisture meter is a simple tool designed to help you understand exactly how much moisture is in your soil. Instead of sticking your finger in the dirt and trying to guess if your plant needs water, you can insert the probe of the meter directly into the soil and get an instant reading.

Using it is incredibly easy. The meter typically has a long probe that you gently insert into the soil near your plant’s roots. Within seconds, the gauge will show the moisture level of the soil. This quick reading helps you determine whether the plant needs watering or if the soil still has enough moisture.

One of the best things about many soil moisture meters is their simplicity. Many models are analog, meaning they do not require batteries. This makes them convenient and reliable, since you don’t have to worry about charging or replacing batteries.

The probe length also helps you get readings below the surface of the soil, where the roots are actually drawing water. This provides a more accurate understanding of the plant’s environment and helps prevent the two most common plant care mistakes: overwatering and underwatering.

Proper soil moisture plays a key role in healthy plant growth. When plants receive the right amount of water, they develop stronger roots, healthier leaves, and better overall growth. A moisture meter helps remove the guesswork so you can confidently care for your plants.

Whether you’re growing houseplants, container gardens, or outdoor plants, this small tool can become a helpful part of your gardening routine.

Sometimes the simplest tools are the ones that make the biggest difference, and a soil moisture meter is a great example of how a small device can help your plants thrive.

https://amzn.to/4cTOXok

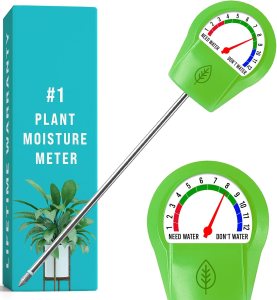
Plant Moisture Meter – Accurately Tells You When to Water Your Plants – 26cm, No Battery Needed

Stay Organized in the Garden with Cleangor’s Plant Labeling Kit

Gardening can be incredibly rewarding, but it can also get messy—literally. Between seeds, seedlings, vegetables, and flowers, it’s easy to forget what you planted where. That’s where a good labeling system makes all the difference.

Cleangor’s 330-piece plant labeling kit is designed to help gardeners stay organized and make tracking plants simple and efficient. The kit includes durable, weatherproof PVC labels and a bonus permanent marker, giving you everything you need to clearly mark your plants and track their growth.

The labels are made from flexible, high-quality PVC, which means they won’t rot like wood or rust like metal. They’re waterproof, sun-resistant, and designed to last season after season. The smooth edges make them safe to handle, and the dual-tip marker writes clearly, so your plant names and dates won’t fade in sunlight or wash away in the rain.

Using the labels is quick and easy. Simply write your plant’s name or planting date on the label, insert the pointed end into the soil, and track growth on both sides. These labels are reusable, making them a smart solution for multiple planting cycles and different garden projects.

Versatile in use, these labels are perfect for home gardens, greenhouses, container gardens, and even experimental pots. They help you clearly identify plant varieties and growth stages, making your garden more efficient and enjoyable.

Beyond functionality, the clean white labels add a professional, neat look to any garden, creating an organized oasis you can be proud of. They also make a thoughtful gift for fellow gardeners, combining practicality with a touch of style.

With Cleangor’s plant labeling kit, you’ll no longer have to guess what’s growing where. Your garden becomes a well-organized, easy-to-manage space where every seed, seedling, and flower has its place. Whether you’re a seasoned gardener or just starting out, this kit is a simple tool that brings clarity, order, and efficiency to your gardening routine.

Your plants will thrive, and your garden will stay beautifully organized, season after season.

https://amzn.to/40YtX

Simple Tips for Better Sourdough Breadmaking

Sourdough breadmaking can feel intimidating at first, but it doesn’t have to be complicated. At its core, sourdough is about patience, observation, and a few consistent habits. With some simple tips, you can improve your results and enjoy the process along the way.

Start With a Healthy Starter

Your starter is the foundation of good sourdough. A healthy starter should be bubbly, active, and reliably double in size a few hours after feeding. If your bread isn’t rising well or tastes overly sour, the starter is often the culprit.

Feed it regularly, use it when it’s at its peak, and don’t rush it. A strong starter makes everything else easier.

Measure Ingredients Carefully

Sourdough is more forgiving than it seems, but consistency matters. Using a kitchen scale instead of measuring cups helps ensure accurate ratios of flour, water, and salt. Small differences can affect texture, hydration, and fermentation, especially as you learn what works best in your kitchen.

Pay Attention to Dough, Not the Clock

Fermentation times vary based on temperature, humidity, and starter strength. Instead of strictly following the clock, watch the dough. Look for signs like increased volume, bubbles on the surface, and a slightly domed shape.

Learning to read the dough is one of the most valuable skills in sourdough baking.

Keep It Simple

It’s tempting to try complex recipes, fancy scoring patterns, or multiple add-ins right away. In the beginning, focus on mastering a basic loaf. Simple flour, water, salt, and starter will teach you more than any complicated recipe.

Once you’re confident with the basics, experimenting becomes much more enjoyable.

Don’t Skip Proper Shaping

Good shaping creates surface tension, which helps the loaf rise and hold its structure in the oven. Take your time during shaping, even if the dough feels sticky or soft. A well-shaped loaf often bakes up taller with a better crumb.

Preheat Your Oven Thoroughly

A hot oven is essential for oven spring. Whether you’re using a Dutch oven or baking stone, give it plenty of time to preheat. Steam during the early part of baking also helps the loaf expand and develop a crisp crust.

Embrace Imperfection

Not every loaf will be perfect—and that’s okay. Dense crumbs, uneven scoring, or flatter loaves are all part of the learning process. Each bake teaches you something new, and even the “mistakes” are usually still delicious.

Great sourdough doesn’t come from complexity; it comes from consistency. A healthy starter, careful observation, and a willingness to learn will take you further than any advanced technique.

Keep it simple, be patient, and enjoy the process—because sourdough baking is just as much about the journey as the loaf itself.

How to Make Perfect Brownies Using Muffin Tins: Crispy Edges, Chewy Centers

If you love brownies (who doesn’t?), but you’re tired of waiting for that large baking pan to cool before slicing, here’s a fun and easy solution: muffin tins! Yes, you can make individual brownie portions in muffin tins, and the results? Well, they’re nothing short of perfect.

Why Muffin Tins?

Muffin tins give you individual brownies that are perfectly portioned, and they bake faster than a full pan. But the best part is the texture. The batter’s exposure to the muffin tin’s edges creates that sought-after contrast between crispy, crunchy edges and a chewy, fudgy center. It’s a win-win!

What You’ll Need:

– Your favorite brownie recipe (or a box mix if you’re in a hurry)
– Muffin tin (standard size)
– Non-stick spray or cupcake liners
– An oven preheated to 350°F

The Magic Numbers: 350°F for 20 Minutes

Here’s where the magic happens. Preheat your oven to 350°F, then scoop your brownie batter into the muffin tins, filling each cup about 2/3 full. The key to getting that perfect crispy edge with a chewy center is baking for about **20 minutes**. This will give you the right balance of texture. You’ll know they’re done when a toothpick inserted into the center comes out with just a few moist crumbs.

The Best of Both Worlds: Crispy Edges, Chewy Centers

One of the main reasons muffin tin brownies are so popular is because they offer two types of brownie textures in every bite. The edges crisp up thanks to their exposure to the hot muffin tin, while the centers stay perfectly soft and chewy. It’s like getting the best of both worlds—what could be better?

Tips for Extra Fudgy Brownies:

1. Use a high-quality cocoa powder or melt some chocolate into your batter for a richer flavor.
2. Don’t overmix the batter, as that can make your brownies cakier.
3. Let them cool in the tin for a few minutes before transferring them to a cooling rack—this helps them hold their shape.

The beauty of this method is that you don’t need to be a professional baker to get a perfect batch of brownies. Whether you’re craving a quick treat for yourself or impressing guests with a fun, individual serving, muffin tins make brownie baking a breeze. Crispy edges, chewy centers, and all the chocolatey goodness in between. What’s not to love?

Happy baking!

https://amzn.to/3LGnkmT

https://amzn.to/3WV2zX2

What You Need to Know About Frost and Protecting Your Garden

As the seasons change and temperatures start to dip, gardeners everywhere face the same concern: frost. While frost is a natural part of the yearly cycle, it can have a significant impact on your plants if you’re not prepared. Understanding how frost works and taking steps to protect your garden can make the difference between a thriving garden and damaged plants.

What is Frost?

Frost forms when temperatures drop below freezing, causing water vapor in the air to condense and freeze on surfaces. It usually appears on clear, calm nights when the heat from the ground escapes into the sky. Frost can damage leaves, flowers, and fruit, especially tender or newly planted species.

How Frost Affects Plants

  • Tender Vegetables and Herbs: Tomatoes, peppers, basil, and other warm-season crops are highly susceptible to frost.

  • Perennials: Some hardy perennials can tolerate light frost, but heavy frost can damage leaves and stems.

  • Fruit Trees: Frost during blooming can harm flowers, reducing fruit yield.

  • Tips to Protect Your Garden from Frost

  1. Know Your Frost Dates
    Check your local frost calendar to understand the average first and last frost dates in your area. This helps you plan planting and harvest schedules.

  2. Cover Your Plants
    Use row covers, garden blankets, or even old sheets to protect tender plants overnight. Be sure to remove covers in the morning to prevent overheating.

  3. Water Wisely
    Moist soil holds heat better than dry soil, so watering your garden in the afternoon before a frost can help protect roots.

  4. Move Potted Plants
    Bring container plants indoors or place them in a protected area like a garage or shed during frost nights.

  5. Mulch
    A thick layer of mulch insulates the soil, helping maintain warmer temperatures around plant roots.

  6. Strategic Planting
    Plant tender crops in locations that get maximum sunlight and are protected from cold winds, such as near walls or fences.

When Frost Strikes

If you wake up to frost, act quickly. Remove frost coverings carefully, and if plants are damaged, wait until the temperature warms before pruning frost-bitten leaves. Some plants recover surprisingly well once the sun comes out.

Frost is inevitable in many climates, but with preparation and awareness, you can minimize its impact and keep your garden healthy. By understanding your garden’s vulnerabilities and acting early, you can enjoy the beauty and bounty of your plants, even as the cold sets in.

Farewell to a Classic: The Farmer’s Almanac Publishes Its Final Edition

After more than two centuries of weather forecasts, gardening tips, and time-honored advice, the Farmer’s Almanac is closing a chapter in its long history. The 2026 edition will be the publication’s last, ending a remarkable 208-year run that has touched generations of readers.

Since its first issue in 1818, the Almanac has been more than just a guide—it’s been a companion for households across the country. Families have consulted it for planting schedules, fishing trips, and even life milestones, following its guidance based on sunspots, lunar cycles, and planetary positions. Its pages offered a mix of practical tips, trivia, jokes, and even natural remedies, creating a charming blend of wisdom and entertainment.

The final 2026 edition promises a “wild ride” for winter 2025-2026, predicting dramatic swings in weather, including cold spells, snow, and repeated chill cycles, especially across the Northern Plains to New England. The cover reflects the Almanac’s broad readership, featuring both a classic farmhouse and a cityscape to appeal to urban and rural readers alike.

While the Farmer’s Almanac closes its doors, its legacy will live on in the memories of those who grew up reading it and in the countless ways it guided people through seasons and life events. Fortunately, fans of time-tested wisdom and practical guidance still have the Old Farmer’s Almanac, which continues to publish annually, offering gardening advice, seasonal forecasts, and folklore with modern tools and digital resources.

The end of the Farmer’s Almanac reminds us of the enduring value of trusted, time-tested guidance. Even in a rapidly changing world, its spirit of curiosity, practical knowledge, and connection to nature will continue to inspire those who cherish its legacy.

https://amzn.to/3JNuTHM

A Fond Farewell

Fresh from Our Garden: Stuffed Eggplant Parmesan Is on the Menu Tonight!

There’s something deeply satisfying about cooking with ingredients grown right in your own garden. Tonight’s dinner is a perfect example—Stuffed Eggplant Parmesan, made fresh with homegrown eggplants, herbs, and tomatoes.

The eggplants were picked this morning—firm, glossy, and full of flavor. After a quick rinse, they’re halved, roasted until tender, and filled with a delicious mixture of sautéed onions, garlic, garden-fresh tomatoes, and a sprinkle of basil and oregano straight from the herb bed. A layer of mozzarella and Parmesan cheese brings everything together in bubbly, golden perfection.

Cooking from the garden isn’t just about flavor—it’s about connection. You know where your food came from, how it was grown, and the care that went into it. Every bite carries the reward of patience and love.

So tonight, the kitchen smells like summer. The garden has given us another reason to be thankful

https://amzn.to/474dyU2

Herb scissors set provides a pair of herb shears, a herb stripper, and a peeler with three different blades. They can help you easily handle a large number of kitchen tasks, such as cutting meat, turkey, and poultry bones. You can not only use it to cut various vegetables, herbs, fruits, cut noodles and even pizza, but also peel potatoes, carrots, zucchini, cucumbers, apples, and avocados. No chopping boards and choppers are needed, bringing more convenience to your kitchen work.

The Perfect Garden Sprayer for Every Project

When it comes to caring for your garden, having the right tools makes all the difference—and a reliable garden sprayer is one of those must-haves. Whether you’re tackling weeds, applying pest control, or simply giving your plants a good soak, this garden sprayer is designed to make the job easy and efficient.

Made from rust-free polyethylene, the tank is translucent, so you can easily check fluid levels without guesswork. That means fewer interruptions and more time doing what you love—nurturing your garden.

This versatile sprayer is perfect for a variety of projects:

  • Treating your lawn and garden with fertilizer or weed control.
  • Spraying pest chemicals to protect your plants naturally.
  • Watering vegetable gardens, hanging plants, or patio greenery.

Whether you’re a seasoned gardener or just starting out, this garden sprayer is durable, easy to use, and built to handle any task around your home. Reliable tools  make gardening easier—

https://amzn.to/4hnlOSt

  • 1-Gallon poly tank
  • In-tank filter helps prevent dirt and debris from interfering with the application
  • Ergonomic pump handle helps prevent hand fatigue
  • Poly wand with comfortable trigger shut-off

Preserving the Harvest: The Art of Pickling

Pickling is a time-honored tradition that has been around for centuries. It’s a process that involves preserving food in vinegar or brine, giving it a tangy, sour flavor that can be enjoyed in a variety of ways. From dill pickles to pickled eggs, pickling is a fun and easy way to add flavor and nutrition to your diet.

To start pickling, you’ll need some basic ingredients: vinegar, salt, sugar, and spices. The type of vinegar you use can vary depending on your personal preference, but most recipes call for either white vinegar or apple cider vinegar. Salt and sugar help to balance the flavors and preserve the food, while spices like dill, garlic, and mustard seeds add extra flavor.

One of the most popular pickling recipes is for dill pickles. To make these, you’ll need cucumbers, vinegar, water, salt, sugar, dill, garlic, and mustard seeds. First, slice the cucumbers into spears or rounds and pack them into sterilized jars. Next, mix together the vinegar, water, salt, sugar, dill, garlic, and mustard seeds in a saucepan and bring the mixture to a boil. Once the mixture is boiling, pour it over the cucumbers in the jars and seal the jars tightly. Let the pickles sit for at least 24 hours before eating to allow the flavors to fully develop.

One of the great things about pickling is that you can experiment with different flavors and ingredients to create your own unique recipes. Try pickling other vegetables like carrots, beets, or green beans, or add different spices like cinnamon or cloves for a unique twist. You can also play around with the ratio of vinegar, salt, and sugar to create your desired flavor profile.


“The Joy of Pickling” by Linda Ziedrich: This classic cookbook is a must-have for anyone interested in pickling. It features over 250 recipes for pickled vegetables, fruits, and relishes, as well as tips on equipment, techniques, and troubleshooting:  https://amzn.to/3KTwMmM


“The Complete Book of Pickling” by Jennifer MacKenzie: This comprehensive guide covers all aspects of pickling, from the basics of canning to more advanced techniques like fermenting and curing. It also includes over 300 recipes for pickled fruits, vegetables, meats, and fish.

https://amzn.to/4nfcb9P

The Rewarding Feeling of Hard Work

There’s something uniquely satisfying about working hard. When we dedicate ourselves to a goal or task and see it through, a sense of pride and accomplishment washes over us. That feeling is even more powerful when we’ve faced challenges or obstacles along the way.

Hard work doesn’t just deliver results—it gives our lives purpose and meaning. Having a goal to work toward provides direction and focus, helping us stay motivated and energized each day. It turns ordinary tasks into opportunities for growth and progress.

Moreover, consistent effort builds resilience and perseverance. Setbacks and failures are inevitable, but pushing through them strengthens our confidence and prepares us to handle future challenges. The more we embrace hard work, the more we learn about our capabilities, and the more empowered we feel.

In the end, it’s not just the achievements themselves—it’s the journey, the effort, and the growth that make hard work one of life’s most rewarding experiences.