The Perfect Garden Sprayer for Every Project

When it comes to caring for your garden, having the right tools makes all the difference—and a reliable garden sprayer is one of those must-haves. Whether you’re tackling weeds, applying pest control, or simply giving your plants a good soak, this garden sprayer is designed to make the job easy and efficient.

Made from rust-free polyethylene, the tank is translucent, so you can easily check fluid levels without guesswork. That means fewer interruptions and more time doing what you love—nurturing your garden.

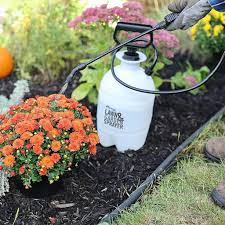
This versatile sprayer is perfect for a variety of projects:

  • Treating your lawn and garden with fertilizer or weed control.
  • Spraying pest chemicals to protect your plants naturally.
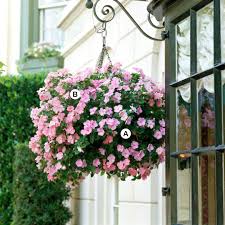
  • Watering vegetable gardens, hanging plants, or patio greenery.

Whether you’re a seasoned gardener or just starting out, this garden sprayer is durable, easy to use, and built to handle any task around your home. Reliable tools  make gardening easier—
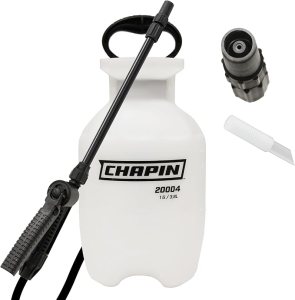
https://amzn.to/4hnlOSt

  • 1-Gallon poly tank
  • In-tank filter helps prevent dirt and debris from interfering with the application
  • Ergonomic pump handle helps prevent hand fatigue
  • Poly wand with comfortable trigger shut-off

Preserving the Harvest: The Art of Pickling

Pickling is a time-honored tradition that has been around for centuries. It’s a process that involves preserving food in vinegar or brine, giving it a tangy, sour flavor that can be enjoyed in a variety of ways. From dill pickles to pickled eggs, pickling is a fun and easy way to add flavor and nutrition to your diet.

To start pickling, you’ll need some basic ingredients: vinegar, salt, sugar, and spices. The type of vinegar you use can vary depending on your personal preference, but most recipes call for either white vinegar or apple cider vinegar. Salt and sugar help to balance the flavors and preserve the food, while spices like dill, garlic, and mustard seeds add extra flavor.

One of the most popular pickling recipes is for dill pickles. To make these, you’ll need cucumbers, vinegar, water, salt, sugar, dill, garlic, and mustard seeds. First, slice the cucumbers into spears or rounds and pack them into sterilized jars. Next, mix together the vinegar, water, salt, sugar, dill, garlic, and mustard seeds in a saucepan and bring the mixture to a boil. Once the mixture is boiling, pour it over the cucumbers in the jars and seal the jars tightly. Let the pickles sit for at least 24 hours before eating to allow the flavors to fully develop.

One of the great things about pickling is that you can experiment with different flavors and ingredients to create your own unique recipes. Try pickling other vegetables like carrots, beets, or green beans, or add different spices like cinnamon or cloves for a unique twist. You can also play around with the ratio of vinegar, salt, and sugar to create your desired flavor profile.


“The Joy of Pickling” by Linda Ziedrich: This classic cookbook is a must-have for anyone interested in pickling. It features over 250 recipes for pickled vegetables, fruits, and relishes, as well as tips on equipment, techniques, and troubleshooting:  https://amzn.to/3KTwMmM


“The Complete Book of Pickling” by Jennifer MacKenzie: This comprehensive guide covers all aspects of pickling, from the basics of canning to more advanced techniques like fermenting and curing. It also includes over 300 recipes for pickled fruits, vegetables, meats, and fish.

https://amzn.to/4nfcb9P

The Rewarding Feeling of Hard Work

There’s something uniquely satisfying about working hard. When we dedicate ourselves to a goal or task and see it through, a sense of pride and accomplishment washes over us. That feeling is even more powerful when we’ve faced challenges or obstacles along the way.

Hard work doesn’t just deliver results—it gives our lives purpose and meaning. Having a goal to work toward provides direction and focus, helping us stay motivated and energized each day. It turns ordinary tasks into opportunities for growth and progress.

Moreover, consistent effort builds resilience and perseverance. Setbacks and failures are inevitable, but pushing through them strengthens our confidence and prepares us to handle future challenges. The more we embrace hard work, the more we learn about our capabilities, and the more empowered we feel.

In the end, it’s not just the achievements themselves—it’s the journey, the effort, and the growth that make hard work one of life’s most rewarding experiences.


Making Sourdough Bread

I made the best sourdough bread yesterday and thought you might like more information on baking bread. Maybe you can learn to bake a loaf too and share it with a neighbor, family, or friends- it also makes the best toast for breakfast…yum!

I have been using, Artisan Sourdough Made Simple: A Beginner’s Guide to Delicious Handcrafted Bread with Minimal Kneading by Emilie Raffa to help in my bread-making journey. I have a Le Creuset Dutch Oven to cook the bread.

Le Creuset Enameled Cast Iron Signature Round Dutch Oven

https://amzn.to/46n3YeC


Artisan Sourdough Made Simple A Beginner’s Guide to Delicious Handcrafted Bread with Minimal Kneading

https://amzn.to/4gOTkRy

Garden Fresh Salsa: A Taste of Summer, Preserved

There’s something undeniably satisfying about growing your vegetables, plucking them straight from your garden, and turning them into a delicious salsa. But what happens when your garden’s bounty becomes too much to enjoy at once? Enter the world of homemade garden fresh salsa, a vibrant taste of summer, lovingly preserved to enjoy year-round.

The Garden’s Bounty:
When your garden is in full swing, it can feel like a race to savor each tomato, pepper, and onion at its peak. However, there comes a point when you have more than you can consume in one sitting. That’s where homemade salsa comes to the rescue.

The Raw, Fresh Advantage:
Unlike cooked salsa, which can alter the flavor and texture of your garden’s treasures, raw salsa retains the essence of each ingredient. The crispness of freshly harvested vegetables shines through, offering a burst of flavor in every bite.

The Preservation Process:
To ensure you can enjoy your garden’s salsa long after the harvest season has ended, consider vacuum-sealing it and storing it in the freezer. This method locks in the salsa’s freshness, preserving its vibrant colors and flavors.

Versatility at Its Best:
Homemade salsa is incredibly versatile. It’s not just a dip for tortilla chips; it can be a topping for grilled chicken, a filling for tacos, or a zesty addition to scrambled eggs. With your garden fresh salsa at the ready, your culinary options are endless.

A Taste of Summer Year-Round:
In the depths of winter, when your garden lies dormant under a blanket of snow, you can open your freezer and find a taste of summer waiting for you. Each spoonful of your homemade garden fresh salsa will transport you back to those sunny days in the garden, a reminder of the joy of growing and savoring your own produce.

So, the next time your garden overflows with ripe tomatoes, peppers, and onions, consider whipping up a batch of homemade garden fresh salsa. With a little effort in the preservation process, you can enjoy the flavors of your garden throughout the year, bringing a taste of summer to even the coldest of days.  #GardenFreshSalsa #PreservationJoy #TasteOfSummer

https://www.kimscravings.com/best-damn-salsa-ever/

https://amzn.to/46usjxG

https://amzn.to/46CWkM1

Copycat Recipes: Bringing Your Favorite Baked Goods Home

There’s something magical about walking into your favorite bakery—the smell of fresh bread, the sight of golden cookies, the taste of a perfectly flaky pastry. But what if you could bring that magic into your own kitchen? That’s where copycat recipes come in.

Copycat recipes are all about recreating the flavors you love from restaurants and bakeries right at home. Not only is it fun, but it can also save money, let you control the ingredients, and give you the satisfaction of baking something delicious from scratch.

Maybe it’s that famous chocolate chip cookie you can never resist, a cinnamon roll that’s perfectly gooey, or a loaf of bread that tastes like it came straight from a bakery case. With a little trial and error (and maybe a few taste tests along the way), you can get surprisingly close to the original.

Here are a few reasons to try copycat baking:

  • Creativity in the kitchen – Test your skills and experiment with flavors.

  • Healthier tweaks – Adjust sugar, flour, or fats to fit your lifestyle.

  • A fun family project – Bake together and see whose version tastes the best.

  • That “nailed it” moment – Nothing beats pulling out a tray and realizing you’ve recreated your favorite treat.

Next time a craving hits, don’t just drive to the bakery—challenge yourself to recreate it. Who knows? You might just discover your homemade version tastes even better.

Copycat Starbucks Pumpkin Cream Cheese Muffins

Ingredients:

  • 1 3/4 cups all-purpose flour

  • 1 cup sugar

  • 1/2 cup vegetable oil

  • 2 eggs

  • 1 cup canned pumpkin puree

  • 1 tsp baking soda

  • 1/2 tsp baking powder

  • 1/2 tsp salt

  • 1 tsp cinnamon

  • 1/2 tsp nutmeg

  • 1/4 tsp cloves

  • 1/4 tsp ginger

Cream Cheese Filling:

  • 4 oz cream cheese, softened

  • 1/4 cup sugar

  • 1/2 tsp vanilla extract

Topping:

  • Pumpkin seeds (pepitas)

Instructions:

  1. Preheat oven to 350°F (175°C). Line a muffin tin with paper liners.

  2. In a bowl, whisk together flour, baking soda, baking powder, salt, and spices.

  3. In another bowl, mix sugar, oil, eggs, and pumpkin puree until smooth. Combine wet and dry ingredients.

  4. Fill muffin cups about 3/4 full.

  5. Mix cream cheese, sugar, and vanilla until smooth. Drop a spoonful into the center of each muffin.

  6. Sprinkle with pumpkin seeds.

  7. Bake for 18–20 minutes, until a toothpick (avoiding the cream cheese center) comes out clean.

  8. Cool slightly and enjoy warm—or store in the fridge for a chilled trea

https://amzn.to/428r9H5

From Garden to Table: Making Yummy Pasta Sauce with Fresh Ingredients

There’s something special about sitting down to a plate of pasta covered in sauce made from ingredients you grew yourself. The taste is richer, the colors brighter, and the satisfaction unbeatable. Turning your garden harvest into a delicious pasta sauce isn’t just cooking—it’s celebrating your hard work.

Start with the Tomatoes

The base of any good pasta sauce is tomatoes. If your garden gave you a bumper crop, you’re in luck! Roma or plum tomatoes work best because they’re meaty and less watery. Simply roast or simmer them down until they release their natural sweetness.

Add Fresh Herbs

This is where your garden shines. Basil, oregano, thyme, and parsley bring depth and freshness you just can’t buy in a jar. Toss them in at different stages—oregano and thyme early for bold flavor, basil at the end for that bright, fragrant finish.

Don’t Forget the Extras

Onions, garlic, and peppers make great supporting players. If you grew them in your garden, even better! Sauté them until golden before adding tomatoes. Want some spice? Add a pinch of red pepper flakes.

Simmer for Flavor

The secret to pasta sauce is patience. Letting your sauce simmer for at least 30–45 minutes helps all the flavors blend together. If you have time, go even longer—you’ll be rewarded with a rich, velvety sauce.

Enjoy the Harvest

Once your sauce is ready, ladle it over your favorite pasta, sprinkle with fresh Parmesan, and enjoy. You can even jar or freeze extra sauce so you’ll have a taste of summer long after the garden has gone to rest.

There’s nothing like the joy of a homemade meal that started as a seed in your backyard. It’s fresh, delicious, and a reminder that the best flavors come from your own hands.

Planting Spring Bulbs: A September Guide for Gardeners in USDA Zones 1–7

As summer winds down and the first hints of fall appear, it’s the perfect time to start thinking about your spring garden. For home gardeners in USDA Zones 1 through 7, September is the ideal month to plant spring bulbs like daffodils, tulips, and crocuses. With the right timing, your garden will burst into color when the weather warms again.

1. Check the Weather First

Before you dig, check your extended weather forecast. Spring bulbs need several weeks to develop roots before the ground freezes. Planting too late risks poor root development and weak blooms.

2. Avoid Too-Warm Soil

If your region is unusually warm in September, be cautious. Planting bulbs in overly warm soil can cause them to sprout early, making them vulnerable to frost and reducing their bloom potential.

3. Prepare Your Soil

Choose well-draining soil and a sunny or partially sunny spot. Loosen the ground and enrich it with compost or bulb fertilizer to give your bulbs the best start.

4. Plant at the Right Depth

As a general rule, plant bulbs about two to three times as deep as the bulb’s height. Tulips, daffodils, and hyacinths each have slightly different depth requirements, so follow the instructions for the specific variety you’re planting.

5. Water and Mulch

After planting, water bulbs thoroughly and add a layer of mulch to protect them from fluctuating fall temperatures. Mulch also helps retain moisture and discourages weeds.

Planting your spring bulbs in September gives them the time they need to root and thrive. By checking the forecast, avoiding overly warm soil, and planting properly, you’ll ensure a vibrant and colorful garden when spring arrives.

https://amzn.to/3I0ryV0

https://amzn.to/3UX27Xu

Keeping Hanging Baskets Happy in Hot Weather: Twice-a-Day Watering Tips

When summer turns up the heat, your hanging baskets can go from lush and perky to droopy and sad faster than you can say, “Where did all the water go?” Unlike plants in the ground, hanging baskets have less soil to hold moisture. Combine that with blazing sunshine and high temps, and you’ve got a recipe for rapid evaporation—and a stressed-out plant.

Why Hanging Baskets Need Extra Care in the Heat
During hot spells, it’s not unusual for hanging plants to need water twice a day. In the morning, before the day’s heat sets in, you’re giving them a head start. In the evening, you’re replenishing what they lost during the day. This routine keeps soil consistently moist, which is key to avoiding wilt, leaf drop, or worse—permanent damage.

Watering Smart: The Dos and Don’ts

  • Morning & Evening Routine: Water early and late to reduce evaporation.
  • Check Before You Pour: Stick your finger into the soil up to your second knuckle—if it feels dry, it’s time to water.
  • Go Deep: Water until you see it draining from the bottom of the basket so the entire root ball gets a drink.
  • Skip Peak Heat Watering: Midday watering often evaporates before it does any good.
  • Drainage Matters: Make sure your baskets have proper drainage holes to prevent root rot.

If your plants still seem thirsty no matter how often you water, try bottom watering. Place the basket in a shallow tub or saucer of water for about 30 minutes—this allows the roots to soak up what they need without splashing water everywhere.

With a little extra attention during heat waves, your hanging baskets can stay vibrant and healthy all season long. And trust me, it’s a lot more rewarding to see them thriving than to watch them droop in defeat.

After the Rain: The Perfect Time to Pull Weeds (Seriously, It’s Weirdly Satisfying)

You know that feeling when you’ve been trying to yank out a stubborn weed and it just will not budge—like it’s gripping the earth with all the strength of a toddler who doesn’t want to leave the park? Yeah, we’ve all been there.

But here’s the secret every gardener learns eventually: after a good rain, those weeds come out like butter.

I don’t mean a light mist or a few sprinkles—I’m talking about a real soaking. When the soil is moist, it softens its grip on the roots, and suddenly that annoying dandelion that’s been taunting you for weeks slides out in one smooth pull. Roots and all. It’s a little victory, and honestly? It feels amazing.

Why It Works:

Rain saturates the ground, loosening the soil around the base of weeds. This makes it easier to:

  • Remove the entire root (key to stopping regrowth).
  • Avoid breaking the weed at the stem (which just makes it come back angrier).
  • Save your wrists and back from unnecessary tugging and digging.

Bring a bucket or tarp with you after the rain and just go to town. Pull as many as you can while the ground is still damp. It’s oddly therapeutic, like nature’s way of letting you hit the reset button.

You’re giving your fall plants a better start by clearing space and reducing competition. Plus, the fewer weeds that go to seed now, the fewer headaches you’ll have next spring. It’s like doing your future self a solid.

Gardening isn’t always glamorous, but moments like this—where the work feels just a bit easier and the results are instant—remind you why it’s worth it. So the next time the rain stops, grab your gloves and get out there. The weeds won’t know what hit ’em.