Fall Flavors: Cooking with Pumpkin—Muffins, Cookies, Lattes & More!

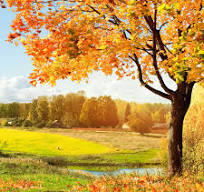
It’s that time of year again—leaves are changing, there’s a crisp chill in the air, and pumpkins are *everywhere*. Whether you’re a full-on pumpkin fanatic or just dabbling in the orange-hued world of fall flavors, there’s something cozy and comforting about cooking with pumpkin. So let’s talk pumpkin treats, shall we?

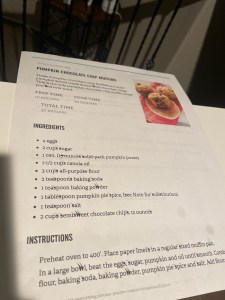
Pumpkin Muffins with Chocolate Chips: The MVP of Fall 🍫
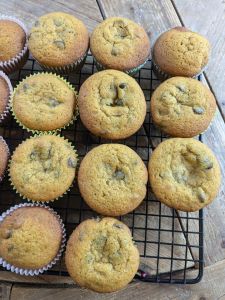
Ah, pumpkin muffins. Soft, warm, and the perfect snack for a chilly day. I’m personally a big fan of adding chocolate chips to the mix. There’s just something magical about the slightly bitter chocolate cutting through the sweet, spiced pumpkin. It’s the best of both worlds! Imagine a chilly Saturday morning with a hot coffee and a fresh pumpkin muffin—it’s practically fall in a bite.

And if you’re in the mood for something richer, top those muffins with a dollop of cream cheese frosting. It’s like a tiny pumpkin cheesecake in every bite. Just a heads-up: these don’t last long on the counter. One muffin quickly turns into two, and before you know it, you’re contemplating baking another batch.

Pumpkin Cookies: Soft, Chewy & Just Sweet Enough 🍪
For those who want pumpkin spice without the heaviness of a pie, pumpkin cookies are the answer. I like to add a hint of cinnamon and nutmeg, which pairs perfectly with a cup of tea or coffee. These cookies are soft, almost cake-like, with a little chew that makes them irresistible. If you’re feeling adventurous, toss in some chopped nuts or a sprinkle of sea salt for a little twist. These are perfect for sharing at fall gatherings—or, you know, hoarding all to yourself on the couch. No judgment!

Pumpkin Pie: The Classic Everyone Loves 🥧
Of course, we can’t forget the OG—pumpkin pie. This classic is a must at any Thanksgiving table and arguably the dessert of the season. Some swear by extra cinnamon; others add a pinch of cloves or ginger to spice things up. Whatever your style, pumpkin pie brings everyone together, whether you’re a whipped cream purist or go for that sprinkle of powdered sugar.

Pumpkin Spice Latte: The Controversial Hero ☕️
Now, here’s where it gets a little controversial: the pumpkin spice latte. Some folks wait all year for it; others can’t stand the thought. But whether you love it or hate it, the pumpkin spice latte is a fall icon. Personally, I enjoy one every now and then—it’s sweet, spicy, and tastes like autumn itself in a cup. And if PSLs aren’t your thing, pumpkin spice tea is a lighter option that still brings those fall vibes.

Or…Maybe You’re Just Not That Into Pumpkin? 😳
Not everyone is a fan of pumpkin, and that’s totally okay! Maybe apple cinnamon or caramel-flavored treats are more your jam. The beauty of fall is that it brings all kinds of cozy flavors to the table. And if pumpkin’s not for you, there are plenty of other ways to get into the seasonal spirit!

So, What’s Your Pumpkin Go-To?
Are you a pumpkin muffin lover, pie purist, or cookie fanatic? Or maybe you’re ready to try something new this fall? Whatever your preference, fall is the time to dive in and enjoy the flavors of the season.

So grab that can of pumpkin, preheat your oven, and let’s get baking! 🍂🎃

Now is Not the Time to Cut Back Your Plants: Why Patience Pays Off in the Garden

It’s fall. The air is crisp, leaves are turning, and the urge to tidy up your garden is almost irresistible. But, here’s a twist: now is *not* the time to cut back your plants. If you’re thinking, “But isn’t fall cleanup supposed to mean trimming back?”—you’re in good company! Let’s talk about why holding back that pruner might actually be the best thing you can do for your garden and its inhabitants.

Why Cutting Back Can Wait
We get it: when plants start to droop, with leaves drying up and flowers gone, it feels natural to clean them up and prepare for a neat winter landscape. But here’s the thing—many plants, including perennials, benefit from being left alone for a bit longer. Their foliage, seeds, and stems serve a purpose even when they look past their prime.

1. Protection Against the Cold
Those dried-out stems and leaves? They’re like a cozy winter coat for the plants. Left intact, they insulate roots from fluctuating temperatures, which can help perennial plants stay strong and resilient through winter.

2. Habitat for Wildlife
Birds, bees, and other beneficial insects rely on old foliage and dried-out plant material to find shelter and food during the colder months. Leaving those stems up provides winter refuge, and if you’re a fan of butterflies, this is great news. Some butterflies, like the mourning cloak, overwinter in plant debris, while others lay their eggs there to hatch in spring.

3. Natural Mulching and Soil Health
Letting plant matter decompose naturally over the winter months feeds your soil without any extra work on your part. As the stems and leaves break down, they enrich the soil with nutrients, reducing the need for extra fertilizer in the spring.

Which Plants Should Wait Until Spring?
If you’re wondering which plants benefit most from a no-trim policy, focus on perennials like ornamental grasses, coneflowers, and sedum. Their seed heads add a little winter interest to the garden, not to mention food for birds like finches. Roses, lavender, and other flowering plants can also benefit from being left alone, with their old stems providing frost protection and fostering growth in spring.

When to Make the Cut?
Of course, you don’t need to avoid your pruners forever. Early spring is the ideal time to trim back these plants. By then, any insects will have emerged, birds will have moved on, and the plants will be ready for their new growth to shine.

Practical Tips to Embrace the “No-Cut” Approach
– Trim Strategically: If a plant looks genuinely messy and bothers you, it’s okay to do a minimal cleanup. Just don’t cut too close to the ground.
– Leave Some Seed Heads: Plants like sunflowers and black-eyed Susans can be left alone for birds to snack on. Their seed heads look pretty against winter snow and bring activity to your garden.
– Consider the Beauty: There’s a unique beauty in the winter garden—soft grasses swaying in the wind, delicate frost on stems. Embrace this quieter beauty.

The Bottom Line: A Garden that Gives Back
Patience in gardening is a skill that pays off. By resisting the urge to cut back right now, you’re setting your plants up for stronger growth come spring, inviting wildlife to your garden, and allowing nature to do some of your work for you. Plus, isn’t it nice to have one less chore on the list?

Winter Gardening: Yes, You Can Grow Goodies in the Cold!

As winter approaches, you might find yourself staring at your garden, wondering if it’s time to hang up your gardening gloves until spring. But hold on! Just because it’s chilly outside doesn’t mean your gardening days are over. In fact, winter gardening can be a delightful adventure, allowing you to grow a variety of hearty crops that can thrive in the cold. So, grab your warmest jacket, and let’s dig into some winter-friendly options that will keep your green thumb busy even when the snowflakes start to fall!

The Winter Wonder Crops

1. Kale
Ah, kale—the superstar of winter veggies! This leafy green not only withstands frost but often gets sweeter after a cold snap. Toss it in salads, smoothies, or soups, and feel like a nutritional champion. Trust me; your body will thank you!

2. Spinach
Spinach is like that reliable friend who always shows up. It loves cool weather and can keep growing throughout the winter. If you cover it with row covers or a simple cold frame, you’ll be enjoying fresh spinach for salads and sautéing all season long.

3. Garlic
Planting garlic in the fall is like giving yourself a delicious gift for the future. It requires minimal care during the winter, and come late spring or early summer, you’ll have fresh bulbs ready for your culinary creations. Nothing says “gourmet chef” like homegrown garlic!

4. Brussels Sprouts
These little green orbs might be the underdogs of the vegetable world, but they shine in winter gardens. Frost actually enhances their flavor, making them sweeter and more delectable. Just remember to harvest them before they bolt in the spring, or you’ll end up with some wild-looking plants!

5. Carrots
Carrots are like those friends who can withstand anything. Sown in late summer or fall, they can be left in the ground throughout winter. After a frost, they taste even sweeter! Just be sure to mulch well to protect them from harsh conditions.

6. Winter Onions
Planting onions in the fall for a summer harvest is a no-brainer. They’re low-maintenance and very forgiving. You’ll be amazed at how satisfying it is to pull fresh onions from the ground when the weather warms up.

7. Cabbage
Cabbage can handle winter’s chill, especially varieties like Savoy. These leafy beauties can survive frosty nights with a little protection, allowing you to enjoy them in hearty winter dishes.

8. Herbs
While many herbs might struggle in the cold, hardy varieties like thyme, rosemary, and parsley can be grown indoors or survive mild winters outdoors with some cover. They’ll add fresh flavor to your winter cooking, no need for a grocery run!

9. Cover Crops
If you’re not ready to plant veggies, consider sowing cover crops like clover or rye. They help improve soil health and prevent erosion, preparing your garden for a bountiful spring.

Tips for Successful Winter Gardening

– Use Cold Frames: Cold frames act like mini-greenhouses, providing shelter from harsh winds and frost. They allow you to extend your growing season and keep your plants cozy.

– Mulch Wisely: A thick layer of mulch not only insulates your plants but also retains soil moisture. It’s like a warm blanket for your garden!

– Choose Hardy Varieties:When selecting plants, look for varieties that are specifically bred for colder climates. They’ll be your best allies in the winter garden.

The Joy of Winter Gardening

Winter gardening can be incredibly rewarding. Not only does it keep your hands dirty and your mind engaged, but it also offers fresh produce even when the world outside is a snowy wonderland. So, whether you’re channeling your inner farmer or simply looking to enjoy the fruits (or veggies!) of your labor, winter gardening is the perfect way to stay connected to nature during the colder months.

Holiday Cooking: How a Digital Spatula Thermometer Can Save Your Sweet Treats and Holiday Feasts

As the holidays roll around and the kitchen starts heating up, we all know what’s coming—endless rounds of cookies, candy-making marathons, and big family dinners. It’s the time of year when the oven is always on, and you suddenly become a mix of Julia Child and a mad scientist. There’s nothing quite like the chaos of the holiday kitchen, but having the right tools on hand makes it a little more fun—and a lot less stressful.

Enter: the Digital LCD Candy Spatula Thermometer. Sounds fancy, right? Well, it kind of is. If you’ve ever tried to make candy or check the temperature of a roast without a trusty thermometer, you know that the margin for error is about as thin as a filo dough sheet. This little gadget is not just any thermometer, though—it’s an instant-read meat and candy thermometer, stirrer, and spatula all in one. BPA-free and made of food-grade silicone, it’s basically the Swiss Army knife of kitchen tools.

The Struggle is Real

I’ll admit it—candy-making used to intimidate me. The first time I tried making homemade caramel, I ended up with a pot full of what I can only describe as caramel-flavored concrete. That’s when I realized, maybe I need some help in the precision department. You can’t just wing it when it comes to candy temperatures, and the “soft ball stage” doesn’t mean it’ll feel like a soft ball; it’s about chemistry, folks!

That’s where the Digital Candy Thermometer has saved my holiday sanity. You can stir while checking the temperature, which means no more burnt hands from trying to multitask with a spoon and an old-school mercury thermometer. Plus, there’s something satisfying about watching those digital numbers climb as you get closer to the perfect temperature for fudge, caramel, or divinity (anyone else’s grandma still make divinity?).

The Roast Beast Test

But wait, it’s not just for sweets! This spatula thermometer also works for meats, which is a game-changer for holiday roasts. Forget cutting into the turkey to “see if it’s done” and watching all the juices run out. Just poke this thermometer in and get an instant read on the temperature without missing a beat.

The holidays are stressful enough without worrying about undercooked (or overcooked) main dishes. And let’s be real—there’s no faster way to derail a holiday feast than to serve a dry turkey. Trust me, nobody will remember the perfect mashed potatoes if the bird’s a bust.

Why You’ll Love It

If you’re like me and like to keep things simple yet effective in the kitchen, this gadget will fit right in with your holiday routine. It’s one of those small investments that make a big difference. You’ll save time, stress, and a whole lot of guessing games when it comes to getting your recipes just right.

I like to think of it as my little sous chef—quiet, dependable, and always ready to lend a (silicone) hand. And the best part? No more failed fudge or overdone turkey. It’s foolproof, which is exactly what I need when I’m juggling cookie trays and holiday guests who show up early.

The Holidays are Coming—Be Ready!

Because who has time for kitchen disasters when there are gifts to wrap and holiday movies to binge? Happy cooking—and may your thermometer always read “just right!”

https://amzn.to/3YnX2tE

The Viral Cucumber Salad Trend: Refreshing Simplicity

In the ever-evolving world of food trends, some dishes capture our taste buds with their simplicity and refreshing flavors. One such recipe that has taken TikTok by storm is the viral cucumber salad created by Logan Moffitt. With its light ingredients and easy preparation, this salad has quickly become a summer favorite.

The Recipe

At the heart of this trend is a deceptively simple cucumber salad. Logan Moffitt’s recipe combines sliced cucumbers with a zesty mix of rice vinegar, sugar, and salt. The result is a crisp, tangy salad that offers a delightful contrast to heavier summer fare. To elevate the flavors, the salad is topped with sesame seeds and fresh herbs, adding an extra layer of texture and freshness.

Ingredients:
– Cucumbers
– Rice vinegar
– Sugar
– Salt
– Sesame seeds
– Fresh herbs (optional)

Preparation:
1. Slice the cucumbers thinly.
2. In a bowl, mix rice vinegar, sugar, and salt until dissolved.
3. Toss the cucumber slices in the mixture.
4. Top with sesame seeds and fresh herbs if desired.

Why It’s Going Viral

The allure of this cucumber salad lies in its simplicity. With just a few ingredients and minimal prep time, it’s an accessible recipe that fits seamlessly into any summer menu. The salad’s bright, tangy flavor is perfect for hot days when you crave something light yet satisfying.

Moffitt’s video showcased the salad’s vibrant colors and ease of preparation, enticing viewers to try it themselves. The trend has inspired countless users to share their own versions, creating a ripple effect of culinary creativity.

Why You Should Try It

If you haven’t yet jumped on the cucumber salad bandwagon, now is the perfect time. This recipe offers a great way to enjoy fresh produce in a new and exciting way. Whether you’re looking for a quick side dish for a barbecue or a refreshing snack on a warm day, this salad is sure to satisfy.

Moreover, the simplicity of the recipe makes it a great canvas for experimentation. Feel free to add your favorite herbs or spices to customize the flavor to your liking. The basic concept of the salad provides a foundation that can be adapted to suit various tastes and preferences.

The viral cucumber salad by Logan Moffitt is a testament to the power of social media in shaping our food culture. Its rise to fame highlights how even the simplest recipes can capture our attention and become beloved favorites. So, grab some cucumbers, mix up a tangy dressing, and enjoy a taste of this refreshing trend.

https://www.today.com/food/trends/viral-cucumber-salad-tiktok-logan-moffitt-rcna165586


https://amzn.to/4ehqfLQ


https://amzn.to/3Zi6z6o

The Wonders of Beeswax: Nature’s Versatile Gift from the Bees

Beeswax is one of nature’s most incredible byproducts, gifted to us by the hard-working honeybees. While honey often takes the spotlight, beeswax is a powerhouse of its own with a wide range of uses. Whether you’re looking to use beeswax in your home or turn it into natural products to sell, there’s no shortage of ways to benefit from this golden treasure.

In a world where there is growing demand for natural and sustainable products, beeswax stands out as an eco-friendly and versatile option. Let’s dive into the many uses of beeswax and how you can incorporate it into your lifestyle or business.

What is Beeswax?

Beeswax is a natural substance produced by worker honeybees to build the honeycomb structure of their hives. It’s a complex mix of compounds, including long-chain fatty acids, esters, and hydrocarbons. As the bees secrete wax from glands on their abdomens, they use it to form hexagonal honeycomb cells, which serve as storage for honey and as nurseries for their larvae.

Once the honey is harvested, the beeswax can be collected and purified, creating a golden-yellow wax that has countless applications.

The Many Uses of Beeswax

1. Natural Skincare Products
Beeswax is a popular ingredient in natural skincare products, thanks to its moisturizing properties and ability to form a protective barrier on the skin. It’s commonly found in lip balms, lotions, salves, and creams. Beeswax locks in moisture without clogging pores, making it ideal for dry or sensitive skin.

2. Eco-Friendly Candles
Beeswax candles are prized for their clean burn and pleasant, natural honey scent. Unlike paraffin candles, which are made from petroleum, beeswax candles are all-natural, non-toxic, and release negative ions that help purify the air. They’re perfect for creating a warm and inviting atmosphere in your home while reducing indoor pollutants.

3. Beeswax Wraps: A Sustainable Alternative to Plastic
Tired of using plastic wrap? Beeswax wraps are an eco-friendly, reusable alternative to single-use plastic. These wraps are made by coating fabric with beeswax, providing a flexible and breathable covering for food storage. They can be used to wrap sandwiches, cover bowls, and store produce, helping to reduce your plastic waste.

4. Polishing and Woodcare
Beeswax is an excellent natural wood polish, giving furniture a soft sheen while protecting it from moisture. It can be used to condition wooden cutting boards, countertops, and even leather goods. The wax penetrates the wood, bringing out its natural beauty while adding a layer of protection.

5. Beeswax Crayons
For parents and educators seeking non-toxic art supplies, beeswax crayons are a great option. These crayons are durable, easy to grip, and provide vibrant colors without any harmful chemicals, making them a safe choice for kids.

6. DIY Beeswax Projects
If you’re a DIY enthusiast, beeswax is a dream material. From making your own lip balms and salves to crafting homemade candles, the possibilities are endless. Beeswax is easy to melt and mold, making it ideal for personal projects or even small business ventures.

Making Beeswax Products to Sell

With the increasing demand for natural, sustainable products, making beeswax-based items to sell can be a lucrative and rewarding endeavor. Here are a few ideas to consider:

– Beeswax Candles: Handcrafted beeswax candles are always in demand, and you can experiment with different shapes, sizes, and even essential oils to create unique offerings.
– Lip Balms and Lotions: Start small with a line of natural skincare products using beeswax as the base. These can be a hit at farmers’ markets or online stores.
– Beeswax Wraps:  As people seek to reduce their plastic use, beeswax wraps have become popular. You can create stylish, sustainable wraps in various sizes and patterns.

With a bit of creativity and effort, you can turn beeswax into a thriving business while promoting sustainability and eco-conscious living.

Why Choose Beeswax?

Beyond its versatility, beeswax has some incredible benefits:
– Eco-Friendly: Beeswax is 100% natural and biodegradable. Unlike synthetic alternatives, it doesn’t contribute to environmental pollution.
– Sustainable: Bees produce beeswax as part of their natural process, making it a renewable resource.
– Non-Toxic: Whether you’re using it in skincare, candles, or food wraps, beeswax is safe and non-toxic, making it a healthier option for your home and family.

Whether you’re looking to embrace a more natural lifestyle or start a small business selling handmade products, beeswax is a wonderful and versatile material to work with. From skincare to candles, food wraps to furniture polish, the possibilities are endless.

If you’re interested in using beeswax, remember to source it from responsible and sustainable beekeepers who prioritize the health and well-being of their bees.

Disclaimer:
Before using any beeswax products on your skin, especially if you have allergies or sensitive skin, it’s best to consult your doctor. Always ensure that you’re using pure, high-quality beeswax from a trusted source.

https://www.thefarmerscupboard.com/blogs/bees-honey/where-buy-beeswaxBeeswax is nature’s gift with endless uses!

The Cycle of Life: Planting, Growing, Harvesting, and Resting

Gardening, in its essence, is a reflection of the life cycle, providing profound insights into the rhythms of existence. As we dig into the soil, plant seeds, nurture growth, harvest the fruits of our labor, and finally, let the land rest, we are not merely tending to our gardens—we are connecting with the natural cycle that mirrors our own life journey.

Planting: The Beginning

Planting represents the start of something new—a dream, a goal, or a phase in life. Just as we carefully select seeds and prepare the soil, we must also prepare ourselves when embarking on a new venture. It’s about setting intentions, laying the groundwork, and trusting in the potential that lies within small beginnings.

In life, planting seeds might mean starting a new project, learning a new skill, or setting a personal goal. It’s a time of hope, anticipation, and faith that the small actions we take today will yield a bountiful harvest in the future.

Growing: Nurturing Progress

Once the seeds are planted, the process of growth begins. This stage requires patience, dedication, and care. Just as plants need water, sunlight, and nutrients, our dreams and goals need consistent effort, learning, and adaptation. Growth is not always visible immediately, and often, the most important developments happen beneath the surface.

In our lives, the growth phase might be challenging. It’s the period where we face obstacles, learn from failures, and continue to nurture our ambitions despite setbacks. But with perseverance, we see progress—whether it’s in personal development, relationships, or career achievements.

Harvesting: Reaping Fulfillment

The harvest is the reward for our hard work. In gardening, this is the time to enjoy the fruits, vegetables, or flowers that have flourished from our efforts. It’s a moment of fulfillment, satisfaction, and gratitude. We celebrate the abundance that comes from our dedication and patience.

In life, the harvest might come in the form of achieving a long-term goal, enjoying the results of personal growth, or experiencing success in our endeavors. It’s important to take time to appreciate these moments, to celebrate the wins, and to share the abundance with others.

Resting: The Essential Pause

After the harvest, the land needs to rest. The soil must be allowed to rejuvenate, to regain its nutrients, and prepare for the next cycle. This period of rest is as crucial as any other stage. It’s in the pause that renewal occurs, setting the stage for new beginnings.

In our own lives, rest is often overlooked but essential. After periods of intense work or growth, taking time to rest, reflect, and rejuvenate is vital. It’s during rest that we gain perspective, recharge our energy, and prepare ourselves for the next cycle of life.

Embracing the Cycle

The cycle of life—planting, growing, harvesting, and resting—teaches us the importance of balance. Each stage has its own purpose and beauty, and by embracing this natural rhythm, we can find greater fulfillment and peace in our lives. Just as in gardening, where each season has its role, in life, every phase is necessary and valuable. As we move through the cycles of our own journey, may we learn to plant with intention, grow with perseverance, harvest with gratitude, and rest with purpose.

Easy-to-Grow Plants for Your Garden: Start with Lettuce and More

Starting a garden can feel overwhelming, especially if you’re new to gardening or unsure about what to plant. The good news is that some plants are incredibly easy to grow, making them perfect for beginners or those looking to expand their gardening skills without much hassle. One of the best choices to start with is lettuce, a versatile and fast-growing plant that requires minimal effort. Let’s explore why lettuce and a few other plants are perfect for beginners and how you can easily grow them in your garden.

1. Lettuce: The Perfect Starter Plant

Lettuce is one of the most forgiving plants to grow, making it ideal for new gardeners. Here’s why lettuce is a great choice:

– Quick Growth: Lettuce has a relatively short growing period. Some varieties can be harvested in as little as 30 days, allowing you to enjoy fresh greens soon after planting.

– Low Maintenance: Lettuce doesn’t require much attention. It thrives in cooler weather and can be planted in both spring and fall. Plus, it’s resistant to many common pests, especially if grown in a well-prepared garden bed or container.

– Continuous Harvest: With lettuce, you can use the “cut-and-come-again” method. This means you can harvest outer leaves as needed, and the plant will continue to produce more. This makes it a sustainable choice for fresh salads throughout the season.

– Variety of Choices: There are many types of lettuce, from romaine to butterhead to leaf lettuce, allowing you to experiment with different flavors and textures.

2. Radishes: Quick and Rewarding

Radishes are another great option for beginner gardeners. They grow quickly, with some varieties maturing in just 3-4 weeks. Radishes thrive in cooler weather and can be planted in early spring or fall. They are also a great way to add some color and spice to your garden and meals.

3. Spinach: Nutrient-Packed and Easy to Grow

Spinach is not only easy to grow but also packed with nutrients. It grows well in cool weather and can be planted in early spring or fall. Spinach leaves can be harvested as they grow, providing a steady supply of fresh greens for salads, smoothies, and cooking.

4. Cherry Tomatoes: Little Gems for Your Garden

Cherry tomatoes are perfect for those looking to grow their own tomatoes without the fuss. They require minimal space and can even be grown in containers. Once they start producing, cherry tomatoes offer a bountiful harvest throughout the summer with little effort.

5. Herbs: Basil, Mint, and More

Herbs like basil and mint are easy to grow and can thrive in pots or garden beds. They require little space and provide fresh flavors for cooking. Basil enjoys the warm summer months, while mint is quite hardy and can grow in a variety of conditions.

Tips for Growing Easy Plants in Your Garden

1. Choose the Right Location: Most easy-to-grow plants need plenty of sunlight. Choose a spot in your garden that receives at least 4-6 hours of sun each day.

2. Prepare the Soil: Good soil is key to a healthy garden. Use well-draining soil enriched with compost or organic matter to provide the nutrients your plants need.

3. Water Regularly but Wisely: While these plants are low-maintenance, they still need consistent watering. Water deeply but less frequently to encourage deep root growth.

4. Protect from Pests: Although many easy-to-grow plants are resistant to pests, it’s always a good idea to keep an eye out for any signs of trouble. Simple measures like row covers or natural repellents can help protect your plants.

5. Harvest Often: Regular harvesting encourages plants like lettuce and herbs to continue producing. Enjoy the fruits (and vegetables) of your labor as often as possible!

Starting a garden doesn’t have to be intimidating. By choosing easy-to-grow plants like lettuce, radishes, spinach, cherry tomatoes, and herbs, you can enjoy the benefits of home-grown produce with minimal effort. These plants are perfect for beginners, providing a great introduction to gardening that’s both fun and rewarding.

The Value of Preparation: Cultivating Success in Your Garden and Life

In gardening, as in life, success often depends on the groundwork you lay before the first visible signs of progress. Just as a bountiful harvest is the result of careful soil preparation and thoughtful garden planning, the achievements in our personal and professional lives are often rooted in how well we prepare.

Preparing the Soil: The Foundation of Growth

The soil is the foundation of any garden. Before planting, it’s essential to ensure that the soil is rich in nutrients, well-drained, and suitable for the types of plants you want to grow. This preparation might involve testing the soil’s pH, adding compost or fertilizer, and removing weeds or rocks that could hinder growth. Without this careful preparation, even the best seeds may fail to thrive.

In life, preparing the “soil” is equally important. Whether you’re starting a new project, pursuing a career goal, or embarking on a personal journey, the success of your endeavor often depends on how well you prepare. This might mean acquiring new skills, gathering resources, or simply taking the time to understand the challenges ahead. Just like in gardening, a solid foundation increases the chances of success.

Planning the Garden Layout: A Blueprint for Success

Once the soil is prepared, the next step is planning the garden layout. This involves deciding where each plant will go, taking into account factors like sunlight, water needs, and how much space each plant will require as it grows. A well-planned garden maximizes space, ensures that each plant has what it needs to thrive, and helps prevent problems like overcrowding or competition for resources.

In any endeavor, having a plan is crucial. Whether you’re managing a team, organizing an event, or pursuing a long-term goal, planning helps you allocate resources effectively, anticipate challenges, and stay focused on your objectives. Just as a well-planned garden leads to a more abundant harvest, a well-thought-out plan in life increases your chances of achieving your desired outcomes.

The Harvest: Reaping the Rewards of Preparation

When the time comes to harvest, the effort you put into preparing the soil and planning the garden layout pays off. A garden that has been carefully prepared and thoughtfully planned is more likely to produce healthy, abundant crops. The same principle applies in life: when you take the time to prepare and plan, you set yourself up for success.

The satisfaction of a bountiful harvest serves as a reminder of the value of preparation. It’s a testament to the idea that success is rarely accidental; it’s the result of careful planning, hard work, and consistent effort. Whether in the garden or in life, the rewards of preparation are well worth the time and energy invested.

Embrace the Power of Preparation

In both gardening and life, the importance of preparation cannot be overstated. By taking the time to prepare the soil and plan the garden layout, you set the stage for a successful harvest. Similarly, by preparing and planning in your personal and professional endeavors, you increase your chances of achieving your goals.

So, as you nurture your garden or pursue your dreams, remember that preparation is the key to success. Embrace the process, trust in your efforts, and look forward to reaping the rewards of your hard work. After all, a bountiful harvest is not just about the fruits and vegetables you grow—it’s about the growth and fulfillment you experience along the way.

Growing Tomatoes from a Sliced Tomato: A Step-by-Step Guide

Tomatoes are a staple in many gardens, prized for their juicy fruits and versatility in the kitchen. While most gardeners start with seeds or seedlings, did you know you can also grow a tomato plant from a sliced tomato? It’s a fun and simple way to propagate new plants, and you might be surprised at how effective it can be. Here’s a step-by-step guide to growing tomatoes from a sliced tomato.

1. Choose the Right Tomato

To begin, select a ripe, healthy tomato from which to harvest seeds. Heirloom varieties work particularly well because they produce seeds that will grow true to the parent plant. Avoid using tomatoes that are overripe or have signs of disease or decay.

2. Prepare the Tomato Slices

Cut the tomato into thick slices, about 1/4 to 1/2 inch thick. You should see the seeds embedded within the fleshy parts of the tomato. Each slice will contain several seeds, which will give you multiple opportunities to grow new plants.

3. Extract the Seeds

To increase your chances of success, it’s best to extract the seeds from the tomato slices. Here’s how:

– Place the tomato slices on a plate or tray.
– Let them sit for a few days until they start to dry out. This drying process helps the seeds to separate from the tomato flesh.
– Gently scrape the seeds off the slices using a spoon or knife.

4. Prepare the Seeds for Planting

Once you’ve extracted the seeds, it’s essential to clean them to remove any remaining tomato pulp. Here’s how:

– Place the seeds in a small bowl and cover them with water.
– Let the seeds soak for a day or two, stirring occasionally.
– After soaking, rinse the seeds thoroughly and spread them out on a paper towel to dry.

5. Plant the Seeds

After the seeds are dry, you’re ready to plant them. You can start them indoors or directly in the garden:

Indoor Planting:
– Fill seed trays or small pots with seed-starting mix.
– Sprinkle the tomato seeds on the surface of the soil and lightly cover them with a thin layer of soil.
– Water gently and place the trays or pots in a warm, sunny location or under grow lights.
– Keep the soil consistently moist but not waterlogged.
– The seeds should germinate within 1-2 weeks.

– Outdoor Planting:
– Prepare a garden bed with well-draining soil.
– Space the tomato slices evenly on the soil surface.
– Lightly cover the slices with a thin layer of soil.
– Water the area and keep it moist until the seeds begin to germinate.
– Thin out the seedlings once they are large enough to handle.

6. Transplanting Seedlings

Once the seedlings are a few inches tall and have developed their first set of true leaves, it’s time to transplant them into larger pots or directly into your garden:

– Potting Up: If you started the seeds indoors, transplant the seedlings into larger pots when they’re ready. Use a high-quality potting mix and ensure the pots have good drainage.
– Garden Transplanting: If you’re planting directly in the garden, choose a sunny spot with well-draining soil. Space the plants about 18-24 inches apart to allow for their growth.

Growing tomatoes from a sliced tomato is a rewarding and straightforward process. By following these steps, you can propagate new plants and enjoy a bountiful tomato harvest. Remember to be patient, as growing from slices takes time…