5 Vegetables You Can Harvest in 30 Days

Gardening can be incredibly rewarding, but not all vegetables take months to grow. If you’re looking for quick results, there are several veggies that you can harvest in as little as 30 days. Whether you’re a seasoned gardener or a beginner, these fast-growing vegetables are perfect for adding to your garden, especially when you’re in the mood for something fresh in a short amount of time.

Here are five vegetables that you can harvest in just 30 days:

1. Radishes

Radishes are one of the fastest-growing vegetables, and they thrive in cooler weather. You can typically harvest radishes in as little as 20 to 30 days, making them perfect for quick satisfaction. Radishes need well-drained soil, a spot with full sunlight, and consistent watering. You can sow them directly in the ground or in containers.

Pro Tip: For the best taste, harvest them when they’re still small—larger radishes can get a bit woody or spicy.

2. Lettuce

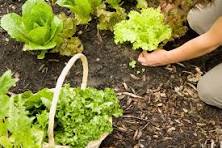
Lettuce is another quick grower that’s perfect for beginners. Depending on the variety, some types of lettuce can be ready for harvest in 30 days or less. Leaf lettuce varieties, such as ‘Butterhead’ or ‘Oakleaf,’ are fast-growing and can be cut when the leaves are large enough to eat. Simply trim the outer leaves and let the plant continue to grow for more harvests.

Pro Tip: Plant lettuce in early spring or late fall for the best results, as they thrive in cooler weather.

3. Spinach

Spinach grows quickly and is an excellent vegetable to grow if you’re looking for a nutrient-packed harvest. You can typically harvest spinach in 30 days, especially if you choose fast-growing varieties like ‘Baby’s Leaf.’ Spinach thrives in cooler weather and well-drained, fertile soil.

Pro Tip: For continued growth, pick only the outer leaves, allowing the inner leaves to keep growing.

4. Baby Carrots

While regular carrots take a bit longer to mature, you can harvest baby carrots in as little as 30 days. Baby carrots are smaller and sweeter than their mature counterparts, making them perfect for snacking or adding to salads. Plant the seeds in loose, well-drained soil, and make sure they get plenty of sunlight.

Pro Tip: Thin the seedlings early on to give them room to grow. This ensures that your carrots have enough space to develop fully.

5. Green Onions (Scallions)

Green onions are one of the easiest vegetables to grow, and you can harvest them in about 30 days. They’re great for small spaces, and you don’t need to wait for a full bulb to form. Simply cut the green tops when they reach about 6-8 inches tall, and they’ll continue to grow, giving you multiple harvests.

Pro Tip: Green onions grow well in containers or directly in the garden. You can even regrow them by placing the roots in water for a few days until they start to sprout

These five vegetables are perfect for gardeners looking for fast results. Whether you’re just starting your garden or you’re looking for a quick fix for fresh produce, these veggies will help you enjoy homegrown goodness in just 30 days. Make sure to check the weather and soil conditions to ensure the best growth possible.
10 Plants and Herbs You Can Propagate From Cuttings

Propagating plants from cuttings is an excellent way to grow your garden, increase your plant collection, and save money. It’s a simple process that anyone can do, even with limited space or experience. By taking a cutting from an established plant, you can create a new one without having to buy a full-grown plant. Here are 10 plants and herbs that you can easily propagate from cuttings:

1. Mint

Mint is one of the easiest herbs to propagate. Simply take a cutting with a few leaves, remove the lower leaves, and place the stem in water. After a couple of weeks, you’ll see roots developing. Once established, you can plant it in soil, and you’ll have a new mint plant ready for your garden or kitchen.

2. Basil

Basil is another herb that takes well to propagation from cuttings. Snip a 4- to 6-inch cutting from a healthy plant and remove the leaves from the bottom 2 inches. Place the cutting in water and wait for the roots to form, usually within 1-2 weeks. Once rooted, you can transfer it to soil.

3. Rosemary

Rosemary is a hardy herb that can be propagated through cuttings. Take a 4- to 6-inch cutting from a mature plant, strip the lower leaves, and dip the cut end in rooting hormone if you like. Place it in a small pot with well-draining soil, and keep the soil moist until roots develop.

4. Lavender

Lavender is not only a lovely plant but also easy to propagate. Cut a 4- to 6-inch stem from a healthy plant, remove the leaves from the bottom half, and place it in a well-draining potting mix. Lavender will root in 3-4 weeks, and once it’s established, you can transplant it into your garden.

5. Coleus

Coleus plants are known for their vibrant colors and can be easily propagated through cuttings. Take a 4-inch cutting from the top of a healthy plant, remove any lower leaves, and place it in water. After about a week, you’ll see roots form, and the cutting will be ready to be potted up.

6. Pothos (Devil’s Ivy)

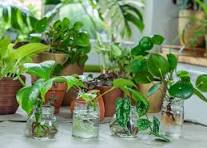
Pothos is one of the most popular houseplants and a great option for beginners to propagate. Cut a 4- to 6-inch section of stem that includes a node (the small bumps where leaves and roots grow). Place the cutting in water, and it will develop roots in 1-2 weeks. Pothos thrives in both soil and water, so you can transfer it into either.

7. Spider Plant (Chlorophytum comosum)

Spider plants are easy to propagate from the “babies” or plantlets that grow off the main plant. Simply cut a baby spider plant off the main plant, place it in water or a small pot with soil, and wait for it to take root. You’ll soon have a fresh new plant to share or add to your collection.

8. Geranium

Geraniums are excellent for propagation by cuttings. Take a 3- to 4-inch cutting from a healthy plant, remove the lower leaves, and place the cutting in a pot with a well-draining mix. Keep the cutting in a bright spot with indirect sunlight, and it will root in a few weeks.

9. African Violet

African violets can be propagated by cutting off a healthy leaf with about an inch of stem attached. Place the stem in water or a small pot with soil, and keep the soil moist. Within a few weeks, you’ll start seeing tiny new plants grow from the base of the leaf.

10. Sweet Potato Vine

Sweet potato vines are not only beautiful but also easy to propagate through cuttings. Snip off a section of vine, and place it in water. Within a few days, you’ll notice roots forming, and after a few weeks, you can plant it in soil. Sweet potato vines make a beautiful addition to hanging baskets or ground cover.

Tips for Successful Propagation:

  • Use clean tools: Ensure that your scissors or pruning shears are clean to prevent spreading disease to your plants.
  • Water regularly: Make sure your cuttings are kept hydrated as they root, but avoid waterlogging.
  • Provide the right environment: Most cuttings benefit from a humid environment, so you can cover them with a clear plastic bag or place them in a propagator to help them thrive.
  • Be patient: Some plants take longer to root than others, so give your cuttings the time they need to develop strong roots before transplanting them.

By propagating plants and herbs from cuttings, you can quickly grow a thriving, diverse garden. Whether you want to create a new herb garden, increase your collection of houseplants, or share plants with friends and family, these 10 plants are the perfect candidates for propagation! Happy gardening!

Winter Gardening: Yes, You Can Grow Goodies in the Cold!

As winter approaches, you might find yourself staring at your garden, wondering if it’s time to hang up your gardening gloves until spring. But hold on! Just because it’s chilly outside doesn’t mean your gardening days are over. In fact, winter gardening can be a delightful adventure, allowing you to grow a variety of hearty crops that can thrive in the cold. So, grab your warmest jacket, and let’s dig into some winter-friendly options that will keep your green thumb busy even when the snowflakes start to fall!

The Winter Wonder Crops

1. Kale
Ah, kale—the superstar of winter veggies! This leafy green not only withstands frost but often gets sweeter after a cold snap. Toss it in salads, smoothies, or soups, and feel like a nutritional champion. Trust me; your body will thank you!

2. Spinach
Spinach is like that reliable friend who always shows up. It loves cool weather and can keep growing throughout the winter. If you cover it with row covers or a simple cold frame, you’ll be enjoying fresh spinach for salads and sautéing all season long.

3. Garlic
Planting garlic in the fall is like giving yourself a delicious gift for the future. It requires minimal care during the winter, and come late spring or early summer, you’ll have fresh bulbs ready for your culinary creations. Nothing says “gourmet chef” like homegrown garlic!

4. Brussels Sprouts
These little green orbs might be the underdogs of the vegetable world, but they shine in winter gardens. Frost actually enhances their flavor, making them sweeter and more delectable. Just remember to harvest them before they bolt in the spring, or you’ll end up with some wild-looking plants!

5. Carrots
Carrots are like those friends who can withstand anything. Sown in late summer or fall, they can be left in the ground throughout winter. After a frost, they taste even sweeter! Just be sure to mulch well to protect them from harsh conditions.

6. Winter Onions
Planting onions in the fall for a summer harvest is a no-brainer. They’re low-maintenance and very forgiving. You’ll be amazed at how satisfying it is to pull fresh onions from the ground when the weather warms up.

7. Cabbage
Cabbage can handle winter’s chill, especially varieties like Savoy. These leafy beauties can survive frosty nights with a little protection, allowing you to enjoy them in hearty winter dishes.

8. Herbs
While many herbs might struggle in the cold, hardy varieties like thyme, rosemary, and parsley can be grown indoors or survive mild winters outdoors with some cover. They’ll add fresh flavor to your winter cooking, no need for a grocery run!

9. Cover Crops
If you’re not ready to plant veggies, consider sowing cover crops like clover or rye. They help improve soil health and prevent erosion, preparing your garden for a bountiful spring.

Tips for Successful Winter Gardening

– Use Cold Frames: Cold frames act like mini-greenhouses, providing shelter from harsh winds and frost. They allow you to extend your growing season and keep your plants cozy.

– Mulch Wisely: A thick layer of mulch not only insulates your plants but also retains soil moisture. It’s like a warm blanket for your garden!

– Choose Hardy Varieties:When selecting plants, look for varieties that are specifically bred for colder climates. They’ll be your best allies in the winter garden.

The Joy of Winter Gardening

Winter gardening can be incredibly rewarding. Not only does it keep your hands dirty and your mind engaged, but it also offers fresh produce even when the world outside is a snowy wonderland. So, whether you’re channeling your inner farmer or simply looking to enjoy the fruits (or veggies!) of your labor, winter gardening is the perfect way to stay connected to nature during the colder months.

 4 Gardening Myths Debunked: Separating Fact from Fiction

Gardening is an age-old practice, but along with it come myths and misconceptions that can mislead both new and experienced gardeners. To help you make the most of your green space, let’s tackle four common gardening myths and provide the truth behind them.

1. Myth: Watering Plants in Direct Sunlight Scorches Leaves
One of the most persistent gardening myths is that watering your plants during the heat of the day will cause the sun to scorch the wet leaves. The theory is that water droplets act as magnifying glasses, intensifying sunlight and burning the plant. However, scientific studies have shown that this isn’t the case. Water droplets don’t concentrate sunlight enough to cause damage to plants.

Debunked: The real risk of watering in direct sunlight is that much of the water will evaporate before it can soak into the soil. For efficiency, it’s best to water early in the morning or late in the afternoon, ensuring the water reaches the roots without unnecessary waste.

2. Myth: You Must Water Your Garden Every Day
Many believe that daily watering is essential for healthy plants, but this can do more harm than good. Overwatering can drown plant roots, lead to fungal growth, and weaken plants over time.

Debunked: The key to healthy plants is deep, less frequent watering that encourages roots to grow deeper into the soil. Aim to water your garden about once or twice a week, depending on the climate and the needs of your plants. Deep watering ensures that moisture reaches the roots and helps plants develop a strong root system.

3. Myth: Using Chemical Fertilizers Is the Best Way to Feed Plants
There’s a common misconception that synthetic fertilizers are the most effective way to ensure lush, fast-growing plants. While they may provide quick results, overuse can lead to nutrient imbalances, harm beneficial soil organisms, and contribute to long-term soil degradation.

Debunked: Organic matter, like compost or well-rotted manure, is a far better way to nourish your garden. It provides a slow, steady release of nutrients and improves soil structure, allowing for better water retention and healthier plant growth. Plus, it fosters beneficial microbes that create a thriving ecosystem in your soil.

4. Myth: More Sunlight Always Equals Better Growth
It’s easy to think that more sunlight means healthier, faster-growing plants. While sunlight is crucial for photosynthesis, not all plants thrive in full sun.

Debunked:Different plants have different light needs. Some, like tomatoes and sunflowers, need full sun (6-8 hours per day), while others, such as lettuce or hostas, prefer partial shade. Exposing shade-loving plants to too much direct sunlight can cause stress, leaf burn, and poor growth. Knowing the light requirements of your plants and positioning them accordingly will ensure a healthier, more productive garden.

Gardening is a journey of learning and discovery, and part of that process is questioning the myths that have been passed down over time. By debunking these common gardening myths, you’ll be better equipped to grow a thriving garden based on sound practices and real results.

Easy-to-Grow Plants for Your Garden: Start with Lettuce and More

Starting a garden can feel overwhelming, especially if you’re new to gardening or unsure about what to plant. The good news is that some plants are incredibly easy to grow, making them perfect for beginners or those looking to expand their gardening skills without much hassle. One of the best choices to start with is lettuce, a versatile and fast-growing plant that requires minimal effort. Let’s explore why lettuce and a few other plants are perfect for beginners and how you can easily grow them in your garden.

1. Lettuce: The Perfect Starter Plant

Lettuce is one of the most forgiving plants to grow, making it ideal for new gardeners. Here’s why lettuce is a great choice:

– Quick Growth: Lettuce has a relatively short growing period. Some varieties can be harvested in as little as 30 days, allowing you to enjoy fresh greens soon after planting.

– Low Maintenance: Lettuce doesn’t require much attention. It thrives in cooler weather and can be planted in both spring and fall. Plus, it’s resistant to many common pests, especially if grown in a well-prepared garden bed or container.

– Continuous Harvest: With lettuce, you can use the “cut-and-come-again” method. This means you can harvest outer leaves as needed, and the plant will continue to produce more. This makes it a sustainable choice for fresh salads throughout the season.

– Variety of Choices: There are many types of lettuce, from romaine to butterhead to leaf lettuce, allowing you to experiment with different flavors and textures.

2. Radishes: Quick and Rewarding

Radishes are another great option for beginner gardeners. They grow quickly, with some varieties maturing in just 3-4 weeks. Radishes thrive in cooler weather and can be planted in early spring or fall. They are also a great way to add some color and spice to your garden and meals.

3. Spinach: Nutrient-Packed and Easy to Grow

Spinach is not only easy to grow but also packed with nutrients. It grows well in cool weather and can be planted in early spring or fall. Spinach leaves can be harvested as they grow, providing a steady supply of fresh greens for salads, smoothies, and cooking.

4. Cherry Tomatoes: Little Gems for Your Garden

Cherry tomatoes are perfect for those looking to grow their own tomatoes without the fuss. They require minimal space and can even be grown in containers. Once they start producing, cherry tomatoes offer a bountiful harvest throughout the summer with little effort.

5. Herbs: Basil, Mint, and More

Herbs like basil and mint are easy to grow and can thrive in pots or garden beds. They require little space and provide fresh flavors for cooking. Basil enjoys the warm summer months, while mint is quite hardy and can grow in a variety of conditions.

Tips for Growing Easy Plants in Your Garden

1. Choose the Right Location: Most easy-to-grow plants need plenty of sunlight. Choose a spot in your garden that receives at least 4-6 hours of sun each day.

2. Prepare the Soil: Good soil is key to a healthy garden. Use well-draining soil enriched with compost or organic matter to provide the nutrients your plants need.

3. Water Regularly but Wisely: While these plants are low-maintenance, they still need consistent watering. Water deeply but less frequently to encourage deep root growth.

4. Protect from Pests: Although many easy-to-grow plants are resistant to pests, it’s always a good idea to keep an eye out for any signs of trouble. Simple measures like row covers or natural repellents can help protect your plants.

5. Harvest Often: Regular harvesting encourages plants like lettuce and herbs to continue producing. Enjoy the fruits (and vegetables) of your labor as often as possible!

Starting a garden doesn’t have to be intimidating. By choosing easy-to-grow plants like lettuce, radishes, spinach, cherry tomatoes, and herbs, you can enjoy the benefits of home-grown produce with minimal effort. These plants are perfect for beginners, providing a great introduction to gardening that’s both fun and rewarding.

Growing Tomatoes from a Sliced Tomato: A Step-by-Step Guide

Tomatoes are a staple in many gardens, prized for their juicy fruits and versatility in the kitchen. While most gardeners start with seeds or seedlings, did you know you can also grow a tomato plant from a sliced tomato? It’s a fun and simple way to propagate new plants, and you might be surprised at how effective it can be. Here’s a step-by-step guide to growing tomatoes from a sliced tomato.

1. Choose the Right Tomato

To begin, select a ripe, healthy tomato from which to harvest seeds. Heirloom varieties work particularly well because they produce seeds that will grow true to the parent plant. Avoid using tomatoes that are overripe or have signs of disease or decay.

2. Prepare the Tomato Slices

Cut the tomato into thick slices, about 1/4 to 1/2 inch thick. You should see the seeds embedded within the fleshy parts of the tomato. Each slice will contain several seeds, which will give you multiple opportunities to grow new plants.

3. Extract the Seeds

To increase your chances of success, it’s best to extract the seeds from the tomato slices. Here’s how:

– Place the tomato slices on a plate or tray.
– Let them sit for a few days until they start to dry out. This drying process helps the seeds to separate from the tomato flesh.
– Gently scrape the seeds off the slices using a spoon or knife.

4. Prepare the Seeds for Planting

Once you’ve extracted the seeds, it’s essential to clean them to remove any remaining tomato pulp. Here’s how:

– Place the seeds in a small bowl and cover them with water.
– Let the seeds soak for a day or two, stirring occasionally.
– After soaking, rinse the seeds thoroughly and spread them out on a paper towel to dry.

5. Plant the Seeds

After the seeds are dry, you’re ready to plant them. You can start them indoors or directly in the garden:

Indoor Planting:
– Fill seed trays or small pots with seed-starting mix.
– Sprinkle the tomato seeds on the surface of the soil and lightly cover them with a thin layer of soil.
– Water gently and place the trays or pots in a warm, sunny location or under grow lights.
– Keep the soil consistently moist but not waterlogged.
– The seeds should germinate within 1-2 weeks.

– Outdoor Planting:
– Prepare a garden bed with well-draining soil.
– Space the tomato slices evenly on the soil surface.
– Lightly cover the slices with a thin layer of soil.
– Water the area and keep it moist until the seeds begin to germinate.
– Thin out the seedlings once they are large enough to handle.

6. Transplanting Seedlings

Once the seedlings are a few inches tall and have developed their first set of true leaves, it’s time to transplant them into larger pots or directly into your garden:

– Potting Up: If you started the seeds indoors, transplant the seedlings into larger pots when they’re ready. Use a high-quality potting mix and ensure the pots have good drainage.
– Garden Transplanting: If you’re planting directly in the garden, choose a sunny spot with well-draining soil. Space the plants about 18-24 inches apart to allow for their growth.

Growing tomatoes from a sliced tomato is a rewarding and straightforward process. By following these steps, you can propagate new plants and enjoy a bountiful tomato harvest. Remember to be patient, as growing from slices takes time…

Embrace the Learning Curve: Wisdom Through Gardening

Gardening can be an intimidating venture, especially when you’re just starting out. The planning, the endless choices of plants, and the uncertainty of what will thrive in your space can feel overwhelming. I remember feeling the same way when I began my gardening journey. But over time, I’ve realized that the beauty of gardening lies not in perfection but in the process of learning and growing—both for the plants and for ourselves.

The Intimidation of Planning and Growing

When I first started gardening, I was intimidated by the idea of planning a garden. How do you know what to plant, where to plant it, and how to care for it? The truth is, you often don’t know until you try. Gardening is as much about experimentation as it is about knowledge. Each season brings new lessons, and with each lesson, you gain a little more wisdom.

Learning as You Go

This year, I learned a lot—one of the most important lessons being that broccoli might not be the best fit for my garden. But that’s okay because every mistake is a step towards a better garden in the future. Next year, I won’t be planting broccoli, but I’ll have a much better idea of my garden layout. I’ve learned which plants thrive in certain spots, how much sunlight different areas get, and how to better space my plants to give them room to grow.

Wisdom Through Experience

Gardening has taught me that wisdom cannot simply be told; it must be gained through experience. Reading books and articles can give you a foundation, but nothing compares to the lessons you learn by getting your hands dirty. Each season is a new opportunity to learn, and each plant is a new teacher.

Just Start Planting

So, my biggest piece of advice to anyone feeling overwhelmed by the thought of starting a garden is this: put some seeds in the ground and watch them grow. Don’t worry about having everything figured out. Start small, observe, and learn. Each year, you’ll gain more confidence, and your garden will reflect your growing wisdom.

Gardening is a journey of growth—not just for your plants but for you as well. It’s okay to make mistakes and to feel uncertain. The important thing is to start, to keep learning, and to enjoy the process. With each season, you’ll become a little more knowledgeable and a lot more connected to the rhythm of nature. So, put those seeds in the ground, embrace the learning curve, and watch your garden—and yourself—grow.

The Benefits of Crop Rotation in Your Vegetable Garden

Crop rotation is a time-honored agricultural practice with significant benefits for vegetable gardens. It involves changing the location of specific crops each growing season to enhance soil health, reduce pests, and improve yields. Understanding the principles of crop rotation can transform your garden into a more productive and sustainable ecosystem.

Why Crop Rotation Matters

1. Enhances Soil Health: Different crops have varying nutrient requirements. By rotating crops, you can prevent the depletion of specific nutrients. For example, legumes like beans and peas fix nitrogen in the soil, which benefits subsequent crops that require high nitrogen levels, such as leafy greens.

2. Reduces Pest and Disease Pressure: Many garden pests and diseases are crop-specific. By rotating crops, you can disrupt the life cycles of pests and reduce the likelihood of diseases that thrive on specific plants. For instance, if you had tomatoes last season, rotating to a different family, such as brassicas, can help minimize tomato-specific diseases.

3. Improves Soil Structure: Different plants have different root structures. Rotating crops can help improve soil structure and aeration. Deep-rooted plants, such as carrots, can break up compacted soil, while shallow-rooted plants, like lettuce, can improve surface soil quality.

4. Increases Biodiversity: By planting a variety of crops, you support a diverse ecosystem in your garden. This diversity can attract beneficial insects and pollinators, creating a balanced and resilient garden environment.

How to Implement Crop Rotation Effectively

1. Understand Crop Families: To rotate crops effectively, it’s essential to know which plant families are related. For example, tomatoes, peppers, and potatoes are all nightshades and should not be planted in the same location consecutively. Keep a list of plant families and their specific requirements to plan rotations accordingly.

2. Plan Your Rotation Schedule: Develop a rotation plan that spans at least three to four years. Ideally, you should rotate crops so that the same plant family is not planted in the same location for several years. A typical rotation might involve a cycle of root vegetables, legumes, leafy greens, and fruiting plants.

3. Keep Records: Maintain a garden journal or map to track where you plant each crop each year. This record will help you remember past planting locations and make informed decisions for future seasons.

4. Incorporate Cover Crops: During the off-season or in between rotations, consider planting cover crops like clover or rye. These plants can improve soil fertility, prevent erosion, and suppress weeds.

5. Monitor and Adjust: Observe your garden’s performance and adjust your rotation plan as needed. If you notice persistent pest issues or nutrient deficiencies, you may need to tweak your rotation schedule or add soil amendments.

Sample Rotation Plan

Here’s a simple example of a four-year rotation plan:

– Year 1: Plant root vegetables (carrots, beets, radishes)
– Year 2: Plant legumes (beans, peas, lentils)
-Year 3: Plant leafy greens  (lettuce, spinach, broccoli, cabbage)
– Year 4: Plant fruiting vegetables (tomatoes, peppers, cucumbers)

By following these principles, you’ll build a more resilient and productive vegetable garden. Crop rotation not only benefits the soil and plants but also contributes to a healthier and more sustainable gardening practice.

Exploring the Benefits of Companion Planting in Summer

As summer unfolds and gardens flourish, the practice of companion planting offers a time-tested strategy to enhance plant growth, boost yields, and reduce pest problems naturally. Companion planting involves pairing plants that support each other’s growth, creating a harmonious garden ecosystem. Here’s how you can make the most of companion planting this summer, including a look at plants that thrive together and ways this practice can help reduce pests.

The Concept of Companion Planting

Companion planting is the practice of growing different plants in proximity to each other to achieve various benefits. These benefits can include improved growth, better flavor, pest control, and enhanced pollination. By understanding which plants complement each other, you can create a more resilient and productive garden.

Plants That Thrive Together

1. Tomatoes and Basil

Tomatoes and basil are a classic combination. Basil helps to repel insects like aphids, mosquitoes, and tomato hornworms. Additionally, many gardeners believe that basil enhances the flavor of tomatoes.

2. Cucumbers and Nasturtiums

Nasturtiums act as a trap crop for aphids, attracting them away from cucumbers. They also deter other pests like cucumber beetles and squash bugs. Nasturtiums’ bright flowers can attract pollinators, benefiting the cucumbers.

3. Carrots and Onions

Carrots and onions make great companions because onions repel carrot flies, and carrots help to aerate the soil for onions. This pairing helps both plants grow better by reducing pest pressure.

4. Corn, Beans, and Squash (The Three Sisters)

This traditional Native American planting trio is a great example of companion planting. Corn provides a natural trellis for beans to climb, beans fix nitrogen in the soil, which benefits the corn and squash, and squash covers the ground, reducing weeds and retaining moisture.

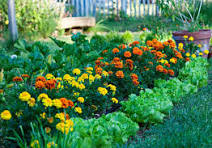
5. Marigolds with Almost Anything

Marigolds are a versatile companion plant that can be used throughout the garden. They help repel nematodes, aphids, and many other pests. Planting marigolds among vegetables can create a pest-resistant barrier.

How Companion Planting Reduces Pests

1. Natural Pest Repellents

Many companion plants have strong scents or produce chemicals that repel pests. For example, herbs like basil, rosemary, and mint can deter insects, while flowers like marigolds release compounds that repel nematodes and other harmful organisms.

2. Trap Crops

Some plants can act as trap crops, drawing pests away from the main crop. Nasturtiums, for example, attract aphids, keeping them away from more valuable plants like cucumbers and tomatoes.

3. Improved Biodiversity

A diverse garden with a variety of plants can confuse pests and reduce their impact. Pests are often attracted to large, monoculture plantings. By mixing different plants, you create a more complex environment that can deter pests and reduce the likelihood of infestations.

4. Beneficial Insects

Certain companion plants attract beneficial insects that prey on pests. For instance, dill and fennel attract ladybugs, lacewings, and parasitic wasps, all of which help control aphids and other harmful insects.

Getting Started with Companion Planting

1. Plan Your Garden Layout

Before planting, take time to plan your garden layout. Consider which plants benefit each other and arrange them accordingly. Use companion planting charts or guides to help you make informed decisions.

2. Rotate Crops

Crop rotation is essential for maintaining soil health and reducing pest problems. Rotate your crops each season to prevent pests and diseases from building up in the soil.

3. Experiment and Observe

Every garden is unique, so don’t be afraid to experiment with different companion planting combinations. Observe how your plants interact and adjust your planting strategies based on what you learn.

Companion planting is a valuable technique for creating a healthy, productive garden. By pairing plants that thrive together, you can boost growth, enhance flavors, and naturally reduce pest problems. As you explore the benefits of companion planting this summer, you’ll discover a more resilient and harmonious garden ecosystem that rewards you with bountiful harvests and fewer pest issues.

Sous Vide Mastery

Sous vide has emerged as a game-changer, revolutionizing the way we approach cooking. This precise and versatile cooking method has gained popularity among both professional chefs and home cooks alike. Let’s delve into why sous vide is more than just a cooking technique – it’s a culinary experience that elevates the art of gastronomy.

Perfect Precision in Every Bite:
Sous vide, French for “under vacuum,” involves cooking food at precise temperatures in a water bath, ensuring unparalleled precision. The result? Perfection in every bite. Whether it’s a steak cooked to the ideal medium-rare or delicate proteins like fish, sous vide guarantees consistent results that are impossible to achieve through traditional methods.

Effortless Consistency:
Consistency is a challenge in traditional cooking, especially when dealing with intricate recipes. Sous vide takes the guesswork out of the equation. With precise temperature control, the cooking process is virtually foolproof, ensuring that your dishes are consistently outstanding, every time.

In the ever-evolving landscape in culinary, sous vide has earned its place as a culinary marvel. Its ability to deliver precise, consistent, and flavorful results is unmatched.