5 Vegetables You Can Harvest in 30 Days

Gardening can be incredibly rewarding, but not all vegetables take months to grow. If you’re looking for quick results, there are several veggies that you can harvest in as little as 30 days. Whether you’re a seasoned gardener or a beginner, these fast-growing vegetables are perfect for adding to your garden, especially when you’re in the mood for something fresh in a short amount of time.

Here are five vegetables that you can harvest in just 30 days:

1. Radishes

Radishes are one of the fastest-growing vegetables, and they thrive in cooler weather. You can typically harvest radishes in as little as 20 to 30 days, making them perfect for quick satisfaction. Radishes need well-drained soil, a spot with full sunlight, and consistent watering. You can sow them directly in the ground or in containers.

Pro Tip: For the best taste, harvest them when they’re still small—larger radishes can get a bit woody or spicy.

2. Lettuce

Lettuce is another quick grower that’s perfect for beginners. Depending on the variety, some types of lettuce can be ready for harvest in 30 days or less. Leaf lettuce varieties, such as ‘Butterhead’ or ‘Oakleaf,’ are fast-growing and can be cut when the leaves are large enough to eat. Simply trim the outer leaves and let the plant continue to grow for more harvests.

Pro Tip: Plant lettuce in early spring or late fall for the best results, as they thrive in cooler weather.

3. Spinach

Spinach grows quickly and is an excellent vegetable to grow if you’re looking for a nutrient-packed harvest. You can typically harvest spinach in 30 days, especially if you choose fast-growing varieties like ‘Baby’s Leaf.’ Spinach thrives in cooler weather and well-drained, fertile soil.

Pro Tip: For continued growth, pick only the outer leaves, allowing the inner leaves to keep growing.

4. Baby Carrots

While regular carrots take a bit longer to mature, you can harvest baby carrots in as little as 30 days. Baby carrots are smaller and sweeter than their mature counterparts, making them perfect for snacking or adding to salads. Plant the seeds in loose, well-drained soil, and make sure they get plenty of sunlight.

Pro Tip: Thin the seedlings early on to give them room to grow. This ensures that your carrots have enough space to develop fully.

5. Green Onions (Scallions)

Green onions are one of the easiest vegetables to grow, and you can harvest them in about 30 days. They’re great for small spaces, and you don’t need to wait for a full bulb to form. Simply cut the green tops when they reach about 6-8 inches tall, and they’ll continue to grow, giving you multiple harvests.

Pro Tip: Green onions grow well in containers or directly in the garden. You can even regrow them by placing the roots in water for a few days until they start to sprout

These five vegetables are perfect for gardeners looking for fast results. Whether you’re just starting your garden or you’re looking for a quick fix for fresh produce, these veggies will help you enjoy homegrown goodness in just 30 days. Make sure to check the weather and soil conditions to ensure the best growth possible.

10 Plants and Herbs You Can Propagate From Cuttings

Propagating plants from cuttings is an excellent way to grow your garden, increase your plant collection, and save money. It’s a simple process that anyone can do, even with limited space or experience. By taking a cutting from an established plant, you can create a new one without having to buy a full-grown plant. Here are 10 plants and herbs that you can easily propagate from cuttings:

1. Mint

Mint is one of the easiest herbs to propagate. Simply take a cutting with a few leaves, remove the lower leaves, and place the stem in water. After a couple of weeks, you’ll see roots developing. Once established, you can plant it in soil, and you’ll have a new mint plant ready for your garden or kitchen.

2. Basil

Basil is another herb that takes well to propagation from cuttings. Snip a 4- to 6-inch cutting from a healthy plant and remove the leaves from the bottom 2 inches. Place the cutting in water and wait for the roots to form, usually within 1-2 weeks. Once rooted, you can transfer it to soil.

3. Rosemary

Rosemary is a hardy herb that can be propagated through cuttings. Take a 4- to 6-inch cutting from a mature plant, strip the lower leaves, and dip the cut end in rooting hormone if you like. Place it in a small pot with well-draining soil, and keep the soil moist until roots develop.

4. Lavender

Lavender is not only a lovely plant but also easy to propagate. Cut a 4- to 6-inch stem from a healthy plant, remove the leaves from the bottom half, and place it in a well-draining potting mix. Lavender will root in 3-4 weeks, and once it’s established, you can transplant it into your garden.

5. Coleus

Coleus plants are known for their vibrant colors and can be easily propagated through cuttings. Take a 4-inch cutting from the top of a healthy plant, remove any lower leaves, and place it in water. After about a week, you’ll see roots form, and the cutting will be ready to be potted up.

6. Pothos (Devil’s Ivy)

Pothos is one of the most popular houseplants and a great option for beginners to propagate. Cut a 4- to 6-inch section of stem that includes a node (the small bumps where leaves and roots grow). Place the cutting in water, and it will develop roots in 1-2 weeks. Pothos thrives in both soil and water, so you can transfer it into either.

7. Spider Plant (Chlorophytum comosum)

Spider plants are easy to propagate from the “babies” or plantlets that grow off the main plant. Simply cut a baby spider plant off the main plant, place it in water or a small pot with soil, and wait for it to take root. You’ll soon have a fresh new plant to share or add to your collection.

8. Geranium

Geraniums are excellent for propagation by cuttings. Take a 3- to 4-inch cutting from a healthy plant, remove the lower leaves, and place the cutting in a pot with a well-draining mix. Keep the cutting in a bright spot with indirect sunlight, and it will root in a few weeks.

9. African Violet

African violets can be propagated by cutting off a healthy leaf with about an inch of stem attached. Place the stem in water or a small pot with soil, and keep the soil moist. Within a few weeks, you’ll start seeing tiny new plants grow from the base of the leaf.

10. Sweet Potato Vine

Sweet potato vines are not only beautiful but also easy to propagate through cuttings. Snip off a section of vine, and place it in water. Within a few days, you’ll notice roots forming, and after a few weeks, you can plant it in soil. Sweet potato vines make a beautiful addition to hanging baskets or ground cover.

Tips for Successful Propagation:

  • Use clean tools: Ensure that your scissors or pruning shears are clean to prevent spreading disease to your plants.
  • Water regularly: Make sure your cuttings are kept hydrated as they root, but avoid waterlogging.
  • Provide the right environment: Most cuttings benefit from a humid environment, so you can cover them with a clear plastic bag or place them in a propagator to help them thrive.
  • Be patient: Some plants take longer to root than others, so give your cuttings the time they need to develop strong roots before transplanting them.

By propagating plants and herbs from cuttings, you can quickly grow a thriving, diverse garden. Whether you want to create a new herb garden, increase your collection of houseplants, or share plants with friends and family, these 10 plants are the perfect candidates for propagation! Happy gardening!

Protecting Your Plants from Winter’s Chill: Essential Tips for Cold Weather Care

As temperatures drop, your garden needs extra protection to survive the harsh winter weather. Cold temperatures, frost, and snow can be damaging to plants, especially those that are not frost-tolerant. Fortunately, there are several steps you can take to help your plants weather the cold. Here are some essential tips for protecting your plants during the colder months:

1. Water Before a Freeze

Watering your plants ahead of a freeze is an important step in protecting them from winter damage. When the soil is moist, it holds more heat than dry soil, which can help moderate temperature fluctuations around the roots. Make sure to thoroughly water your garden beds before a freeze, but avoid overwatering. The moisture helps prevent the plant cells from freezing, giving them a better chance to survive extreme cold.

Be mindful of the time of day when watering. It’s best to water in the morning to allow the moisture to soak in and have time to be absorbed before temperatures drop significantly in the evening.

2. Add Mulch for Insulation

Mulching is a simple yet effective way to protect your plants’ roots during the winter. A thick layer of mulch, such as straw, wood chips, or leaves, helps insulate the soil and keep the root system at a more stable temperature. Mulch helps prevent the soil from freezing and thawing rapidly, which can stress plants and lead to frost heaving (when the roots are lifted out of the ground due to expansion from freezing and thawing).

Add mulch around the base of your plants, particularly perennials, shrubs, and trees, to provide them with an extra layer of protection. For best results, aim for 2 to 4 inches of mulch, but be careful not to pile it directly against the stems or trunks of plants to avoid moisture build-up, which could lead to rot.

3. Cover Garden Beds for Extra Protection

Covering garden beds is one of the best ways to shield your plants from the cold. Use materials such as plastic sheeting, frost blankets, or old sheets to cover the plants in your garden. These coverings trap heat and moisture, creating a mini-greenhouse effect that helps protect plants from freezing temperatures.

When covering garden beds, make sure the material is secure to avoid blowing away in the wind. If using plastic, create a tent-like structure over your plants to ensure adequate airflow. Avoid allowing the plastic to come into direct contact with the plants, as this can cause frost burn.

If you’re using a fabric covering, ensure it is designed for frost protection and allows light and moisture to penetrate while still shielding your plants from cold air.

4. Protect Container Plants

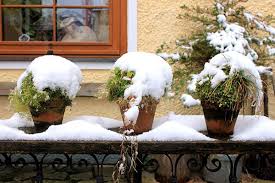
Potted plants are especially vulnerable to the cold, as their roots are more exposed than those planted in the ground. To help them survive freezing temperatures, bring potted plants closer to the foundation of your house or place them under eaves where the temperature tends to be warmer. The heat retained by the house will provide a more stable environment for your plants.

If bringing plants indoors is not an option, cover your container plants with frost cloth or heat-retentive blankets. These materials help shield the plants from the cold while maintaining warmth around the roots. You can also wrap the pots themselves in burlap or bubble wrap to help insulate them from the cold.

Winter can be a tough time for plants, but with the right precautions, you can ensure that your garden remains healthy and vibrant despite the cold. By watering properly, mulching, covering garden beds, and protecting container plants, you’re giving your garden the best chance to survive the winter months and thrive in the spring.

The Warm Comfort of Winter Vegetable Soup

As winter settles in, there’s nothing quite like a warm bowl of vegetable soup to nourish your body and soul. Packed with seasonal ingredients, hearty flavors, and vibrant nutrients, vegetable soup is more than just a meal—it’s a comforting ritual to embrace during the colder months.

Why Vegetable Soup?

  1. Seasonal Nutrition: Winter vegetables like carrots, parsnips, squash, kale, and sweet potatoes are at their peak, offering a boost of vitamins and minerals.
  2. Easy on Digestion: Warm soups are gentle on the stomach, making them ideal for cold days when your body craves soothing foods.
  3. Budget-Friendly: Root vegetables and legumes, often the stars of winter soups, are affordable and widely available.

Crafting the Perfect Bowl

  • Start with a Flavorful Base: Sauté onions, garlic, and celery for a fragrant beginning.
  • Add Seasonal Veggies: Think earthy carrots, creamy potatoes, or sweet squash.
  • Incorporate Protein: Beans, lentils, or tofu add a satisfying heft.
  • Spice It Up: Use warming spices like cumin, turmeric, or paprika for depth.

Beyond the Bowl

Pair your soup with crusty bread or a simple side salad for a complete meal. The act of simmering soup can also be meditative—a moment of mindfulness in a busy season.

This winter, embrace the simplicity and warmth of vegetable soup.

https://www.yellowblissroad.com/tortellini-soup-with-italian-sausage-spinach/

The Farmer and the Seeds: Planting for a Fruitful Life

The parable of The Farmer and the Seeds (traditional) offers a powerful lesson in understanding how our environment and mindset shape the results we achieve. In this story, a farmer scatters seeds, which fall on different types of soil: the hard path, rocky ground, thorny bushes, and good soil. While the seeds on the good soil yield a fruitful harvest, the others fail to grow.

What does this teach us? It emphasizes that the conditions we cultivate in our lives—whether through our mindset, the relationships we nurture, or the environments we place ourselves in—directly affect the outcomes we experience.

  1. Mindset: Like the good soil, a positive and growth-oriented mindset is essential for success. When we approach challenges with resilience and determination, we foster the conditions for growth, even when times are tough.
  2. Environment: Surrounding ourselves with supportive and nurturing people (like good soil) encourages personal development and success. Just as seeds need the right environment to flourish, we too need to ensure that our environments—work, home, and social circles—are conducive to our growth.
  3. Relationships: Relationships, like soil, play a significant role in our personal growth. Some relationships may drain or hinder us, while others can cultivate our abilities and encourage us to reach our potential.

As we begin this new year, reflect on your own “soil.” Are you setting yourself up for success by nurturing the right mindset, cultivating supportive relationships, and surrounding yourself with a positive environment? Small changes to these areas can have a significant impact on the results you achieve.

Remember, just as the farmer’s good soil yields an abundant harvest, the conditions you create today will shape your future.

How to Make Perfect Brownies Using Muffin Tins: Crispy Edges, Chewy Centers

If you love brownies (who doesn’t?), but you’re tired of waiting for that large baking pan to cool before slicing, here’s a fun and easy solution: muffin tins! Yes, you can make individual brownie portions in muffin tins, and the results? Well, they’re nothing short of perfect.

Why Muffin Tins?

Muffin tins give you individual brownies that are perfectly portioned, and they bake faster than a full pan. But the best part is the texture. The batter’s exposure to the muffin tin’s edges creates that sought-after contrast between crispy, crunchy edges and a chewy, fudgy center. It’s a win-win!

What You’ll Need:

– Your favorite brownie recipe (or a box mix if you’re in a hurry)
– Muffin tin (standard size)
– Non-stick spray or cupcake liners
– An oven preheated to 350°F

The Magic Numbers: 350°F for 20 Minutes

Here’s where the magic happens. Preheat your oven to 350°F, then scoop your brownie batter into the muffin tins, filling each cup about 2/3 full. The key to getting that perfect crispy edge with a chewy center is baking for about **20 minutes**. This will give you the right balance of texture. You’ll know they’re done when a toothpick inserted into the center comes out with just a few moist crumbs.

The Best of Both Worlds: Crispy Edges, Chewy Centers

One of the main reasons muffin tin brownies are so popular is because they offer two types of brownie textures in every bite. The edges crisp up thanks to their exposure to the hot muffin tin, while the centers stay perfectly soft and chewy. It’s like getting the best of both worlds—what could be better?

Tips for Extra Fudgy Brownies:

1. Use a high-quality cocoa powder or melt some chocolate into your batter for a richer flavor.
2. Don’t overmix the batter, as that can make your brownies cakier.
3. Let them cool in the tin for a few minutes before transferring them to a cooling rack—this helps them hold their shape.

The beauty of this method is that you don’t need to be a professional baker to get a perfect batch of brownies. Whether you’re craving a quick treat for yourself or impressing guests with a fun, individual serving, muffin tins make brownie baking a breeze. Crispy edges, chewy centers, and all the chocolatey goodness in between. What’s not to love?

Happy baking!

https://amzn.to/3CixlSK

https://amzn.to/3YWNkif

Fall Flavors: Cooking with Pumpkin—Muffins, Cookies, Lattes & More!

It’s that time of year again—leaves are changing, there’s a crisp chill in the air, and pumpkins are *everywhere*. Whether you’re a full-on pumpkin fanatic or just dabbling in the orange-hued world of fall flavors, there’s something cozy and comforting about cooking with pumpkin. So let’s talk pumpkin treats, shall we?

Pumpkin Muffins with Chocolate Chips: The MVP of Fall 🍫
Ah, pumpkin muffins. Soft, warm, and the perfect snack for a chilly day. I’m personally a big fan of adding chocolate chips to the mix. There’s just something magical about the slightly bitter chocolate cutting through the sweet, spiced pumpkin. It’s the best of both worlds! Imagine a chilly Saturday morning with a hot coffee and a fresh pumpkin muffin—it’s practically fall in a bite.

And if you’re in the mood for something richer, top those muffins with a dollop of cream cheese frosting. It’s like a tiny pumpkin cheesecake in every bite. Just a heads-up: these don’t last long on the counter. One muffin quickly turns into two, and before you know it, you’re contemplating baking another batch.

Pumpkin Cookies: Soft, Chewy & Just Sweet Enough 🍪
For those who want pumpkin spice without the heaviness of a pie, pumpkin cookies are the answer. I like to add a hint of cinnamon and nutmeg, which pairs perfectly with a cup of tea or coffee. These cookies are soft, almost cake-like, with a little chew that makes them irresistible. If you’re feeling adventurous, toss in some chopped nuts or a sprinkle of sea salt for a little twist. These are perfect for sharing at fall gatherings—or, you know, hoarding all to yourself on the couch. No judgment!

Pumpkin Pie: The Classic Everyone Loves 🥧
Of course, we can’t forget the OG—pumpkin pie. This classic is a must at any Thanksgiving table and arguably the dessert of the season. Some swear by extra cinnamon; others add a pinch of cloves or ginger to spice things up. Whatever your style, pumpkin pie brings everyone together, whether you’re a whipped cream purist or go for that sprinkle of powdered sugar.

Pumpkin Spice Latte: The Controversial Hero ☕️
Now, here’s where it gets a little controversial: the pumpkin spice latte. Some folks wait all year for it; others can’t stand the thought. But whether you love it or hate it, the pumpkin spice latte is a fall icon. Personally, I enjoy one every now and then—it’s sweet, spicy, and tastes like autumn itself in a cup. And if PSLs aren’t your thing, pumpkin spice tea is a lighter option that still brings those fall vibes.

Or…Maybe You’re Just Not That Into Pumpkin? 😳
Not everyone is a fan of pumpkin, and that’s totally okay! Maybe apple cinnamon or caramel-flavored treats are more your jam. The beauty of fall is that it brings all kinds of cozy flavors to the table. And if pumpkin’s not for you, there are plenty of other ways to get into the seasonal spirit!

So, What’s Your Pumpkin Go-To?
Are you a pumpkin muffin lover, pie purist, or cookie fanatic? Or maybe you’re ready to try something new this fall? Whatever your preference, fall is the time to dive in and enjoy the flavors of the season.

So grab that can of pumpkin, preheat your oven, and let’s get baking! 🍂🎃

Now is Not the Time to Cut Back Your Plants: Why Patience Pays Off in the Garden

It’s fall. The air is crisp, leaves are turning, and the urge to tidy up your garden is almost irresistible. But, here’s a twist: now is *not* the time to cut back your plants. If you’re thinking, “But isn’t fall cleanup supposed to mean trimming back?”—you’re in good company! Let’s talk about why holding back that pruner might actually be the best thing you can do for your garden and its inhabitants.

Why Cutting Back Can Wait
We get it: when plants start to droop, with leaves drying up and flowers gone, it feels natural to clean them up and prepare for a neat winter landscape. But here’s the thing—many plants, including perennials, benefit from being left alone for a bit longer. Their foliage, seeds, and stems serve a purpose even when they look past their prime.

1. Protection Against the Cold
Those dried-out stems and leaves? They’re like a cozy winter coat for the plants. Left intact, they insulate roots from fluctuating temperatures, which can help perennial plants stay strong and resilient through winter.

2. Habitat for Wildlife
Birds, bees, and other beneficial insects rely on old foliage and dried-out plant material to find shelter and food during the colder months. Leaving those stems up provides winter refuge, and if you’re a fan of butterflies, this is great news. Some butterflies, like the mourning cloak, overwinter in plant debris, while others lay their eggs there to hatch in spring.

3. Natural Mulching and Soil Health
Letting plant matter decompose naturally over the winter months feeds your soil without any extra work on your part. As the stems and leaves break down, they enrich the soil with nutrients, reducing the need for extra fertilizer in the spring.

Which Plants Should Wait Until Spring?
If you’re wondering which plants benefit most from a no-trim policy, focus on perennials like ornamental grasses, coneflowers, and sedum. Their seed heads add a little winter interest to the garden, not to mention food for birds like finches. Roses, lavender, and other flowering plants can also benefit from being left alone, with their old stems providing frost protection and fostering growth in spring.

When to Make the Cut?
Of course, you don’t need to avoid your pruners forever. Early spring is the ideal time to trim back these plants. By then, any insects will have emerged, birds will have moved on, and the plants will be ready for their new growth to shine.

Practical Tips to Embrace the “No-Cut” Approach
– Trim Strategically: If a plant looks genuinely messy and bothers you, it’s okay to do a minimal cleanup. Just don’t cut too close to the ground.
– Leave Some Seed Heads: Plants like sunflowers and black-eyed Susans can be left alone for birds to snack on. Their seed heads look pretty against winter snow and bring activity to your garden.
– Consider the Beauty: There’s a unique beauty in the winter garden—soft grasses swaying in the wind, delicate frost on stems. Embrace this quieter beauty.

The Bottom Line: A Garden that Gives Back
Patience in gardening is a skill that pays off. By resisting the urge to cut back right now, you’re setting your plants up for stronger growth come spring, inviting wildlife to your garden, and allowing nature to do some of your work for you. Plus, isn’t it nice to have one less chore on the list?

Winter Gardening: Yes, You Can Grow Goodies in the Cold!

As winter approaches, you might find yourself staring at your garden, wondering if it’s time to hang up your gardening gloves until spring. But hold on! Just because it’s chilly outside doesn’t mean your gardening days are over. In fact, winter gardening can be a delightful adventure, allowing you to grow a variety of hearty crops that can thrive in the cold. So, grab your warmest jacket, and let’s dig into some winter-friendly options that will keep your green thumb busy even when the snowflakes start to fall!

The Winter Wonder Crops

1. Kale
Ah, kale—the superstar of winter veggies! This leafy green not only withstands frost but often gets sweeter after a cold snap. Toss it in salads, smoothies, or soups, and feel like a nutritional champion. Trust me; your body will thank you!

2. Spinach
Spinach is like that reliable friend who always shows up. It loves cool weather and can keep growing throughout the winter. If you cover it with row covers or a simple cold frame, you’ll be enjoying fresh spinach for salads and sautéing all season long.

3. Garlic
Planting garlic in the fall is like giving yourself a delicious gift for the future. It requires minimal care during the winter, and come late spring or early summer, you’ll have fresh bulbs ready for your culinary creations. Nothing says “gourmet chef” like homegrown garlic!

4. Brussels Sprouts
These little green orbs might be the underdogs of the vegetable world, but they shine in winter gardens. Frost actually enhances their flavor, making them sweeter and more delectable. Just remember to harvest them before they bolt in the spring, or you’ll end up with some wild-looking plants!

5. Carrots
Carrots are like those friends who can withstand anything. Sown in late summer or fall, they can be left in the ground throughout winter. After a frost, they taste even sweeter! Just be sure to mulch well to protect them from harsh conditions.

6. Winter Onions
Planting onions in the fall for a summer harvest is a no-brainer. They’re low-maintenance and very forgiving. You’ll be amazed at how satisfying it is to pull fresh onions from the ground when the weather warms up.

7. Cabbage
Cabbage can handle winter’s chill, especially varieties like Savoy. These leafy beauties can survive frosty nights with a little protection, allowing you to enjoy them in hearty winter dishes.

8. Herbs
While many herbs might struggle in the cold, hardy varieties like thyme, rosemary, and parsley can be grown indoors or survive mild winters outdoors with some cover. They’ll add fresh flavor to your winter cooking, no need for a grocery run!

9. Cover Crops
If you’re not ready to plant veggies, consider sowing cover crops like clover or rye. They help improve soil health and prevent erosion, preparing your garden for a bountiful spring.

Tips for Successful Winter Gardening

– Use Cold Frames: Cold frames act like mini-greenhouses, providing shelter from harsh winds and frost. They allow you to extend your growing season and keep your plants cozy.

– Mulch Wisely: A thick layer of mulch not only insulates your plants but also retains soil moisture. It’s like a warm blanket for your garden!

– Choose Hardy Varieties:When selecting plants, look for varieties that are specifically bred for colder climates. They’ll be your best allies in the winter garden.

The Joy of Winter Gardening

Winter gardening can be incredibly rewarding. Not only does it keep your hands dirty and your mind engaged, but it also offers fresh produce even when the world outside is a snowy wonderland. So, whether you’re channeling your inner farmer or simply looking to enjoy the fruits (or veggies!) of your labor, winter gardening is the perfect way to stay connected to nature during the colder months.

Holiday Cooking: How a Digital Spatula Thermometer Can Save Your Sweet Treats and Holiday Feasts

As the holidays roll around and the kitchen starts heating up, we all know what’s coming—endless rounds of cookies, candy-making marathons, and big family dinners. It’s the time of year when the oven is always on, and you suddenly become a mix of Julia Child and a mad scientist. There’s nothing quite like the chaos of the holiday kitchen, but having the right tools on hand makes it a little more fun—and a lot less stressful.

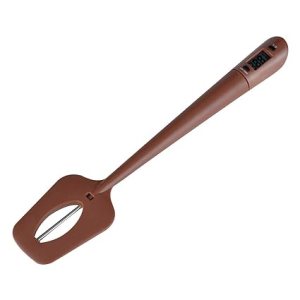
Enter: the Digital LCD Candy Spatula Thermometer. Sounds fancy, right? Well, it kind of is. If you’ve ever tried to make candy or check the temperature of a roast without a trusty thermometer, you know that the margin for error is about as thin as a filo dough sheet. This little gadget is not just any thermometer, though—it’s an instant-read meat and candy thermometer, stirrer, and spatula all in one. BPA-free and made of food-grade silicone, it’s basically the Swiss Army knife of kitchen tools.

The Struggle is Real

I’ll admit it—candy-making used to intimidate me. The first time I tried making homemade caramel, I ended up with a pot full of what I can only describe as caramel-flavored concrete. That’s when I realized, maybe I need some help in the precision department. You can’t just wing it when it comes to candy temperatures, and the “soft ball stage” doesn’t mean it’ll feel like a soft ball; it’s about chemistry, folks!

That’s where the Digital Candy Thermometer has saved my holiday sanity. You can stir while checking the temperature, which means no more burnt hands from trying to multitask with a spoon and an old-school mercury thermometer. Plus, there’s something satisfying about watching those digital numbers climb as you get closer to the perfect temperature for fudge, caramel, or divinity (anyone else’s grandma still make divinity?).

The Roast Beast Test

But wait, it’s not just for sweets! This spatula thermometer also works for meats, which is a game-changer for holiday roasts. Forget cutting into the turkey to “see if it’s done” and watching all the juices run out. Just poke this thermometer in and get an instant read on the temperature without missing a beat.

The holidays are stressful enough without worrying about undercooked (or overcooked) main dishes. And let’s be real—there’s no faster way to derail a holiday feast than to serve a dry turkey. Trust me, nobody will remember the perfect mashed potatoes if the bird’s a bust.

Why You’ll Love It

If you’re like me and like to keep things simple yet effective in the kitchen, this gadget will fit right in with your holiday routine. It’s one of those small investments that make a big difference. You’ll save time, stress, and a whole lot of guessing games when it comes to getting your recipes just right.

I like to think of it as my little sous chef—quiet, dependable, and always ready to lend a (silicone) hand. And the best part? No more failed fudge or overdone turkey. It’s foolproof, which is exactly what I need when I’m juggling cookie trays and holiday guests who show up early.

The Holidays are Coming—Be Ready!

Because who has time for kitchen disasters when there are gifts to wrap and holiday movies to binge? Happy cooking—and may your thermometer always read “just right!”

https://amzn.to/3YnX2tE