Fresh from Our Garden: Stuffed Eggplant Parmesan Is on the Menu Tonight!

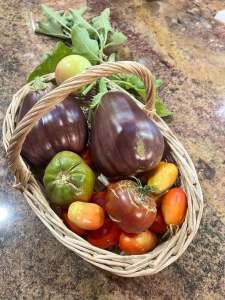
There’s something deeply satisfying about cooking with ingredients grown right in your own garden. Tonight’s dinner is a perfect example—Stuffed Eggplant Parmesan, made fresh with homegrown eggplants, herbs, and tomatoes.

The eggplants were picked this morning—firm, glossy, and full of flavor. After a quick rinse, they’re halved, roasted until tender, and filled with a delicious mixture of sautéed onions, garlic, garden-fresh tomatoes, and a sprinkle of basil and oregano straight from the herb bed. A layer of mozzarella and Parmesan cheese brings everything together in bubbly, golden perfection.

Cooking from the garden isn’t just about flavor—it’s about connection. You know where your food came from, how it was grown, and the care that went into it. Every bite carries the reward of patience and love.

So tonight, the kitchen smells like summer. The garden has given us another reason to be thankful

https://amzn.to/474dyU2

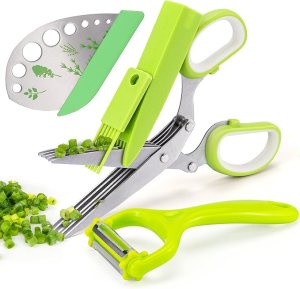
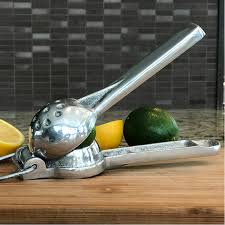
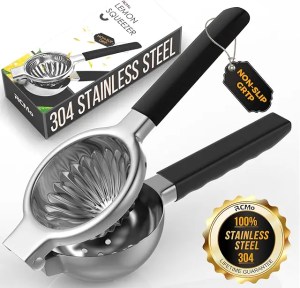
Herb scissors set provides a pair of herb shears, a herb stripper, and a peeler with three different blades. They can help you easily handle a large number of kitchen tasks, such as cutting meat, turkey, and poultry bones. You can not only use it to cut various vegetables, herbs, fruits, cut noodles and even pizza, but also peel potatoes, carrots, zucchini, cucumbers, apples, and avocados. No chopping boards and choppers are needed, bringing more convenience to your kitchen work.

The Rewarding Feeling of Hard Work

There’s something uniquely satisfying about working hard. When we dedicate ourselves to a goal or task and see it through, a sense of pride and accomplishment washes over us. That feeling is even more powerful when we’ve faced challenges or obstacles along the way.

Hard work doesn’t just deliver results—it gives our lives purpose and meaning. Having a goal to work toward provides direction and focus, helping us stay motivated and energized each day. It turns ordinary tasks into opportunities for growth and progress.

Moreover, consistent effort builds resilience and perseverance. Setbacks and failures are inevitable, but pushing through them strengthens our confidence and prepares us to handle future challenges. The more we embrace hard work, the more we learn about our capabilities, and the more empowered we feel.

In the end, it’s not just the achievements themselves—it’s the journey, the effort, and the growth that make hard work one of life’s most rewarding experiences.


Planting Spring Bulbs: A September Guide for Gardeners in USDA Zones 1–7

As summer winds down and the first hints of fall appear, it’s the perfect time to start thinking about your spring garden. For home gardeners in USDA Zones 1 through 7, September is the ideal month to plant spring bulbs like daffodils, tulips, and crocuses. With the right timing, your garden will burst into color when the weather warms again.

1. Check the Weather First

Before you dig, check your extended weather forecast. Spring bulbs need several weeks to develop roots before the ground freezes. Planting too late risks poor root development and weak blooms.

2. Avoid Too-Warm Soil

If your region is unusually warm in September, be cautious. Planting bulbs in overly warm soil can cause them to sprout early, making them vulnerable to frost and reducing their bloom potential.

3. Prepare Your Soil

Choose well-draining soil and a sunny or partially sunny spot. Loosen the ground and enrich it with compost or bulb fertilizer to give your bulbs the best start.

4. Plant at the Right Depth

As a general rule, plant bulbs about two to three times as deep as the bulb’s height. Tulips, daffodils, and hyacinths each have slightly different depth requirements, so follow the instructions for the specific variety you’re planting.

5. Water and Mulch

After planting, water bulbs thoroughly and add a layer of mulch to protect them from fluctuating fall temperatures. Mulch also helps retain moisture and discourages weeds.

Planting your spring bulbs in September gives them the time they need to root and thrive. By checking the forecast, avoiding overly warm soil, and planting properly, you’ll ensure a vibrant and colorful garden when spring arrives.

https://amzn.to/3I0ryV0

https://amzn.to/3UX27Xu

Fall Garden Check-In: Evaluating Your Garden for Next Year

As the growing season winds down, fall is the perfect time to pause and take a good look at your garden. What thrived this year? What didn’t quite make the cut? Doing an honest evaluation now can save you headaches—and help you make better choices—when spring arrives.

1. Reflect on What Worked and What Didn’t

Take note of plants that flourished and those that struggled. Maybe certain flowers bloomed beautifully, while others never took off. Jotting this down now gives you a clear roadmap for next year’s shopping and planting decisions.

2. Plan for Better Placement

Fall is an ideal time to consider moving plants to more suitable spots. Some areas of your garden may receive more sun or shade than you realized, or certain plants might perform better elsewhere. Take notes for next year’s layout adjustments.

3. Enhance Privacy and Views

Are there spots in your garden where you’d like more privacy or screening from less-than-ideal views? Consider adding shrubs, hedges, or trellises to improve your garden’s comfort and aesthetics.

4. Think About Fall Interest

Fall isn’t just about clean-up—it’s also a chance to plan for beauty in the cooler months. Think about adding plants with striking fall colors or interesting textures to keep your garden lively and engaging even as temperatures drop.

5. Start a Master List

Create a running list of lessons learned, plant successes, and ideas for next year. This list will be invaluable when you start shopping in spring, helping you make smarter decisions and avoid repeating mistakes.

Evaluating your garden in the fall is more than a seasonal chore—it’s a strategic step toward a healthier, more beautiful, and well-planned garden next year. Take notes, reflect honestly, and use this time to set yourself up for success.

How My Garden Gives Me Something to Relate to With Others

One of the unexpected joys of having a garden is how it connects me to other people. Whether it’s talking about what I’m planting, sharing the excitement of the first tomato ripening, or swapping tips on how to keep pests away, the garden gives me common ground to relate to others.

It’s funny how quickly conversations start when gardening comes up. Everyone has a story—maybe it’s about their grandmother’s garden, the basil plant they tried to grow on their windowsill, or their neighbor’s zucchini that seemed to multiply overnight. Even people who don’t garden themselves often light up at the thought of fresh herbs or vegetables.

For me, the garden becomes more than just soil, seeds, and sunshine—it’s a bridge. It allows me to connect, listen, and share experiences with people from all walks of life. And it reminds me that even in a fast-paced, digital world, something as simple as growing a cucumber or tending to flowers can spark real conversation and genuine connection.

Sometimes the best relationships grow just like gardens—slowly, naturally, and with a little bit of care.

https://amzn.to/4oZLecu

Keeping Hanging Baskets Happy in Hot Weather: Twice-a-Day Watering Tips

When summer turns up the heat, your hanging baskets can go from lush and perky to droopy and sad faster than you can say, “Where did all the water go?” Unlike plants in the ground, hanging baskets have less soil to hold moisture. Combine that with blazing sunshine and high temps, and you’ve got a recipe for rapid evaporation—and a stressed-out plant.

Why Hanging Baskets Need Extra Care in the Heat
During hot spells, it’s not unusual for hanging plants to need water twice a day. In the morning, before the day’s heat sets in, you’re giving them a head start. In the evening, you’re replenishing what they lost during the day. This routine keeps soil consistently moist, which is key to avoiding wilt, leaf drop, or worse—permanent damage.

Watering Smart: The Dos and Don’ts

  • Morning & Evening Routine: Water early and late to reduce evaporation.
  • Check Before You Pour: Stick your finger into the soil up to your second knuckle—if it feels dry, it’s time to water.
  • Go Deep: Water until you see it draining from the bottom of the basket so the entire root ball gets a drink.
  • Skip Peak Heat Watering: Midday watering often evaporates before it does any good.
  • Drainage Matters: Make sure your baskets have proper drainage holes to prevent root rot.

If your plants still seem thirsty no matter how often you water, try bottom watering. Place the basket in a shallow tub or saucer of water for about 30 minutes—this allows the roots to soak up what they need without splashing water everywhere.

With a little extra attention during heat waves, your hanging baskets can stay vibrant and healthy all season long. And trust me, it’s a lot more rewarding to see them thriving than to watch them droop in defeat.

After the Rain: The Perfect Time to Pull Weeds (Seriously, It’s Weirdly Satisfying)

You know that feeling when you’ve been trying to yank out a stubborn weed and it just will not budge—like it’s gripping the earth with all the strength of a toddler who doesn’t want to leave the park? Yeah, we’ve all been there.

But here’s the secret every gardener learns eventually: after a good rain, those weeds come out like butter.

I don’t mean a light mist or a few sprinkles—I’m talking about a real soaking. When the soil is moist, it softens its grip on the roots, and suddenly that annoying dandelion that’s been taunting you for weeks slides out in one smooth pull. Roots and all. It’s a little victory, and honestly? It feels amazing.

Why It Works:

Rain saturates the ground, loosening the soil around the base of weeds. This makes it easier to:

  • Remove the entire root (key to stopping regrowth).
  • Avoid breaking the weed at the stem (which just makes it come back angrier).
  • Save your wrists and back from unnecessary tugging and digging.

Bring a bucket or tarp with you after the rain and just go to town. Pull as many as you can while the ground is still damp. It’s oddly therapeutic, like nature’s way of letting you hit the reset button.

You’re giving your fall plants a better start by clearing space and reducing competition. Plus, the fewer weeds that go to seed now, the fewer headaches you’ll have next spring. It’s like doing your future self a solid.

Gardening isn’t always glamorous, but moments like this—where the work feels just a bit easier and the results are instant—remind you why it’s worth it. So the next time the rain stops, grab your gloves and get out there. The weeds won’t know what hit ’em.

The Power of Three: A Simple Trick to Transform Your Garden Design

Ever notice how a trio of flowers just feels better than a pair? Or how three decorative pots by the front door look more inviting than just one? You’re not imagining things. There’s a little design magic at work here—and it’s called the Rule of Three.

This design principle shows up everywhere from photography and graphic design to architecture and yes, even gardening. And once you start to see it, you’ll understand why it works—and how to use it to create a more beautiful, balanced, and memorable outdoor space.

Why Three?

The human brain loves patterns, but too much symmetry can feel stiff or boring. Odd numbers, especially threes, naturally guide the eye. They feel dynamic, organic, and intentional. Threes create visual movement, which is especially helpful in a garden, where you want the eye to flow and the space to feel alive.

How to Use the Rule of Three in Your Garden

Plant Groupings

Instead of planting two shrubs or four flowers in a row, go with three. Try placing them at slightly different heights or spacing them in a triangle to create depth and visual interest.

Tip: Try planting three different plants that thrive in the same conditions—like lavender, coneflowers, and salvia for a pollinator-friendly purple theme.

Hardscape Features

Whether you’re arranging patio furniture, boulders in a rock garden, or even stepping stones, threes just work better. They create rhythm and feel intentional rather than random.

Example: A small path of three staggered pavers looks more inviting and less stiff than two side-by-side or four in a straight line.

Focal Points

Have one striking garden statue? Consider flanking it with two smaller planters or lanterns. That creates a balanced trio that makes the focal point stand out without feeling lonely or overpowering.

Threes Don’t Have to Match

The beauty of the Rule of Three is in its flexibility. The elements don’t all have to be the same. Three different but complementary items—like a tall grass, a mid-height flowering plant, and a low groundcover—can look even more stunning than three identical ones.

The next time you’re out in the garden rearranging pots or planning a new bed, think in threes. It’s a small shift, but it makes a big difference. Just like storytelling and comedy, great gardens often come in threes.

End-of-Season Surprise: The Joy of a Mystery Bloom

Sometimes the best things in life come from a little mystery—and maybe a clearance table at your local nursery.

It was the end of the season, the nursery was clearing out the last of their plants, and I spotted a little green pot with no tag, sitting half off to the side like it had already accepted its fate. It didn’t have a name, no picture, not even a price sticker that made sense. But for a couple bucks, I thought, “Why not?”

I planted it not really knowing what to expect. Would it even survive? Would it bloom?

Weeks went by. It grew taller. Still no sign of color, still no clue what it was.

And then—it bloomed.

Bright, bold, sunshine yellow. Not soft or pale, not subtle, but the kind of yellow that makes you smile the second you see it.

It was a simple moment, but it reminded me of what gardening is really about: the wonder, the waiting, the little surprises that pop up when you least expect them. Not everything needs to be perfectly planned. Sometimes it’s the “what is this thing?” that ends up stealing the show.

So, here’s a fun idea if you’re closing out your gardening season: head to your local nursery’s clearance section. Pick out a mystery plant or two. Something unlabeled, forgotten, or a little scruffy. Give it a spot in your garden and see what happens.

Worst case? You got your hands dirty and added some green. Best case? You’ll be grinning like I was

The Simple Citrus Hack That’ll Squeeze Out More Juice

You know the saying, “When life gives you lemons…”—but what if you’ve been squeezing them the wrong way this whole time?

If you’re using a handheld citrus juicer, here’s a little kitchen hack that might surprise you: turn your lemon the opposite direction. Instead of placing it cut-side down, try placing it cut-side up, curved-side down—and watch the juice flow.

Why It Works

Most of us instinctively place lemons cut-side down into citrus presses. But by flipping the lemon so the cut side faces up, the press’s dome pushes into the rounded exterior of the lemon. This squeezes the fruit from the outside in, maximizing pressure and surface contact inside the lemon.

Result? You get a lot more juice—especially from firmer lemons or limes.

How to Do It:

  1. Cut your lemon in half as usual.
  2. Place one half in your citrus press cut-side up (so the curved rind faces down into the bowl of the juicer).
  3. Squeeze like normal.
  4. Be amazed at how much more juice comes out—with less strain on your hands!

Roll Before You Slice

Want to make it even easier? Roll the lemon on your counter with firm pressure before slicing. This breaks down some of the internal membranes, making juicing even more effective.

Sometimes, the best kitchen tips are the simplest. So next time you’re making salad dressing, cocktails, or fresh lemonade—flip that lemon. Your juicer (and your recipes) will thank you.

https://amzn.to/4kM46bA