Peanut Butter Blossoms: A Festive Melody for the Holiday Soul

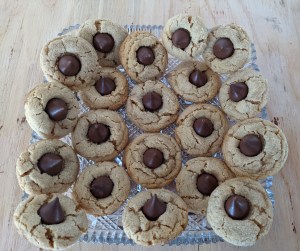
In the grand orchestration of holiday traditions, few treats compose a sweeter melody than the classic Peanut Butter Blossoms. These cookies, with their nutty richness and chocolatey crown, claim an indisputable place as the highlight of the festive symphony. Whether gifted with love, shared in the warmth of companionship, or savored as a moment of self-care.

The Gift of Love:
As you carefully arrange these delectable creations in festive boxes or tie them with ribbons, you’re not just presenting cookies. You’re gifting love, tradition, and the essence of the season. Each Peanut Butter Blossom becomes a token of warmth, a small but powerful expression of the joy that the holidays bring.

Sharing Warmth with Loved Ones:
The act of sharing Peanut Butter Blossoms is akin to passing a plate of joy. Whether at family gatherings, holiday parties, or a cozy night in, these cookies create moments of togetherness. The nutty aroma and sweet taste become the backdrop to laughter, stories, and the creation of cherished memories.

Indulging in Self-Care:
In the hustle and bustle of the holiday season, taking a moment for self-care is paramount. Indulging in the simple pleasure of a Peanut Butter Blossom, perhaps accompanied by a cup of hot cocoa, is a moment of tranquility. It’s a pause in the festive rush—a chance to relish the flavors and embrace the spirit of the season.

Here’s to Peanut Butter Blossoms—claiming their rightful place as a highlight of the festive melody. May you find joy in gifting, sharing, and indulging in these delightful treats. As you savor each day, each cookie, and each cherished moment, may your holiday season be filled with the warmth and magic that Peanut Butter Blossoms bring. Happy baking! 🍪🎄 #HolidayMagic #PeanutButterBlossoms #FestiveMelody

https://www.bettycrocker.com/recipes/classic-peanut-butter-blossom-cookies/a3563f6e-96b0-443f-ae0a-53cef4be6db6muffins?utm_source=google&utm_medium=cpc&utm_campaign=OG_OMP_BC.COM_DSA_FY24_Google_US_CPC_TD&utm_content=Cookies&int=td&rc=&gclid=CjwKCAiAg9urBhB_EiwAgw88mcmJ35TdyIxH6nH5YvzVu6CCrSxe-iqbgP19n_At4xjVQnLOUroZEhoC-dIQAvD_BwE

Snickerdoodle Delight: Day 1 of the 12 Days of Christmas Cookies

Welcome to our sweet journey through the 12 Days of Christmas Cookies! As we embark on this delightful adventure, we kick off the series with a classic that needs no introduction – the beloved Snickerdoodle.

Origins of the Snickerdoodle:
The Snickerdoodle’s exact origins are a bit hazy, but its charm is undeniable. Some say it has German, Dutch, or even Scottish roots. Regardless of its origin story, this cookie has become a festive icon, adored by generations.

A Symphony of Flavors:
What makes the Snickerdoodle so special? It’s the perfect harmony of flavors and textures. Imagine biting into a cookie with a soft, chewy center that gives way to a subtle crunch from the cinnamon sugar coating. It’s a symphony of sweetness and spice that captures the essence of holiday comfort.

Baking Tips for Snickerdoodle Success:
Achieving the perfect Snickerdoodle requires a delicate balance of ingredients and techniques. Here are some tips to ensure your Snickerdoodles are nothing short of perfection:

Cream of Tartar Magic: The inclusion of cream of tartar is what gives Snickerdoodles their distinct chewiness. Don’t skip it!

Chill the Dough: For that ideal texture, allow the dough to chill. This not only enhances the flavors but also ensures the cookies hold their shape during baking.

Rolling in Cinnamon Sugar: Coat your dough balls generously in cinnamon sugar before baking. This not only adds flavor but creates that signature crackled appearance.

Mind the Size: Keep your Snickerdoodles uniform in size to ensure even baking. Use a cookie scoop for consistent portions.

Timeless Appeal:
What is it about Snickerdoodles that has made them endure the test of time? Perhaps it’s the simplicity – basic ingredients transformed into something extraordinary. Or maybe it’s the universal joy they bring, reminiscent of childhood and holiday gatherings.

Wrap-Up:
As we savor the first day of our Christmas cookie countdown, let the Snickerdoodle be a reminder that sometimes, the simplest things bring the greatest joy. Stay tuned for the next 11 days as we explore more cookie wonders that will surely sweeten your holiday season. Happy baking! 🍪🎄 #12DaysOfCookies #SnickerdoodleDelight #HolidayBakingMagic

The Best Snickerdoodle Cookie Recipe

Soft & Thick Snickerdoodles

https://www.allrecipes.com/recipe/10687/mrs-siggs-snickerdoodles/

Turkey Perfection: The Case for Thanksgiving Brining

As Thanksgiving approaches, the quest for the perfect turkey takes center stage. Enter the culinary secret that promises succulence and flavor beyond compare – brining. In this blog post, we unravel the magic behind brining your Thanksgiving turkey and why it should be a non-negotiable step in your holiday cooking.

1. Unleashing Flavor Fusion:
Brining involves soaking the turkey in a saltwater solution, creating a gateway for flavors to infuse deep into the meat. This process results in a turkey that’s not merely seasoned on the surface but boasts a rich, well-balanced flavor throughout.

2. Moisture Magic:
Say goodbye to dry, lackluster turkey! The salt in the brine works its magic by enhancing the turkey’s ability to retain moisture. The result? A juicy, tender bird that’s sure to elicit applause from your Thanksgiving guests.

3. Texture Transformation:
Brining doesn’t just impact flavor; it works wonders on the texture too. The salt alters the protein structure of the turkey, creating a more relaxed, tender meat. Expect a turkey with the perfect balance of firmness and succulence that will have everyone coming back for seconds.

4. The Battle Against Blandness:
Traditional seasoning methods often leave the interior of the turkey underseasoned. Brining ensures that every bite, from the outer crust to the innermost layers, is infused with a delightful blend of savory goodness.

5. Forgiveness for Cook Time Fluctuations:
Cooking a turkey can be a delicate dance between achieving golden perfection and avoiding dryness. Brining acts as a safety net, allowing a bit more leeway in cook times. The extra moisture retained during brining helps prevent the unforgiving dryness that can result from slight cooking variations.

6. Customizing Flavor Profiles:
Get creative with your brine by adding herbs, spices, citrus, or even aromatics like garlic and onion. This allows you to tailor the flavor profile to your preferences, ensuring a turkey that aligns perfectly with your Thanksgiving vision.

7. Simple Brining Steps:
Brining may sound like a complex culinary endeavor, but it’s surprisingly straightforward. Submerge the turkey in a solution of salt, water, and additional flavorings for a set amount of time. The result is a hassle-free yet transformative step that elevates your Thanksgiving feast.

Conclusion: Elevate Your Thanksgiving Tradition
As you prepare to create a Thanksgiving feast to remember, consider the transformative power of brining your turkey. Unlocking a symphony of flavors, moisture, and tenderness, brining is the secret ingredient that turns a good turkey into a show-stopping centerpiece for your holiday table. Elevate your Thanksgiving tradition with a brined turkey that will leave an impression on family and friends. Happy brining and Happy Thanksgiving! 🦃✨


https://amzn.to/47qiS1T


https://amzn.to/47qiS1T

Green Delights on Your Plate: How to Use Microgreens

Microgreens, those tiny powerhouses of nutrition and flavor. These small but mighty greens can transform your meals from ordinary to extraordinary. In this blog post, we’ll explore creative and delicious ways to incorporate microgreens into your diet, enhancing both the taste and nutritional value of your dishes.

1. Garnish with Style

One of the simplest ways to use microgreens is as a garnish. Sprinkle them atop soups, omelets, or even a grilled steak for an instant burst of color, flavor, and nutrition. Not only do they add visual appeal, but they also provide a delightful contrast to the dish’s texture and taste.

2. Elevate Your Salads

Salads are an obvious choice for microgreens, and for a good reason. They offer a delicate crunch and an explosion of flavors that can take your salad from ordinary to gourmet. Toss microgreens into your leafy greens or use them as the base for your salad. Arugula, radish, and pea shoots are excellent choices to consider.

3. Sandwich and Wrap Sensation

Transform your sandwiches and wraps into healthy masterpieces by layering microgreens within. Whether you’re making a classic BLT or a vegetarian wrap, microgreens add a peppery or nutty punch that complements the other ingredients. Their tender, small leaves make them a perfect addition without overwhelming the sandwich.

4. Blend into Smoothies

Don’t limit microgreens to savory dishes. They can also play a role in your morning routine. Add a handful of microgreens to your morning smoothie for a nutrient boost. The mild taste of microgreens pairs well with fruits, giving your smoothie a refreshing and healthy twist.

5. Experiment in Cooking

Microgreens aren’t just for garnishes; they can be incorporated into cooked dishes too. Stir-fry them with other vegetables, mix them into pasta sauces, or use them as a topping for pizzas. Their versatility knows no bounds, allowing you to experiment with various recipes.

With a range of flavors and a world of culinary possibilities, incorporating microgreens into your diet is both easy and enjoyable. They add a touch of elegance and a burst of health to your everyday meals, making your culinary experiences extraordinary. So, don’t hesitate to get creative and explore the wonderful world of microgreens. Your taste buds and your health will thank you.

Natural Ant Repellent: Cinnamon – A Fiery Solution for Your Home Garden

Ants invading your precious vegetable and plant planters? Before reaching for harsh chemicals, consider an effective and natural solution right from your kitchen pantry: cinnamon. Not only is it a delightful spice for your dishes, but it also doubles as an ant deterrent with a fiery twist.

Cinnamon works wonders in keeping ants at bay due to its strong aroma and essential oils that ants find repugnant. The best part? It’s safe for your plants too! A light sprinkle around your planters not only creates a protective barrier but also enhances the well-being of your greens.

The secret lies in its dual role – while it’s a fragrant delight for us, it’s an unwelcome surprise for ants. This natural ant repellent is proof that effective pest control doesn’t have to be harsh on your environment.

So, the next time ants attempt an invasion on your indoor garden, simply reach for the cinnamon jar. With this simple spice, you’ll not only protect your plants but also experience firsthand how nature’s solutions can be both effective and eco-friendly.

DIY Raised Herb Garden with Pallets: An Eco-Friendly Solution for Herb Enthusiasts

If you’re passionate about gardening but lack space or resources for a traditional garden bed, look no further than “How to Build a Raised Herb Garden with Pallets.” This informative video offers an ingenious and budget-friendly solution for creating a thriving herb garden using repurposed pallets. In just a few simple steps, you can transform discarded pallets into a beautiful and functional raised herb garden that adds freshness and flavor to your culinary adventures.

Step-by-Step Guide:

The video takes you through the entire process, starting with disassembling the pallets and preparing the wood for construction. With some basic tools and minimal effort, you can turn the pallets into sturdy and rustic garden bed frames.

Once the frames are ready, the video demonstrates how to fill them with nutrient-rich soil, ensuring the perfect environment for your herbs to flourish. Finally, it showcases the planting process, providing valuable tips on herb selection and spacing.

Affordable and Creative:

Building a raised herb garden with pallets is not only eco-friendly, but it also offers an affordable and creative alternative for herb enthusiasts. The versatility of pallets allows you to customize the garden bed to fit any available space, whether it’s a small balcony or a corner of your backyard.

With “How to Build a Raised Herb Garden with Pallets” as your guide, you can embark on a rewarding DIY project that brings the joy of gardening to any space. This eco-friendly solution offers not only a practical herb garden but also a testament to creativity and sustainability. So, gather your pallets and get ready to nurture your own little green oasis, adding fresh and aromatic flavors to your culinary creations. 🌿🌱 #DIYGarden #RaisedHerbGarden #PalletProjects

https://www.realtor.com/videos/how-to-build-a-raised-herb-garden-with-pallets/456b5ac4-fd69-41d8-a665-c136993e29a3/

Sizzling Summer Dinners: 3 Oven-Free Ideas to Beat the Heat

When the summer sun is blazing, the last thing you want is to turn on the oven and heat up your kitchen. Fear not! We’ve got you covered with three delicious and oven-free dinner ideas that will keep you cool and satisfied all summer long.

Grilled Delights:
Fire up the grill and embrace the smoky flavors of summer. Grill marinated chicken, juicy burgers, or succulent seafood like shrimp or fish fillets. Pair your protein with a refreshing side salad, grilled vegetables, or corn on the cob for a complete and satisfying meal. Grilling not only adds incredible flavor but also keeps the heat outside where it belongs.

Ultra Juicy Smash Burgers On The Blackstone Griddle Recipe

Fresh and Vibrant Salads:
Create vibrant salads bursting with seasonal produce. Opt for a refreshing watermelon and feta salad with a drizzle of balsamic glaze or a zesty citrus salad with mixed greens, avocado, and grilled shrimp. Get creative with unique combinations, adding fruits, vegetables, nuts, and a variety of proteins to keep your salads exciting and satisfying.

https://www.delish.com/cooking/g1341/pasta-salad/

Chilled Pasta or Grain Bowls:
Beat the heat with chilled pasta or grain bowls loaded with colorful vegetables, herbs, and proteins. Cook your pasta or grains ahead of time and toss them with a light dressing, such as lemon vinaigrette or a tangy yogurt-based sauce. Add your favorite mix-ins like cherry tomatoes, cucumbers, olives, grilled chicken, or chickpeas for a refreshing and filling meal.

Spicy Chipotle Honey Salmon Bowls.

With these three oven-free dinner ideas, you can enjoy delicious meals without the added heat in your kitchen. From sizzling grilled delights to refreshing salads and chilled pasta or grain bowls, there’s a summer dinner option to suit every taste and keep you cool. Embrace the flavors of the season, stay out of the kitchen, and savor the joys of summer dining without the oven’s help. Bon appétit!

Soak Up the Sunshine: How to Make Sun Tea

There’s a simple and delightful way to infuse the flavors of nature into your favorite beverage—making sun tea. This effortless brewing method harnesses the power of the sun to create a refreshing and naturally flavored tea. Join us as we explore the art of making sun tea and enjoy a sip of sunshine.

Making sun tea is a breeze. Start by selecting your preferred tea leaves—whether it’s black, green, herbal, or a blend. Fill a clean glass container with filtered water, and add the desired amount of tea leaves. Cover the container and place it in a sunny spot outdoors, where it can bask in the sun’s warmth.

Allow the tea to steep in the sunlight for a few hours, allowing the flavors to gently infuse into the water. The length of steeping time can vary depending on your taste preference and the intensity of the sun. Once the tea has reached your desired strength, remove it from the sun and strain out the tea leaves.

Add ice, sweetener if desired, and garnish with fresh herbs or citrus slices. Sit back, relax, and sip on the sun-infused tea that’s as vibrant and invigorating as a sunny summer day.

Making sun tea is a simple and enjoyable process that allows you to embrace the flavors of nature. As the sun works its magic, it infuses your chosen tea leaves with warmth and sunlight, resulting in a unique and refreshing beverage. So, seize the opportunity to soak up the sunshine and experience the joy of making sun tea—a delightful way to savor the essence of nature in every sip.

A fun place to start with some ideas!

https://www.simplyrecipes.com/recipes/sun_tea/

https://www.thepioneerwoman.com/food-cooking/recipes/a87137/how-to-make-sun-tea/

https://www.eatingonadime.com/easy-sun-tea-recipe/

G2G Bar: Writing Our Their Story of Freshness and Flavor

I met the owner and founder of G2G Protein Bars at Costco yesterday evening! Great guy and it was fun to meet him- plus the bars taste great!

In a market saturated with protein bars loaded with preservatives, G2G Bar emerged in 2010 as a trailblazer, introducing the concept of refrigerated protein bars. Back then, the idea of a fresh, refrigerated protein bar was a novelty, challenging the norms of the industry. G2G Bar’s mission was clear from the beginning: to provide customers with a truly fresh and nutritious protein bar experience. With their motto, “When you eat one, you’ll know,” G2G Bar aimed to entice curious consumers to try something new.

A Decade of Dedication:
Over the past decade, G2G Bar has remained committed to its founding principles. One thing that sets them apart is their unwavering promise to exclude preservatives and artificial ingredients from their bars. Each bar is meticulously crafted with clean, simple, and fresh ingredients. By producing their bars in their own facility, G2G Bar ensures full control over the quality, maintaining their high standards and delivering a superior product to their customers.

The Taste That Speaks for Itself:
At G2G Bar, taste is paramount. After all, what good is a nutritious bar if it doesn’t taste great? Understanding this, G2G Bar puts an emphasis on creating bars that are not only healthy but also delicious. With a variety of flavors to choose from, G2G Bar is determined to make every bite a delightful experience. From the first chew to the last, their bars deliver a burst of flavor that leaves a lasting impression.

“When you eat one, you’ll know,” rings true. Embark on a delicious and nutritious journey with G2G Bar and experience the difference firsthand.

5 Ways Farmers Can Celebrate Earth Day

Happy Earth Day! Farmers have a special relationship with the Earth. We rely on its soil, water, and sun to grow the crops that feed the world. That’s why it’s so important for us to take care of the planet we call home. Here are a few ways that farmers can celebrate Earth Day.

Practice Sustainable Agriculture: Sustainable agriculture is all about balancing the needs of the environment with the needs of the farmer. By using techniques like crop rotation, cover cropping, and integrated pest management, farmers can reduce their impact on the environment while still producing high-quality crops.

Reduce Energy Use: Farming can be a very energy-intensive industry, but there are ways to reduce your energy use and lower your carbon footprint. For example, you can switch to energy-efficient equipment, and install solar panels.

Conserve Water: Water is one of our most precious resources, and farmers need it to grow their crops. That’s why it’s important to conserve water wherever possible. This can be done through techniques like drip irrigation, using drought-resistant crops, and capturing rainwater.

Protect Wildlife: As farmers, we share our land with a variety of wildlife. By creating habitats and protecting endangered species, we can help preserve the natural balance of our ecosystems.

Support Local Food Systems: When you buy locally grown food, you’re supporting farmers in your community and reducing the environmental impact of long-distance food transportation. By supporting local food systems, we can create a more sustainable and resilient food system for everyone.

On this Earth Day, let’s all take a moment to appreciate the beauty and importance of our planet.

As an Amazon Assoicate, I earn from qualifying purchases.