Whats in it:
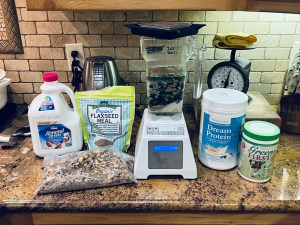
Give it a try and let me know what you think


Whats in it:
Give it a try and let me know what you think

Sourdough breadmaking can feel intimidating at first, but it doesn’t have to be complicated. At its core, sourdough is about patience, observation, and a few consistent habits. With some simple tips, you can improve your results and enjoy the process along the way.
Your starter is the foundation of good sourdough. A healthy starter should be bubbly, active, and reliably double in size a few hours after feeding. If your bread isn’t rising well or tastes overly sour, the starter is often the culprit.
Feed it regularly, use it when it’s at its peak, and don’t rush it. A strong starter makes everything else easier.
Sourdough is more forgiving than it seems, but consistency matters. Using a kitchen scale instead of measuring cups helps ensure accurate ratios of flour, water, and salt. Small differences can affect texture, hydration, and fermentation, especially as you learn what works best in your kitchen.
Fermentation times vary based on temperature, humidity, and starter strength. Instead of strictly following the clock, watch the dough. Look for signs like increased volume, bubbles on the surface, and a slightly domed shape.
Learning to read the dough is one of the most valuable skills in sourdough baking.
It’s tempting to try complex recipes, fancy scoring patterns, or multiple add-ins right away. In the beginning, focus on mastering a basic loaf. Simple flour, water, salt, and starter will teach you more than any complicated recipe.
Once you’re confident with the basics, experimenting becomes much more enjoyable.
Good shaping creates surface tension, which helps the loaf rise and hold its structure in the oven. Take your time during shaping, even if the dough feels sticky or soft. A well-shaped loaf often bakes up taller with a better crumb.
A hot oven is essential for oven spring. Whether you’re using a Dutch oven or baking stone, give it plenty of time to preheat. Steam during the early part of baking also helps the loaf expand and develop a crisp crust.
Not every loaf will be perfect—and that’s okay. Dense crumbs, uneven scoring, or flatter loaves are all part of the learning process. Each bake teaches you something new, and even the “mistakes” are usually still delicious.
Great sourdough doesn’t come from complexity; it comes from consistency. A healthy starter, careful observation, and a willingness to learn will take you further than any advanced technique.
Keep it simple, be patient, and enjoy the process—because sourdough baking is just as much about the journey as the loaf itself.

The holiday season is a time of joy, laughter, and of course, delicious treats. Among the myriad of festive confections, one particular delight stands out – the spritz cookie. With its delicate buttery flavor and distinctive shapes, spritz cookies have been gracing holiday tables for generations.
The History of Spritz Cookies:
The origins of spritz cookies can be traced back to Germany, where they are known as “Spritzgebäck.” The word “spritz” comes from the German verb “spritzen,” which means “to squirt” or “to spray.” The name aptly describes the technique of using a cookie press to create intricate shapes by extruding the dough onto the baking sheet. This German culinary gem gradually made its way into Scandinavian and American kitchens, becoming a cherished part of holiday celebrations.
Ingredients and Preparation:
The magic of spritz cookies lies in their simple yet high-quality ingredients. Flour, sugar, butter, and vanilla extract form the base of the dough, creating a rich and buttery flavor that melts in your mouth. Almond extract is often added to enhance the taste, providing a subtle nuttiness that elevates the cookie’s profile.
The dough is mixed to a smooth consistency, and the key to achieving the perfect spritz cookie lies in its texture. It should be pliable enough to pass through the cookie press easily, yet firm enough to hold its intricate shape during baking.
The Cookie Press: A Spritz Cookie Essential:
No discussion about spritz cookies is complete without mentioning the indispensable tool – the cookie press. This handheld device allows bakers to create an array of shapes, from classic swirls to festive holiday symbols. The press enables precise control over the dough, ensuring that each cookie is a work of art.
Baking and Decorating:
Once the dough is prepared and loaded into the cookie press, the fun part begins – shaping the cookies. The pressed dough is carefully arranged on a baking sheet, and after a short time in the oven, the kitchen is filled with the irresistible aroma of butter and vanilla. After baking, the cookies can be left as is or adorned with a sprinkle of colored sugar, chopped nuts, or a drizzle of chocolate.
Sharing the Tradition:
Spritz cookies are not just a delightful treat; they are also a symbol of togetherness and tradition. Baking and decorating spritz cookies with family and friends create lasting memories that are as sweet as the cookies themselves. Whether passed down through generations or started as a new family tradition, the act of making spritz cookies is a joyful celebration of the holiday spirit.
As the holiday season approaches, consider adding the time-honored tradition of baking spritz cookies to your festivities. With their rich history, delightful flavors, and endless possibilities for creativity, spritz cookies are sure to bring warmth and cheer to your home. Embrace the joy of baking and sharing these classic treats, and create your own delicious memories to cherish for years to come.
https://preppykitchen.com/spritz-cookies/


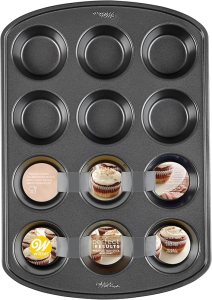
If you love brownies (who doesn’t?), but you’re tired of waiting for that large baking pan to cool before slicing, here’s a fun and easy solution: muffin tins! Yes, you can make individual brownie portions in muffin tins, and the results? Well, they’re nothing short of perfect.
Why Muffin Tins?
Muffin tins give you individual brownies that are perfectly portioned, and they bake faster than a full pan. But the best part is the texture. The batter’s exposure to the muffin tin’s edges creates that sought-after contrast between crispy, crunchy edges and a chewy, fudgy center. It’s a win-win!
What You’ll Need:
– Your favorite brownie recipe (or a box mix if you’re in a hurry)
– Muffin tin (standard size)
– Non-stick spray or cupcake liners
– An oven preheated to 350°F
The Magic Numbers: 350°F for 20 Minutes
Here’s where the magic happens. Preheat your oven to 350°F, then scoop your brownie batter into the muffin tins, filling each cup about 2/3 full. The key to getting that perfect crispy edge with a chewy center is baking for about **20 minutes**. This will give you the right balance of texture. You’ll know they’re done when a toothpick inserted into the center comes out with just a few moist crumbs.
The Best of Both Worlds: Crispy Edges, Chewy Centers
One of the main reasons muffin tin brownies are so popular is because they offer two types of brownie textures in every bite. The edges crisp up thanks to their exposure to the hot muffin tin, while the centers stay perfectly soft and chewy. It’s like getting the best of both worlds—what could be better?
Tips for Extra Fudgy Brownies:
1. Use a high-quality cocoa powder or melt some chocolate into your batter for a richer flavor.
2. Don’t overmix the batter, as that can make your brownies cakier.
3. Let them cool in the tin for a few minutes before transferring them to a cooling rack—this helps them hold their shape.
The beauty of this method is that you don’t need to be a professional baker to get a perfect batch of brownies. Whether you’re craving a quick treat for yourself or impressing guests with a fun, individual serving, muffin tins make brownie baking a breeze. Crispy edges, chewy centers, and all the chocolatey goodness in between. What’s not to love?
Happy baking!


After more than two centuries of weather forecasts, gardening tips, and time-honored advice, the Farmer’s Almanac is closing a chapter in its long history. The 2026 edition will be the publication’s last, ending a remarkable 208-year run that has touched generations of readers.
Since its first issue in 1818, the Almanac has been more than just a guide—it’s been a companion for households across the country. Families have consulted it for planting schedules, fishing trips, and even life milestones, following its guidance based on sunspots, lunar cycles, and planetary positions. Its pages offered a mix of practical tips, trivia, jokes, and even natural remedies, creating a charming blend of wisdom and entertainment.
The final 2026 edition promises a “wild ride” for winter 2025-2026, predicting dramatic swings in weather, including cold spells, snow, and repeated chill cycles, especially across the Northern Plains to New England. The cover reflects the Almanac’s broad readership, featuring both a classic farmhouse and a cityscape to appeal to urban and rural readers alike.
While the Farmer’s Almanac closes its doors, its legacy will live on in the memories of those who grew up reading it and in the countless ways it guided people through seasons and life events. Fortunately, fans of time-tested wisdom and practical guidance still have the Old Farmer’s Almanac, which continues to publish annually, offering gardening advice, seasonal forecasts, and folklore with modern tools and digital resources.
The end of the Farmer’s Almanac reminds us of the enduring value of trusted, time-tested guidance. Even in a rapidly changing world, its spirit of curiosity, practical knowledge, and connection to nature will continue to inspire those who cherish its legacy.

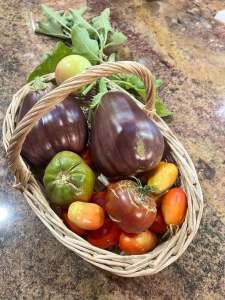
There’s something deeply satisfying about cooking with ingredients grown right in your own garden. Tonight’s dinner is a perfect example—Stuffed Eggplant Parmesan, made fresh with homegrown eggplants, herbs, and tomatoes.
The eggplants were picked this morning—firm, glossy, and full of flavor. After a quick rinse, they’re halved, roasted until tender, and filled with a delicious mixture of sautéed onions, garlic, garden-fresh tomatoes, and a sprinkle of basil and oregano straight from the herb bed. A layer of mozzarella and Parmesan cheese brings everything together in bubbly, golden perfection.
Cooking from the garden isn’t just about flavor—it’s about connection. You know where your food came from, how it was grown, and the care that went into it. Every bite carries the reward of patience and love.
So tonight, the kitchen smells like summer. The garden has given us another reason to be thankful
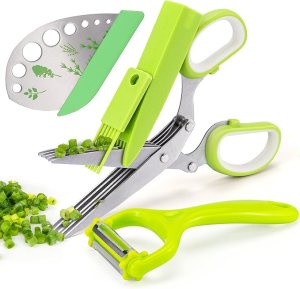
Herb scissors set provides a pair of herb shears, a herb stripper, and a peeler with three different blades. They can help you easily handle a large number of kitchen tasks, such as cutting meat, turkey, and poultry bones. You can not only use it to cut various vegetables, herbs, fruits, cut noodles and even pizza, but also peel potatoes, carrots, zucchini, cucumbers, apples, and avocados. No chopping boards and choppers are needed, bringing more convenience to your kitchen work.
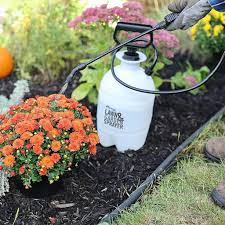
When it comes to caring for your garden, having the right tools makes all the difference—and a reliable garden sprayer is one of those must-haves. Whether you’re tackling weeds, applying pest control, or simply giving your plants a good soak, this garden sprayer is designed to make the job easy and efficient.
Made from rust-free polyethylene, the tank is translucent, so you can easily check fluid levels without guesswork. That means fewer interruptions and more time doing what you love—nurturing your garden.
This versatile sprayer is perfect for a variety of projects:
Whether you’re a seasoned gardener or just starting out, this garden sprayer is durable, easy to use, and built to handle any task around your home. Reliable tools make gardening easier—


Pickling is a time-honored tradition that has been around for centuries. It’s a process that involves preserving food in vinegar or brine, giving it a tangy, sour flavor that can be enjoyed in a variety of ways. From dill pickles to pickled eggs, pickling is a fun and easy way to add flavor and nutrition to your diet.
To start pickling, you’ll need some basic ingredients: vinegar, salt, sugar, and spices. The type of vinegar you use can vary depending on your personal preference, but most recipes call for either white vinegar or apple cider vinegar. Salt and sugar help to balance the flavors and preserve the food, while spices like dill, garlic, and mustard seeds add extra flavor.
One of the most popular pickling recipes is for dill pickles. To make these, you’ll need cucumbers, vinegar, water, salt, sugar, dill, garlic, and mustard seeds. First, slice the cucumbers into spears or rounds and pack them into sterilized jars. Next, mix together the vinegar, water, salt, sugar, dill, garlic, and mustard seeds in a saucepan and bring the mixture to a boil. Once the mixture is boiling, pour it over the cucumbers in the jars and seal the jars tightly. Let the pickles sit for at least 24 hours before eating to allow the flavors to fully develop.
One of the great things about pickling is that you can experiment with different flavors and ingredients to create your own unique recipes. Try pickling other vegetables like carrots, beets, or green beans, or add different spices like cinnamon or cloves for a unique twist. You can also play around with the ratio of vinegar, salt, and sugar to create your desired flavor profile.

“The Joy of Pickling” by Linda Ziedrich: This classic cookbook is a must-have for anyone interested in pickling. It features over 250 recipes for pickled vegetables, fruits, and relishes, as well as tips on equipment, techniques, and troubleshooting: https://amzn.to/3KTwMmM

“The Complete Book of Pickling” by Jennifer MacKenzie: This comprehensive guide covers all aspects of pickling, from the basics of canning to more advanced techniques like fermenting and curing. It also includes over 300 recipes for pickled fruits, vegetables, meats, and fish.

There’s something uniquely satisfying about working hard. When we dedicate ourselves to a goal or task and see it through, a sense of pride and accomplishment washes over us. That feeling is even more powerful when we’ve faced challenges or obstacles along the way.
Hard work doesn’t just deliver results—it gives our lives purpose and meaning. Having a goal to work toward provides direction and focus, helping us stay motivated and energized each day. It turns ordinary tasks into opportunities for growth and progress.
Moreover, consistent effort builds resilience and perseverance. Setbacks and failures are inevitable, but pushing through them strengthens our confidence and prepares us to handle future challenges. The more we embrace hard work, the more we learn about our capabilities, and the more empowered we feel.
In the end, it’s not just the achievements themselves—it’s the journey, the effort, and the growth that make hard work one of life’s most rewarding experiences.

There’s something magical about freezing a moment in nature—capturing the delicate curve of a petal, the intricate veins of a leaf, or the subtle texture of a stem. Casting Flowers offers a creative way to do just that, introducing botanical bas-relief as a rewarding art form for beginners and seasoned artists alike.
Botanical bas-relief is a technique where artists create low-relief impressions of flowers and plants in clay and plaster. Unlike flat drawings or pressed flowers, this method preserves the texture, pattern, and delicate details of each plant, turning them into lasting, three-dimensional works of art.
All you need is a few basic materials: clay, flowers or plants, and plaster. Even a single stem can be transformed into a beautiful piece, or you can create elaborate compositions reminiscent of a wildflower meadow. The process is forgiving enough for beginners, yet versatile enough to challenge more experienced creators.
Once your plaster cast is dry, you can leave it bare for an elegant, minimalist look—or add color with paints to breathe life back into the flowers. Each piece becomes a unique celebration of nature, a personal snapshot of its beauty preserved in time.
Creative satisfaction: Even beginners can achieve professional-looking results.
Mindful practice: The process encourages observation, patience, and appreciation for natural details.
Decorative art: Finished pieces make beautiful, personalized home décor or gifts.
Botanical bas-relief lets you hold a piece of nature in your hands, capturing the essence of flowers and plants in a tangible, artistic way. Whether you leave your casts natural or painted, each creation tells a story of beauty, texture, and delicate artistry.