The Rewarding Feeling of Hard Work

There’s something uniquely satisfying about working hard. When we dedicate ourselves to a goal or task and see it through, a sense of pride and accomplishment washes over us. That feeling is even more powerful when we’ve faced challenges or obstacles along the way.

Hard work doesn’t just deliver results—it gives our lives purpose and meaning. Having a goal to work toward provides direction and focus, helping us stay motivated and energized each day. It turns ordinary tasks into opportunities for growth and progress.

Moreover, consistent effort builds resilience and perseverance. Setbacks and failures are inevitable, but pushing through them strengthens our confidence and prepares us to handle future challenges. The more we embrace hard work, the more we learn about our capabilities, and the more empowered we feel.

In the end, it’s not just the achievements themselves—it’s the journey, the effort, and the growth that make hard work one of life’s most rewarding experiences.


Making Sourdough Bread

I made the best sourdough bread yesterday and thought you might like more information on baking bread. Maybe you can learn to bake a loaf too and share it with a neighbor, family, or friends- it also makes the best toast for breakfast…yum!

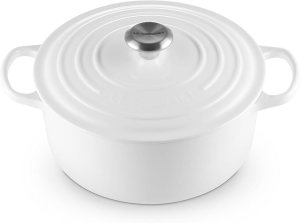
I have been using, Artisan Sourdough Made Simple: A Beginner’s Guide to Delicious Handcrafted Bread with Minimal Kneading by Emilie Raffa to help in my bread-making journey. I have a Le Creuset Dutch Oven to cook the bread.

Le Creuset Enameled Cast Iron Signature Round Dutch Oven

https://amzn.to/46n3YeC


Artisan Sourdough Made Simple A Beginner’s Guide to Delicious Handcrafted Bread with Minimal Kneading

https://amzn.to/4gOTkRy

Copycat Recipes: Bringing Your Favorite Baked Goods Home

There’s something magical about walking into your favorite bakery—the smell of fresh bread, the sight of golden cookies, the taste of a perfectly flaky pastry. But what if you could bring that magic into your own kitchen? That’s where copycat recipes come in.

Copycat recipes are all about recreating the flavors you love from restaurants and bakeries right at home. Not only is it fun, but it can also save money, let you control the ingredients, and give you the satisfaction of baking something delicious from scratch.

Maybe it’s that famous chocolate chip cookie you can never resist, a cinnamon roll that’s perfectly gooey, or a loaf of bread that tastes like it came straight from a bakery case. With a little trial and error (and maybe a few taste tests along the way), you can get surprisingly close to the original.

Here are a few reasons to try copycat baking:

  • Creativity in the kitchen – Test your skills and experiment with flavors.

  • Healthier tweaks – Adjust sugar, flour, or fats to fit your lifestyle.

  • A fun family project – Bake together and see whose version tastes the best.

  • That “nailed it” moment – Nothing beats pulling out a tray and realizing you’ve recreated your favorite treat.

Next time a craving hits, don’t just drive to the bakery—challenge yourself to recreate it. Who knows? You might just discover your homemade version tastes even better.

Copycat Starbucks Pumpkin Cream Cheese Muffins

Ingredients:

  • 1 3/4 cups all-purpose flour

  • 1 cup sugar

  • 1/2 cup vegetable oil

  • 2 eggs

  • 1 cup canned pumpkin puree

  • 1 tsp baking soda

  • 1/2 tsp baking powder

  • 1/2 tsp salt

  • 1 tsp cinnamon

  • 1/2 tsp nutmeg

  • 1/4 tsp cloves

  • 1/4 tsp ginger

Cream Cheese Filling:

  • 4 oz cream cheese, softened

  • 1/4 cup sugar

  • 1/2 tsp vanilla extract

Topping:

  • Pumpkin seeds (pepitas)

Instructions:

  1. Preheat oven to 350°F (175°C). Line a muffin tin with paper liners.

  2. In a bowl, whisk together flour, baking soda, baking powder, salt, and spices.

  3. In another bowl, mix sugar, oil, eggs, and pumpkin puree until smooth. Combine wet and dry ingredients.

  4. Fill muffin cups about 3/4 full.

  5. Mix cream cheese, sugar, and vanilla until smooth. Drop a spoonful into the center of each muffin.

  6. Sprinkle with pumpkin seeds.

  7. Bake for 18–20 minutes, until a toothpick (avoiding the cream cheese center) comes out clean.

  8. Cool slightly and enjoy warm—or store in the fridge for a chilled trea

https://amzn.to/428r9H5

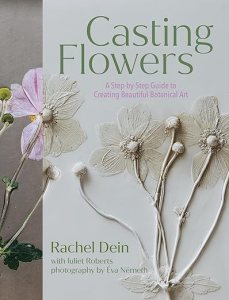
Capture Nature in Clay: The Art of Botanical Bas-Relief

There’s something magical about freezing a moment in nature—capturing the delicate curve of a petal, the intricate veins of a leaf, or the subtle texture of a stem. Casting Flowers offers a creative way to do just that, introducing botanical bas-relief as a rewarding art form for beginners and seasoned artists alike.

What is Botanical Bas-Relief?

Botanical bas-relief is a technique where artists create low-relief impressions of flowers and plants in clay and plaster. Unlike flat drawings or pressed flowers, this method preserves the texture, pattern, and delicate details of each plant, turning them into lasting, three-dimensional works of art.

Simple Materials, Stunning Results

All you need is a few basic materials: clay, flowers or plants, and plaster. Even a single stem can be transformed into a beautiful piece, or you can create elaborate compositions reminiscent of a wildflower meadow. The process is forgiving enough for beginners, yet versatile enough to challenge more experienced creators.

Bring Your Pieces to Life

Once your plaster cast is dry, you can leave it bare for an elegant, minimalist look—or add color with paints to breathe life back into the flowers. Each piece becomes a unique celebration of nature, a personal snapshot of its beauty preserved in time.

Why Try It?

  • Creative satisfaction: Even beginners can achieve professional-looking results.

  • Mindful practice: The process encourages observation, patience, and appreciation for natural details.

  • Decorative art: Finished pieces make beautiful, personalized home décor or gifts.

Botanical bas-relief lets you hold a piece of nature in your hands, capturing the essence of flowers and plants in a tangible, artistic way. Whether you leave your casts natural or painted, each creation tells a story of beauty, texture, and delicate artistry.

https://amzn.to/41HbEph

From Garden to Table: Making Yummy Pasta Sauce with Fresh Ingredients

There’s something special about sitting down to a plate of pasta covered in sauce made from ingredients you grew yourself. The taste is richer, the colors brighter, and the satisfaction unbeatable. Turning your garden harvest into a delicious pasta sauce isn’t just cooking—it’s celebrating your hard work.

Start with the Tomatoes

The base of any good pasta sauce is tomatoes. If your garden gave you a bumper crop, you’re in luck! Roma or plum tomatoes work best because they’re meaty and less watery. Simply roast or simmer them down until they release their natural sweetness.

Add Fresh Herbs

This is where your garden shines. Basil, oregano, thyme, and parsley bring depth and freshness you just can’t buy in a jar. Toss them in at different stages—oregano and thyme early for bold flavor, basil at the end for that bright, fragrant finish.

Don’t Forget the Extras

Onions, garlic, and peppers make great supporting players. If you grew them in your garden, even better! Sauté them until golden before adding tomatoes. Want some spice? Add a pinch of red pepper flakes.

Simmer for Flavor

The secret to pasta sauce is patience. Letting your sauce simmer for at least 30–45 minutes helps all the flavors blend together. If you have time, go even longer—you’ll be rewarded with a rich, velvety sauce.

Enjoy the Harvest

Once your sauce is ready, ladle it over your favorite pasta, sprinkle with fresh Parmesan, and enjoy. You can even jar or freeze extra sauce so you’ll have a taste of summer long after the garden has gone to rest.

There’s nothing like the joy of a homemade meal that started as a seed in your backyard. It’s fresh, delicious, and a reminder that the best flavors come from your own hands.

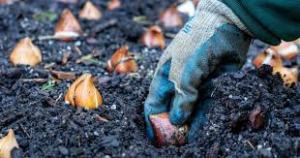
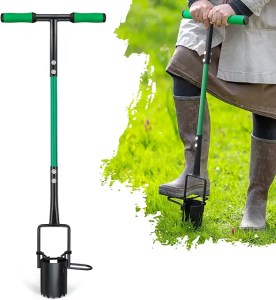
Planting Spring Bulbs: A September Guide for Gardeners in USDA Zones 1–7

As summer winds down and the first hints of fall appear, it’s the perfect time to start thinking about your spring garden. For home gardeners in USDA Zones 1 through 7, September is the ideal month to plant spring bulbs like daffodils, tulips, and crocuses. With the right timing, your garden will burst into color when the weather warms again.

1. Check the Weather First

Before you dig, check your extended weather forecast. Spring bulbs need several weeks to develop roots before the ground freezes. Planting too late risks poor root development and weak blooms.

2. Avoid Too-Warm Soil

If your region is unusually warm in September, be cautious. Planting bulbs in overly warm soil can cause them to sprout early, making them vulnerable to frost and reducing their bloom potential.

3. Prepare Your Soil

Choose well-draining soil and a sunny or partially sunny spot. Loosen the ground and enrich it with compost or bulb fertilizer to give your bulbs the best start.

4. Plant at the Right Depth

As a general rule, plant bulbs about two to three times as deep as the bulb’s height. Tulips, daffodils, and hyacinths each have slightly different depth requirements, so follow the instructions for the specific variety you’re planting.

5. Water and Mulch

After planting, water bulbs thoroughly and add a layer of mulch to protect them from fluctuating fall temperatures. Mulch also helps retain moisture and discourages weeds.

Planting your spring bulbs in September gives them the time they need to root and thrive. By checking the forecast, avoiding overly warm soil, and planting properly, you’ll ensure a vibrant and colorful garden when spring arrives.

https://amzn.to/3I0ryV0

https://amzn.to/3UX27Xu

How My Garden Gives Me Something to Relate to With Others

One of the unexpected joys of having a garden is how it connects me to other people. Whether it’s talking about what I’m planting, sharing the excitement of the first tomato ripening, or swapping tips on how to keep pests away, the garden gives me common ground to relate to others.

It’s funny how quickly conversations start when gardening comes up. Everyone has a story—maybe it’s about their grandmother’s garden, the basil plant they tried to grow on their windowsill, or their neighbor’s zucchini that seemed to multiply overnight. Even people who don’t garden themselves often light up at the thought of fresh herbs or vegetables.

For me, the garden becomes more than just soil, seeds, and sunshine—it’s a bridge. It allows me to connect, listen, and share experiences with people from all walks of life. And it reminds me that even in a fast-paced, digital world, something as simple as growing a cucumber or tending to flowers can spark real conversation and genuine connection.

Sometimes the best relationships grow just like gardens—slowly, naturally, and with a little bit of care.

https://amzn.to/4oZLecu

After the Rain: The Perfect Time to Pull Weeds (Seriously, It’s Weirdly Satisfying)

You know that feeling when you’ve been trying to yank out a stubborn weed and it just will not budge—like it’s gripping the earth with all the strength of a toddler who doesn’t want to leave the park? Yeah, we’ve all been there.

But here’s the secret every gardener learns eventually: after a good rain, those weeds come out like butter.

I don’t mean a light mist or a few sprinkles—I’m talking about a real soaking. When the soil is moist, it softens its grip on the roots, and suddenly that annoying dandelion that’s been taunting you for weeks slides out in one smooth pull. Roots and all. It’s a little victory, and honestly? It feels amazing.

Why It Works:

Rain saturates the ground, loosening the soil around the base of weeds. This makes it easier to:

  • Remove the entire root (key to stopping regrowth).
  • Avoid breaking the weed at the stem (which just makes it come back angrier).
  • Save your wrists and back from unnecessary tugging and digging.

Bring a bucket or tarp with you after the rain and just go to town. Pull as many as you can while the ground is still damp. It’s oddly therapeutic, like nature’s way of letting you hit the reset button.

You’re giving your fall plants a better start by clearing space and reducing competition. Plus, the fewer weeds that go to seed now, the fewer headaches you’ll have next spring. It’s like doing your future self a solid.

Gardening isn’t always glamorous, but moments like this—where the work feels just a bit easier and the results are instant—remind you why it’s worth it. So the next time the rain stops, grab your gloves and get out there. The weeds won’t know what hit ’em.

End-of-Season Surprise: The Joy of a Mystery Bloom

Sometimes the best things in life come from a little mystery—and maybe a clearance table at your local nursery.

It was the end of the season, the nursery was clearing out the last of their plants, and I spotted a little green pot with no tag, sitting half off to the side like it had already accepted its fate. It didn’t have a name, no picture, not even a price sticker that made sense. But for a couple bucks, I thought, “Why not?”

I planted it not really knowing what to expect. Would it even survive? Would it bloom?

Weeks went by. It grew taller. Still no sign of color, still no clue what it was.

And then—it bloomed.

Bright, bold, sunshine yellow. Not soft or pale, not subtle, but the kind of yellow that makes you smile the second you see it.

It was a simple moment, but it reminded me of what gardening is really about: the wonder, the waiting, the little surprises that pop up when you least expect them. Not everything needs to be perfectly planned. Sometimes it’s the “what is this thing?” that ends up stealing the show.

So, here’s a fun idea if you’re closing out your gardening season: head to your local nursery’s clearance section. Pick out a mystery plant or two. Something unlabeled, forgotten, or a little scruffy. Give it a spot in your garden and see what happens.

Worst case? You got your hands dirty and added some green. Best case? You’ll be grinning like I was

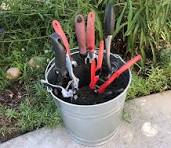
A Timeless Garden Hack: Keep Your Tools Sharp, Clean & Rust-Free

Every gardener knows that having the right tools makes a world of difference—but keeping those tools in top shape? That’s a game-changer. There’s an old-school garden trick that’s simple, affordable, and incredibly effective for maintaining your hand tools: the sand-and-oil bucket method.

Here’s how it works and why you’ll want to add it to your gardening routine.

What You’ll Need:

  • A 5-gallon bucket
  • About 5 gallons of coarse sand
  • ¾ quart of motor oil (used or new works)

How to Use the Sand and Oil Bucket:

  1. Fill the Bucket: Pour the sand into the bucket, then drizzle the motor oil over the top.
  2. Mix It Up: Use a trowel or small hand tool to mix the sand and oil until it’s evenly distributed.
  3. Clean Your Tools: Plunge your dirty tools into the sand several times. The gritty texture scrapes off dirt and debris.
  4. Tap and Wipe: Tap the tool against the edge of the bucket and wipe with a cloth to remove leftover sand.

Why It Works:

  • Cleans Dirt: The abrasive sand naturally scrapes away stuck-on soil without damaging your tools.
  • Sharpens Edges: The friction created as you dip the tool in and out of the sand helps sharpen blades and edges.
  • Prevents Rust: The oil coats the metal, creating a barrier that protects against moisture and rust.

It’s Reusable

This isn’t a one-and-done solution. Your sand-and-oil bucket will last all season (and longer), ready to clean and protect your tools after every use. Just keep it in your shed or garage, and dip your tools in regularly for quick maintenance.

Sometimes, the best solutions are the simplest. This old garden trick proves you don’t need fancy gadgets to care for your tools—just a little sand, oil, and a few minutes of upkeep. Your tools will thank you with years of dependable use in return.